> ## Documentation Index
> Fetch the complete documentation index at: https://portkey-docs-mintlify-add-terraform-provider-docs-72855.mintlify.site/llms.txt
> Use this file to discover all available pages before exploring further.

# OpenAI Agent Builder (Python)

> Use Portkey with OpenAI Agent Builder to add observability, reliability, and production features to your visual agent workflows

## Introduction

OpenAI Agent Builder is a visual canvas for creating multi-step agent workflows. With its drag-and-drop interface, you can design complex agent workflows, test them with live data, and export production-ready code.

Portkey seamlessly integrates with Agent Builder's exported code, adding enterprise features like:

* **Complete observability** of your agent workflows
* **Cost tracking** across all agent executions
* **Reliability features** like fallbacks and retries
* **Access to 1600+ LLMs** through the same interface
* **Guardrails** for safe and compliant agent behavior

## Quick Start

<Steps>
  <Step title="Design Your Workflow in Agent Builder">
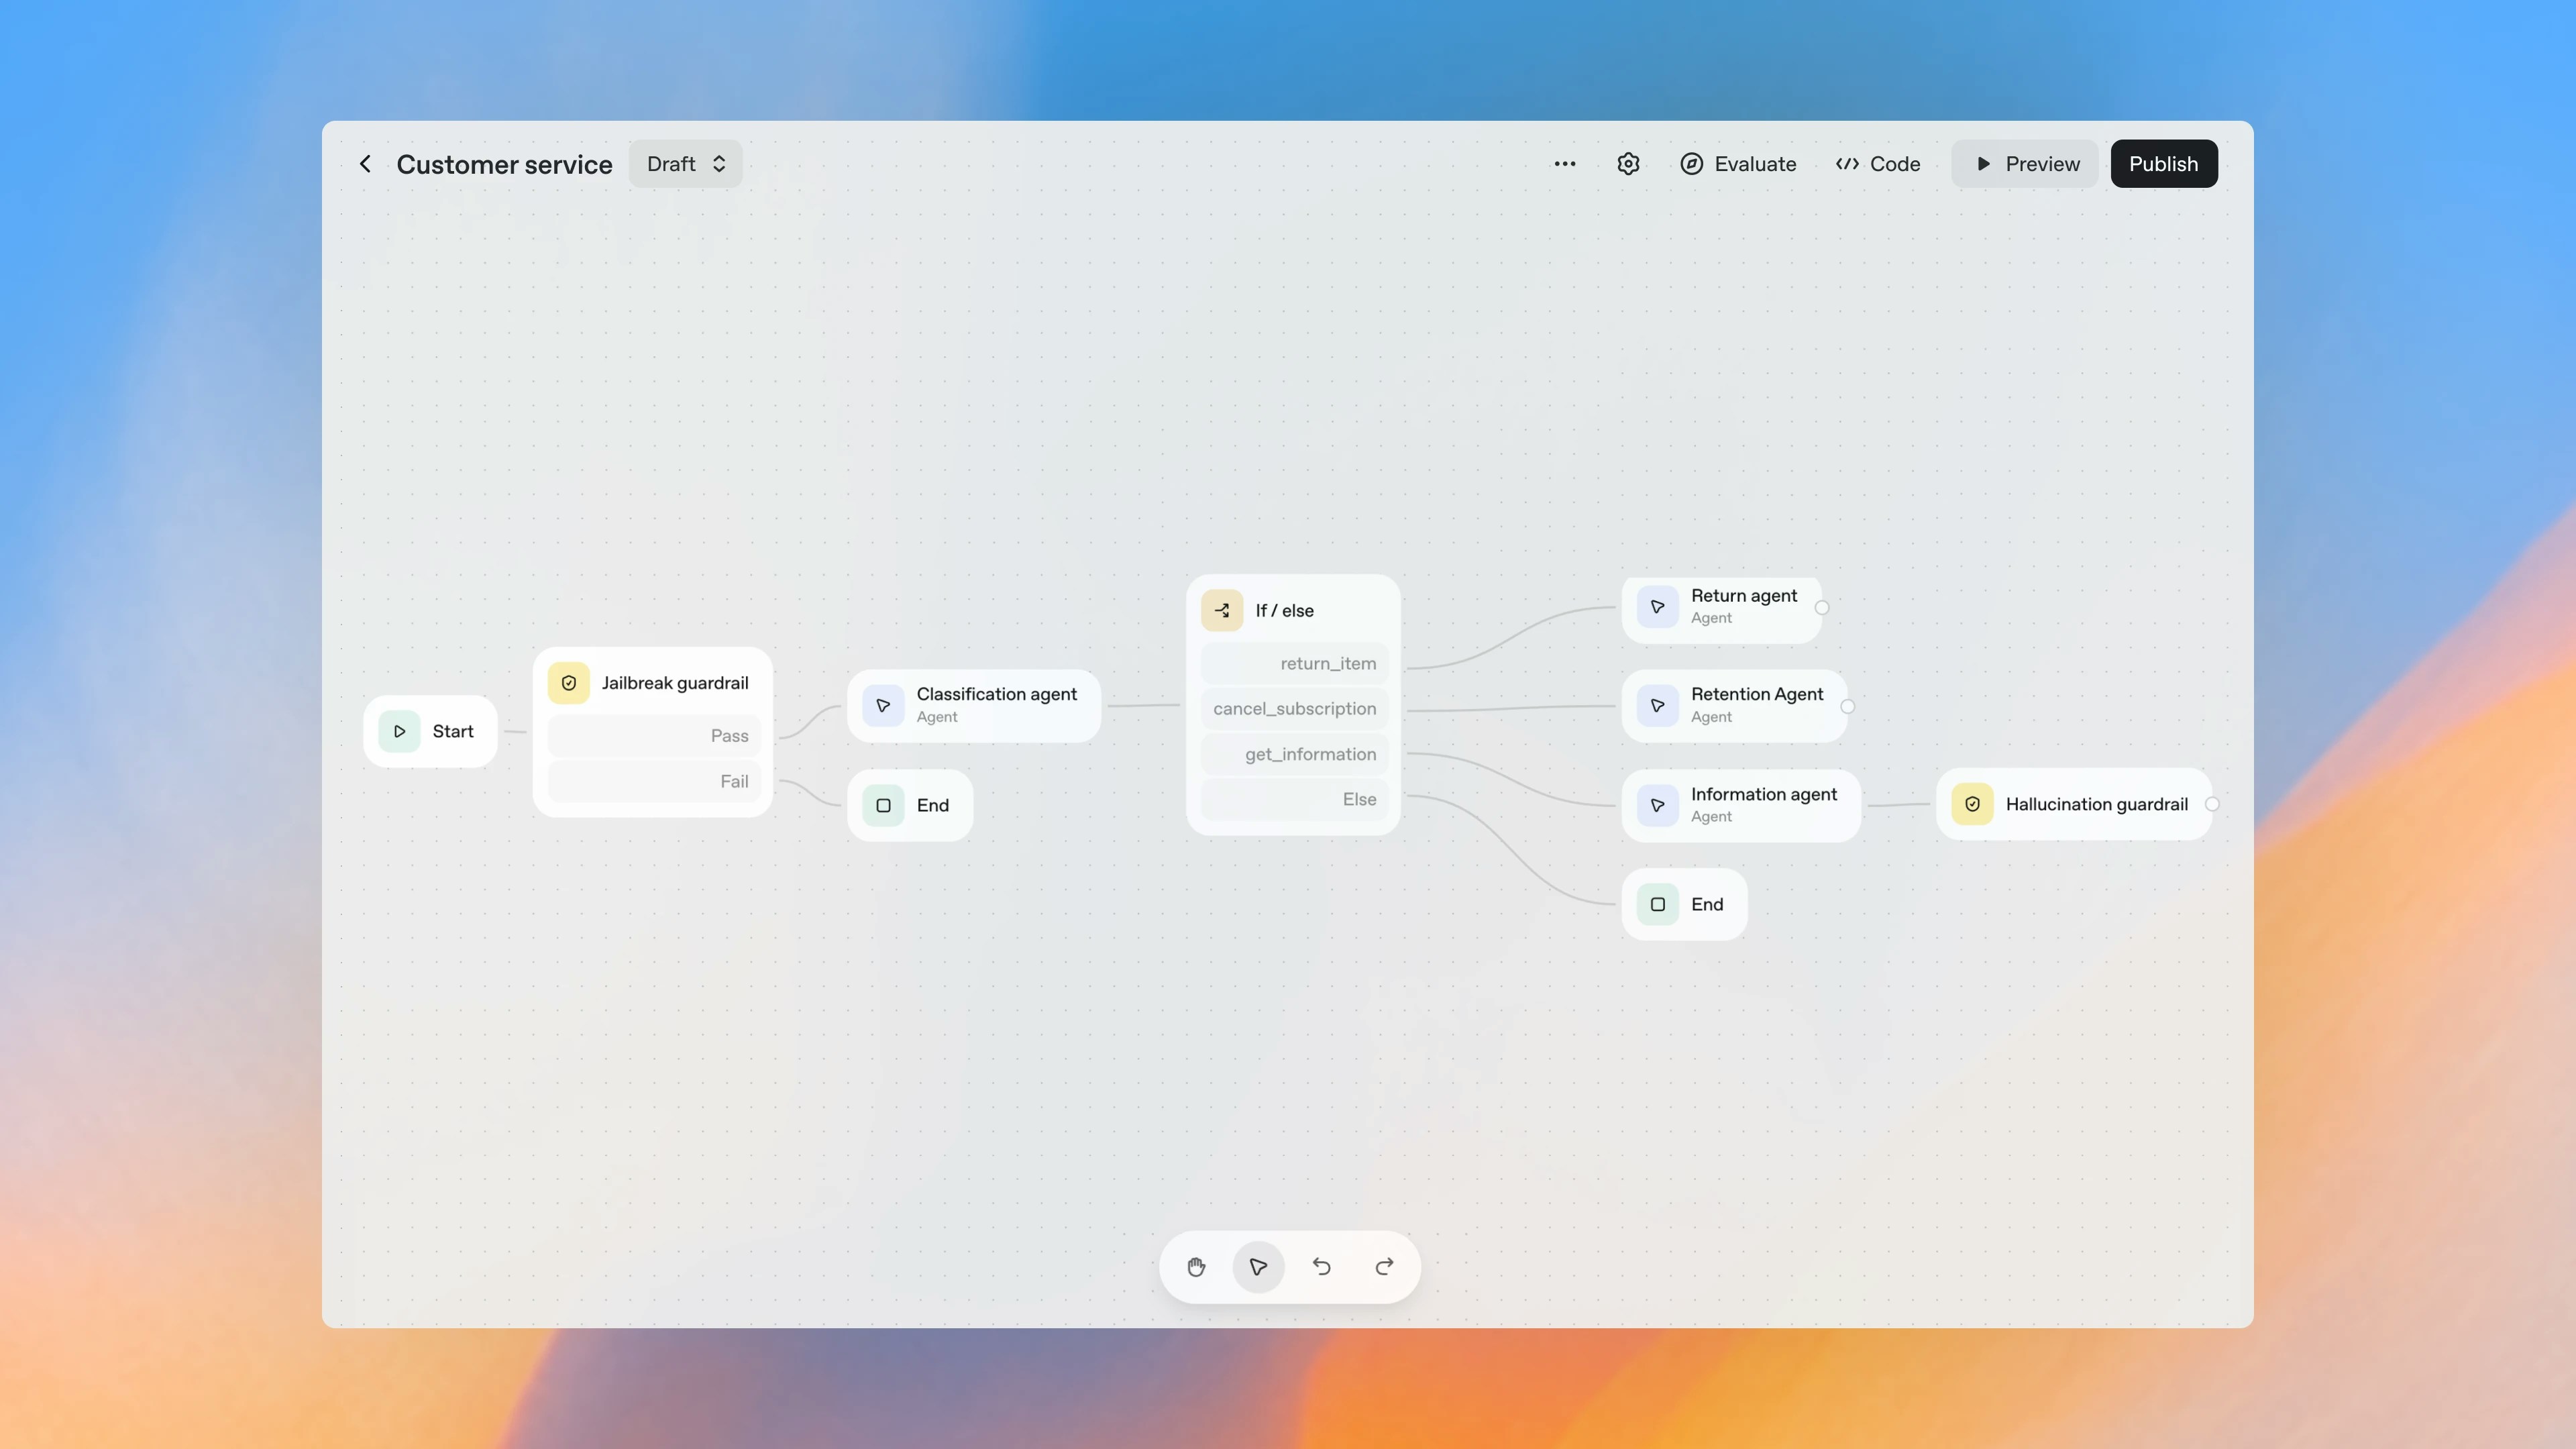
    Open [OpenAI Agent Builder](https://platform.openai.com/playground/agent-builder) and create your agent workflow using the visual canvas. Add nodes for agents, tools, and control flow logic.

    <Frame>
      <img src="https://mintcdn.com/portkey-docs-mintlify-add-terraform-provider-docs-72855/2eJr0Ah02F2VMAmj/images/libraries/openai-agent-builder.webp?fit=max&auto=format&n=2eJr0Ah02F2VMAmj&q=85&s=01064b4c7e820592e9a48033f18cba42" width="3840" height="2160" data-path="images/libraries/openai-agent-builder.webp" />
    </Frame>
  </Step>

  <Step title="Export Your Code">
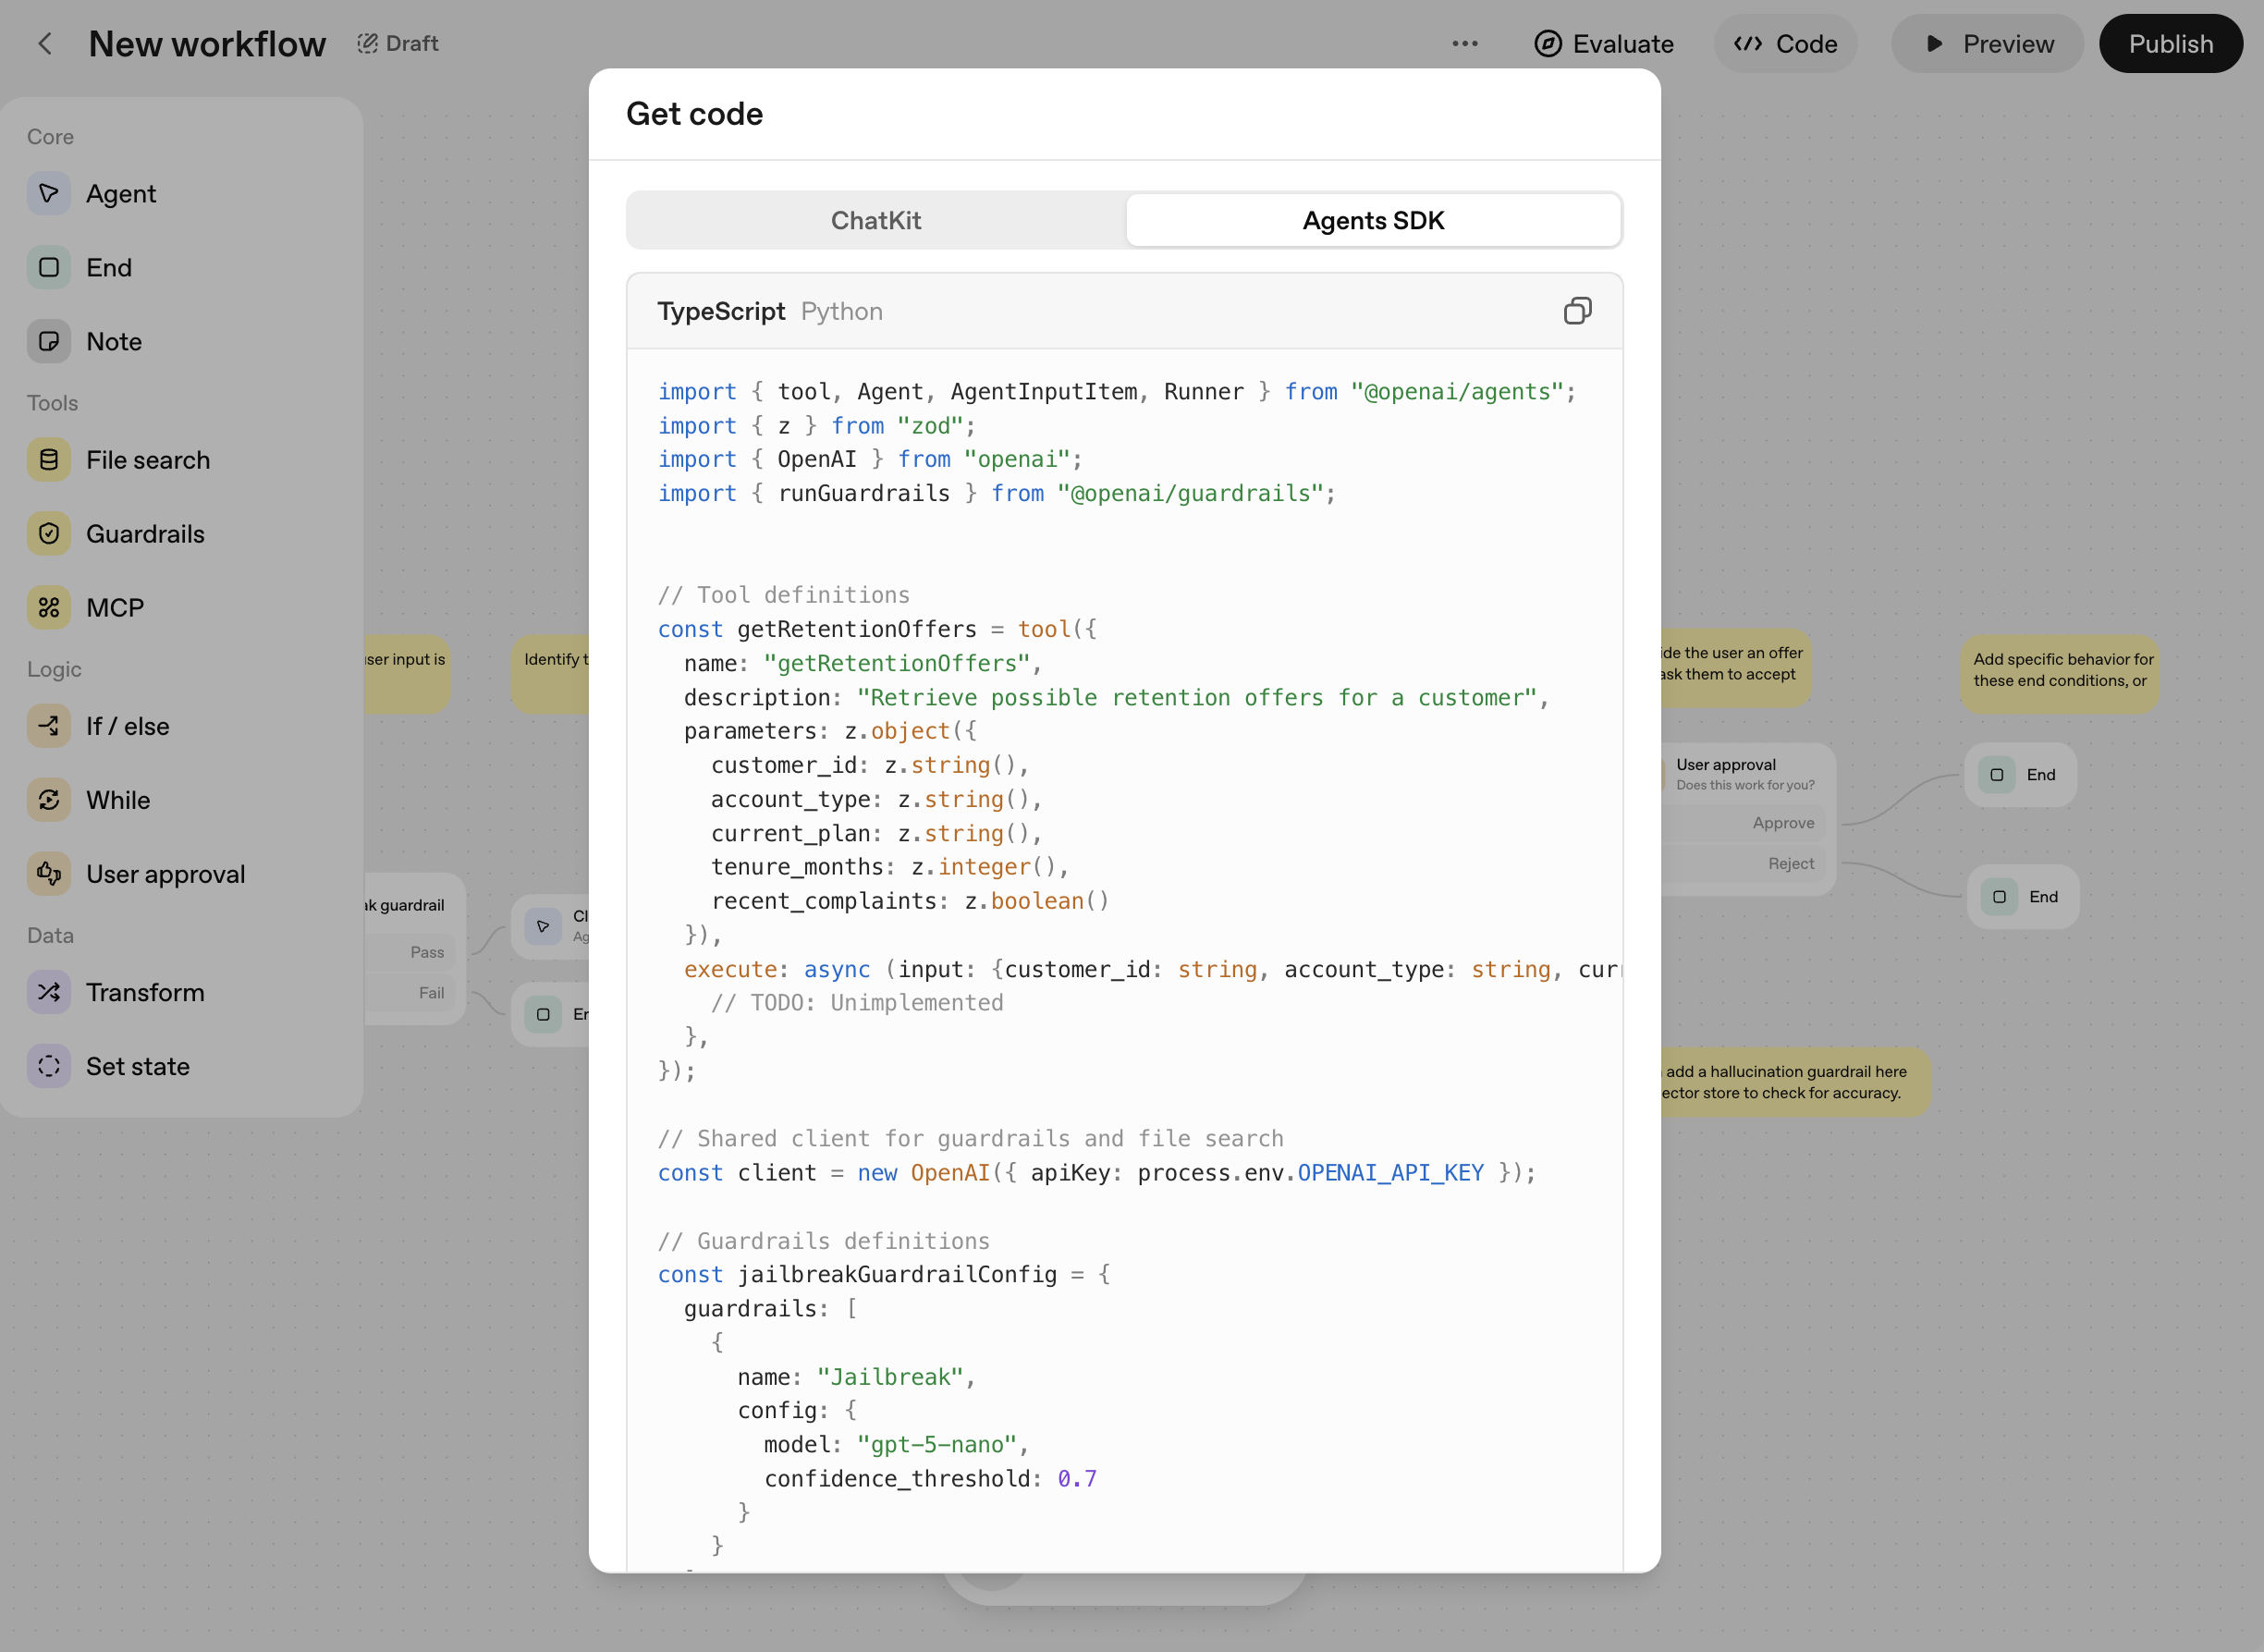
    Once your workflow is ready, click **Code** in the top navigation and select **Agents SDK** to get the Python implementation of your workflow.

    <Frame>
      <img src="https://mintcdn.com/portkey-docs-mintlify-add-terraform-provider-docs-72855/2eJr0Ah02F2VMAmj/images/libraries/agent-builder-2.png?fit=max&auto=format&n=2eJr0Ah02F2VMAmj&q=85&s=4ff2483a5a2012461e672596aa1338fe" width="2449" height="1787" data-path="images/libraries/agent-builder-2.png" />
    </Frame>
  </Step>

  <Step title="Install Required Packages">
    ```bash theme={null}
    pip install -U openai-agents openai
    ```
  </Step>

  <Step title="Integrate Portkey">
    Replace the default OpenAI client initialization in your exported code with Portkey:

    ```python theme={null}
    # Original Agent Builder code (Python)
    from agents import Agent, Runner

    # Add OpenAI SDK and default client setter
    from agents import set_default_openai_client, set_default_openai_api
    from openai import AsyncOpenAI
    import os, json

    PORTKEY_GATEWAY_URL = "https://api.portkey.ai/v1"

    # Configure Portkey client via OpenAI SDK
    portkey = AsyncOpenAI(
        base_url=PORTKEY_GATEWAY_URL,
        api_key=os.environ["PORTKEY_API_KEY"],
        default_headers={
            "x-portkey-provider": "@your-openai-provider-slug",
        }
    )

    # Set as default client for all agents
    set_default_openai_client(portkey)
    set_default_openai_api("chat_completions")  # Responses API → Chat

    # Your Agent Builder workflow code continues as exported...
    # ...
    ```

    <Note>
      In your `model` field of your OpenAI Agents SDK code, enter the Portkey Model Slug from Model Catalog. Example: `@openai-provider-slug/gpt-5`, `@anthropic-provider/claude-sonnet-latest`.
    </Note>
  </Step>
</Steps>

## Production Features

### 1. Enhanced Observability

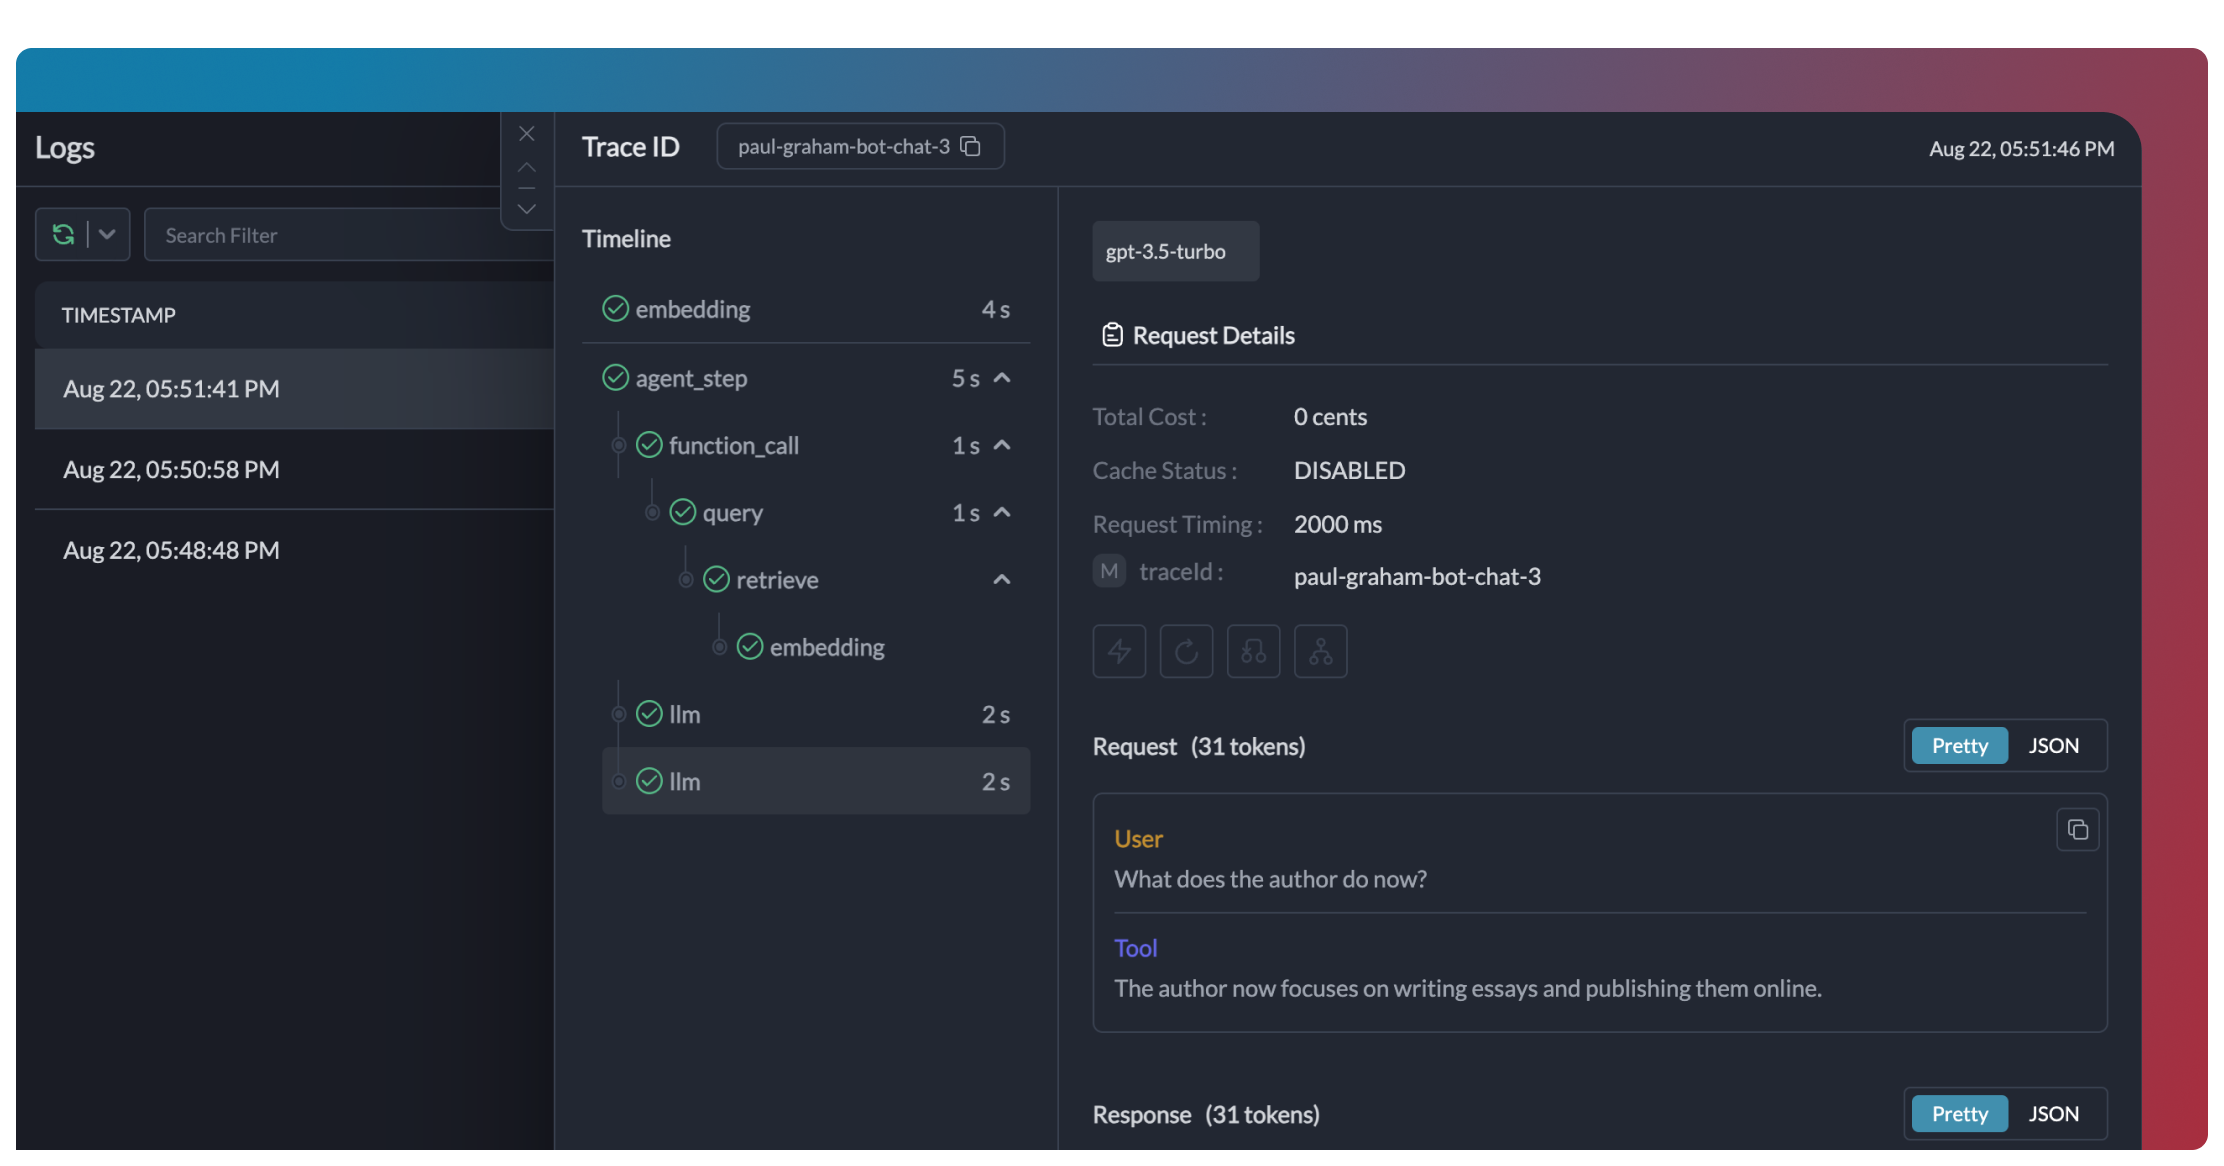
Portkey provides comprehensive observability for your OpenAI Agents, helping you understand exactly what's happening during each execution.

<Tabs>
  <Tab title="Traces">
    <Frame>
      <img src="https://mintcdn.com/portkey-docs-mintlify-add-terraform-provider-docs-72855/hAiIWTYl1V3E6iN6/images/product/product-11-1.webp?fit=max&auto=format&n=hAiIWTYl1V3E6iN6&q=85&s=70963722f742297e23ea26d08d4149b2" width="2224" height="1166" data-path="images/product/product-11-1.webp" />
    </Frame>

    ```python theme={null}
    # Add tracing to your OpenAI Agents
    from openai import AsyncOpenAI
    from agents import set_default_openai_client
    import os

    portkey = AsyncOpenAI(
        base_url="https://api.portkey.ai/v1",
        api_key=os.environ["PORTKEY_API_KEY"],
        default_headers={
            "x-portkey-trace-id": "unique_execution_trace_id",  # Add unique trace ID
            "x-portkey-provider": "@your-openai-provider-slug",
        }
    )
    set_default_openai_client(portkey)
    ```
  </Tab>

  <Tab title="Logs">
    <Frame>
      <img src="https://mintcdn.com/portkey-docs-mintlify-add-terraform-provider-docs-72855/hAiIWTYl1V3E6iN6/images/product/product-2.avif?fit=max&auto=format&n=hAiIWTYl1V3E6iN6&q=85&s=100f7a3a7fc120a3556aa2b4f849538b" width="800" height="492" data-path="images/product/product-2.avif" />
    </Frame>

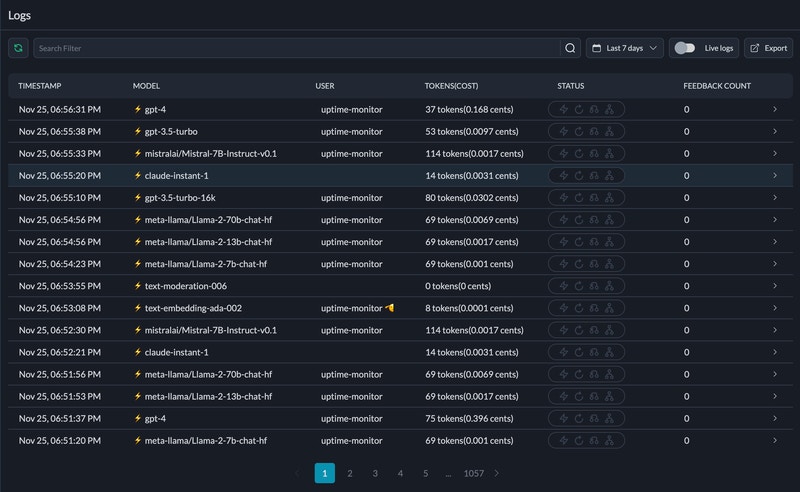
    Portkey logs every interaction with LLMs, including:

    * Complete request and response payloads
    * Latency and token usage metrics
    * Cost calculations
    * Tool calls and function executions

    All logs can be filtered by metadata, trace IDs, models, and more, making it easy to debug specific agent runs.
  </Tab>

  <Tab title="Metrics & Dashboards">
    <Frame>
      <img src="https://mintcdn.com/portkey-docs-mintlify-add-terraform-provider-docs-72855/qsr0evnTREXEwQWU/images/product/dashboard.png?fit=max&auto=format&n=qsr0evnTREXEwQWU&q=85&s=2a9b15a78b76ba1be3d4512ac8f01a4f" width="600" height="348" data-path="images/product/dashboard.png" />
    </Frame>

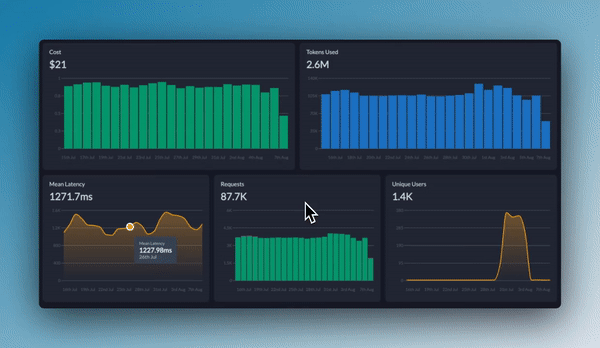
    Portkey provides built-in dashboards that help you:

    * Track cost and token usage across all agent runs
    * Analyze performance metrics like latency and success rates
    * Identify bottlenecks in your agent workflows
    * Compare different agent configurations and LLMs

    You can filter and segment all metrics by custom metadata to analyze specific agent types, user groups, or use cases.
  </Tab>

  <Tab title="Metadata Filtering">
    <Frame>
      <img src="https://mintcdn.com/portkey-docs-mintlify-add-terraform-provider-docs-72855/IaH-e_OUk4WwW23Y/images/metadata.png?fit=max&auto=format&n=IaH-e_OUk4WwW23Y&q=85&s=3a8d8e46eb4b9f548051c80a45300455" alt="Analytics with metadata filters" width="3156" height="1876" data-path="images/metadata.png" />
    </Frame>

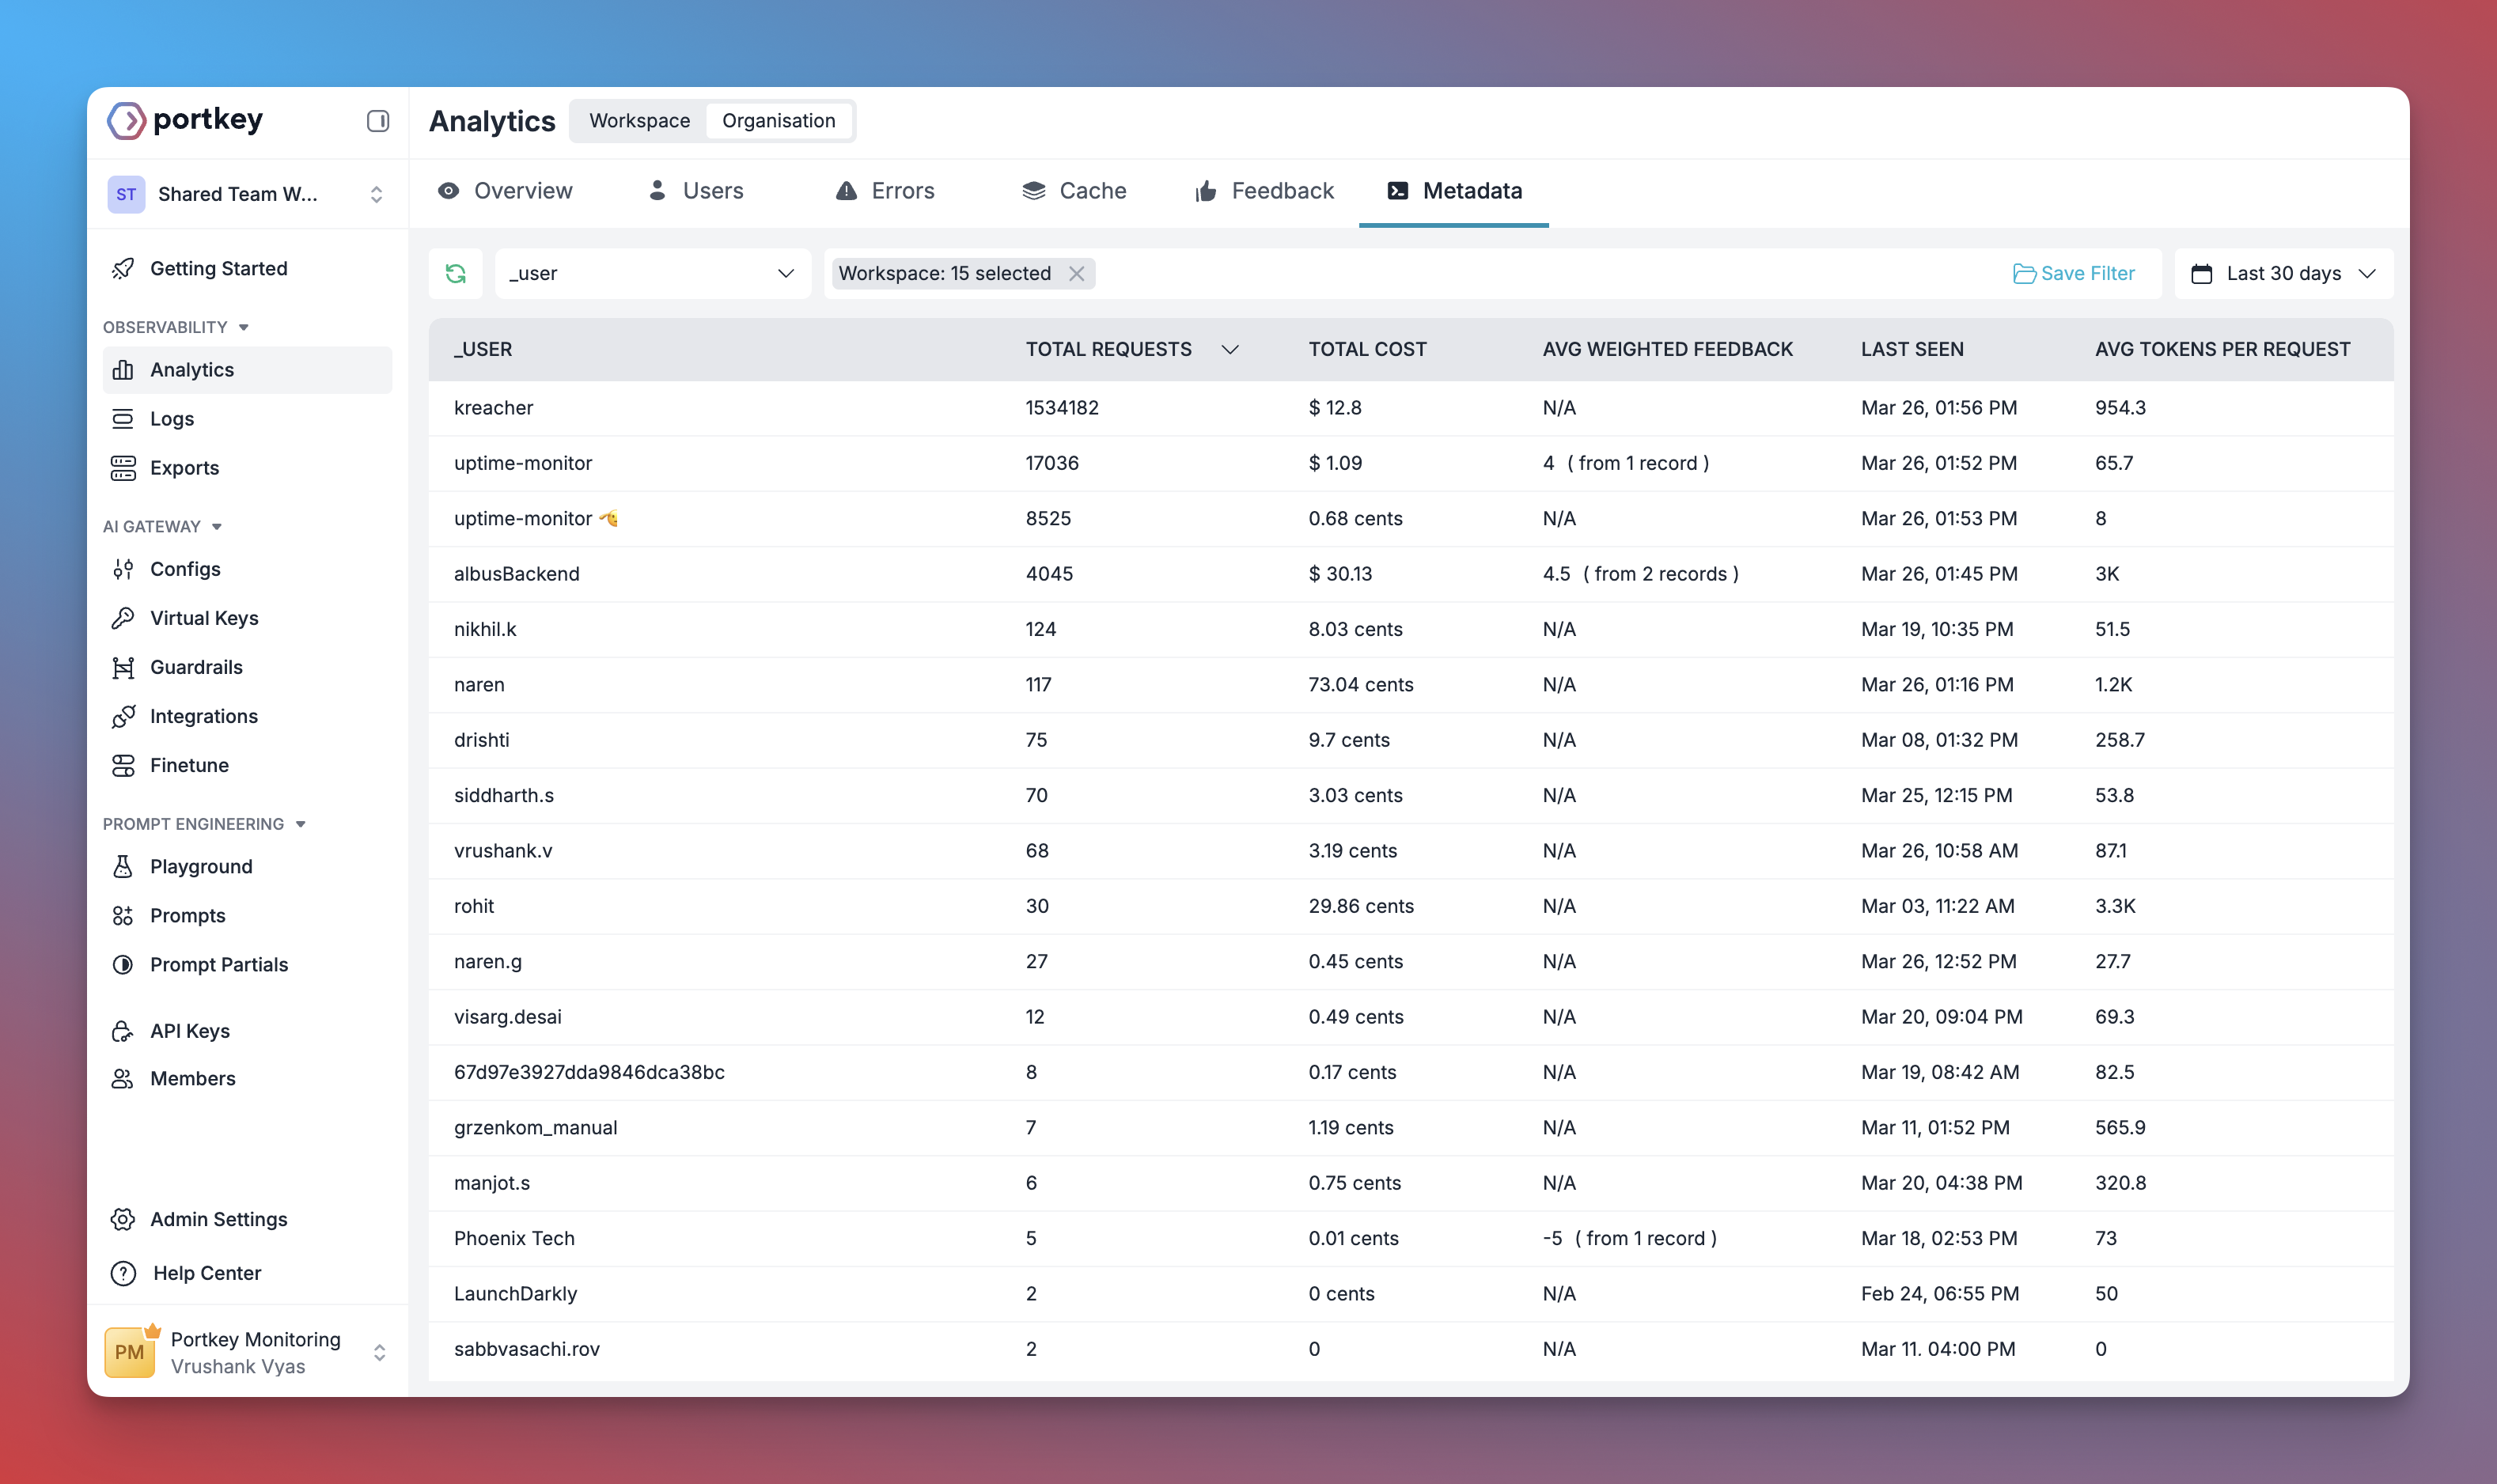
    Add custom metadata to your OpenAI agent calls to enable powerful filtering and segmentation:

    ```python theme={null}
    from openai import AsyncOpenAI
    from agents import set_default_openai_client
    import os, json

    portkey = AsyncOpenAI(
        base_url="https://api.portkey.ai/v1",
        api_key=os.environ["PORTKEY_API_KEY"],
        default_headers={
            "x-portkey-metadata": json.dumps({"agent_type": "research_agent"}),
            "x-portkey-provider": "@your-openai-provider-slug",
        }
    )
    set_default_openai_client(portkey)
    ```

    This metadata can be used to filter logs, traces, and metrics on the Portkey dashboard, allowing you to analyze specific agent runs, users, or environments.
  </Tab>
</Tabs>

### 2. Reliability - Keep Your Agents Running Smoothly

When running agents in production, things can go wrong - API rate limits, network issues, or provider outages. Portkey's reliability features ensure your agents keep running smoothly even when problems occur.

It's this simple to enable fallback in your OpenAI Agents:

```python theme={null}
from openai import AsyncOpenAI
from agents import set_default_openai_client
import os, json

PORTKEY_GATEWAY_URL = "https://api.portkey.ai/v1"

# Create a config with fallbacks. It's recommended that you create the Config
# in the Portkey App rather than hard-code the config JSON directly.
config = {
  "strategy": {"mode": "fallback"},
  "targets": [
    {"provider": "openai", "override_params": {"model": "gpt-4o"}},
    {"provider": "anthropic", "override_params": {"model": "claude-3-opus-20240229"}},
  ],
}

# Configure Portkey client with fallback config
portkey = AsyncOpenAI(
    base_url=PORTKEY_GATEWAY_URL,
    api_key=os.environ["PORTKEY_API_KEY"],
    default_headers={
        # You can also pass a Config ID instead of the full JSON
        "x-portkey-config": json.dumps(config),
    }
)
set_default_openai_client(portkey)
```

This configuration will automatically try Claude if the GPT-4o request fails, ensuring your agent can continue operating.

<CardGroup cols="2">
  <Card title="Automatic Retries" icon="rotate" href="../../product/ai-gateway/automatic-retries">
    Handles temporary failures automatically. If an LLM call fails, Portkey will retry the same request for the specified number of times - perfect for rate limits or network blips.
  </Card>

  <Card title="Request Timeouts" icon="clock" href="../../product/ai-gateway/request-timeouts">
    Prevent your agents from hanging. Set timeouts to ensure you get responses (or can fail gracefully) within your required timeframes.
  </Card>

  <Card title="Conditional Routing" icon="route" href="../../product/ai-gateway/conditional-routing">
    Send different requests to different providers. Route complex reasoning to GPT-4, creative tasks to Claude, and quick responses to Gemini based on your needs.
  </Card>

  <Card title="Fallbacks" icon="shield" href="../../product/ai-gateway/fallbacks">
    Keep running even if your primary provider fails. Automatically switch to backup providers to maintain availability.
  </Card>

  <Card title="Load Balancing" icon="scale-balanced" href="../../product/ai-gateway/load-balancing">
    Spread requests across multiple API keys or providers. Great for high-volume agent operations and staying within rate limits.
  </Card>
</CardGroup>

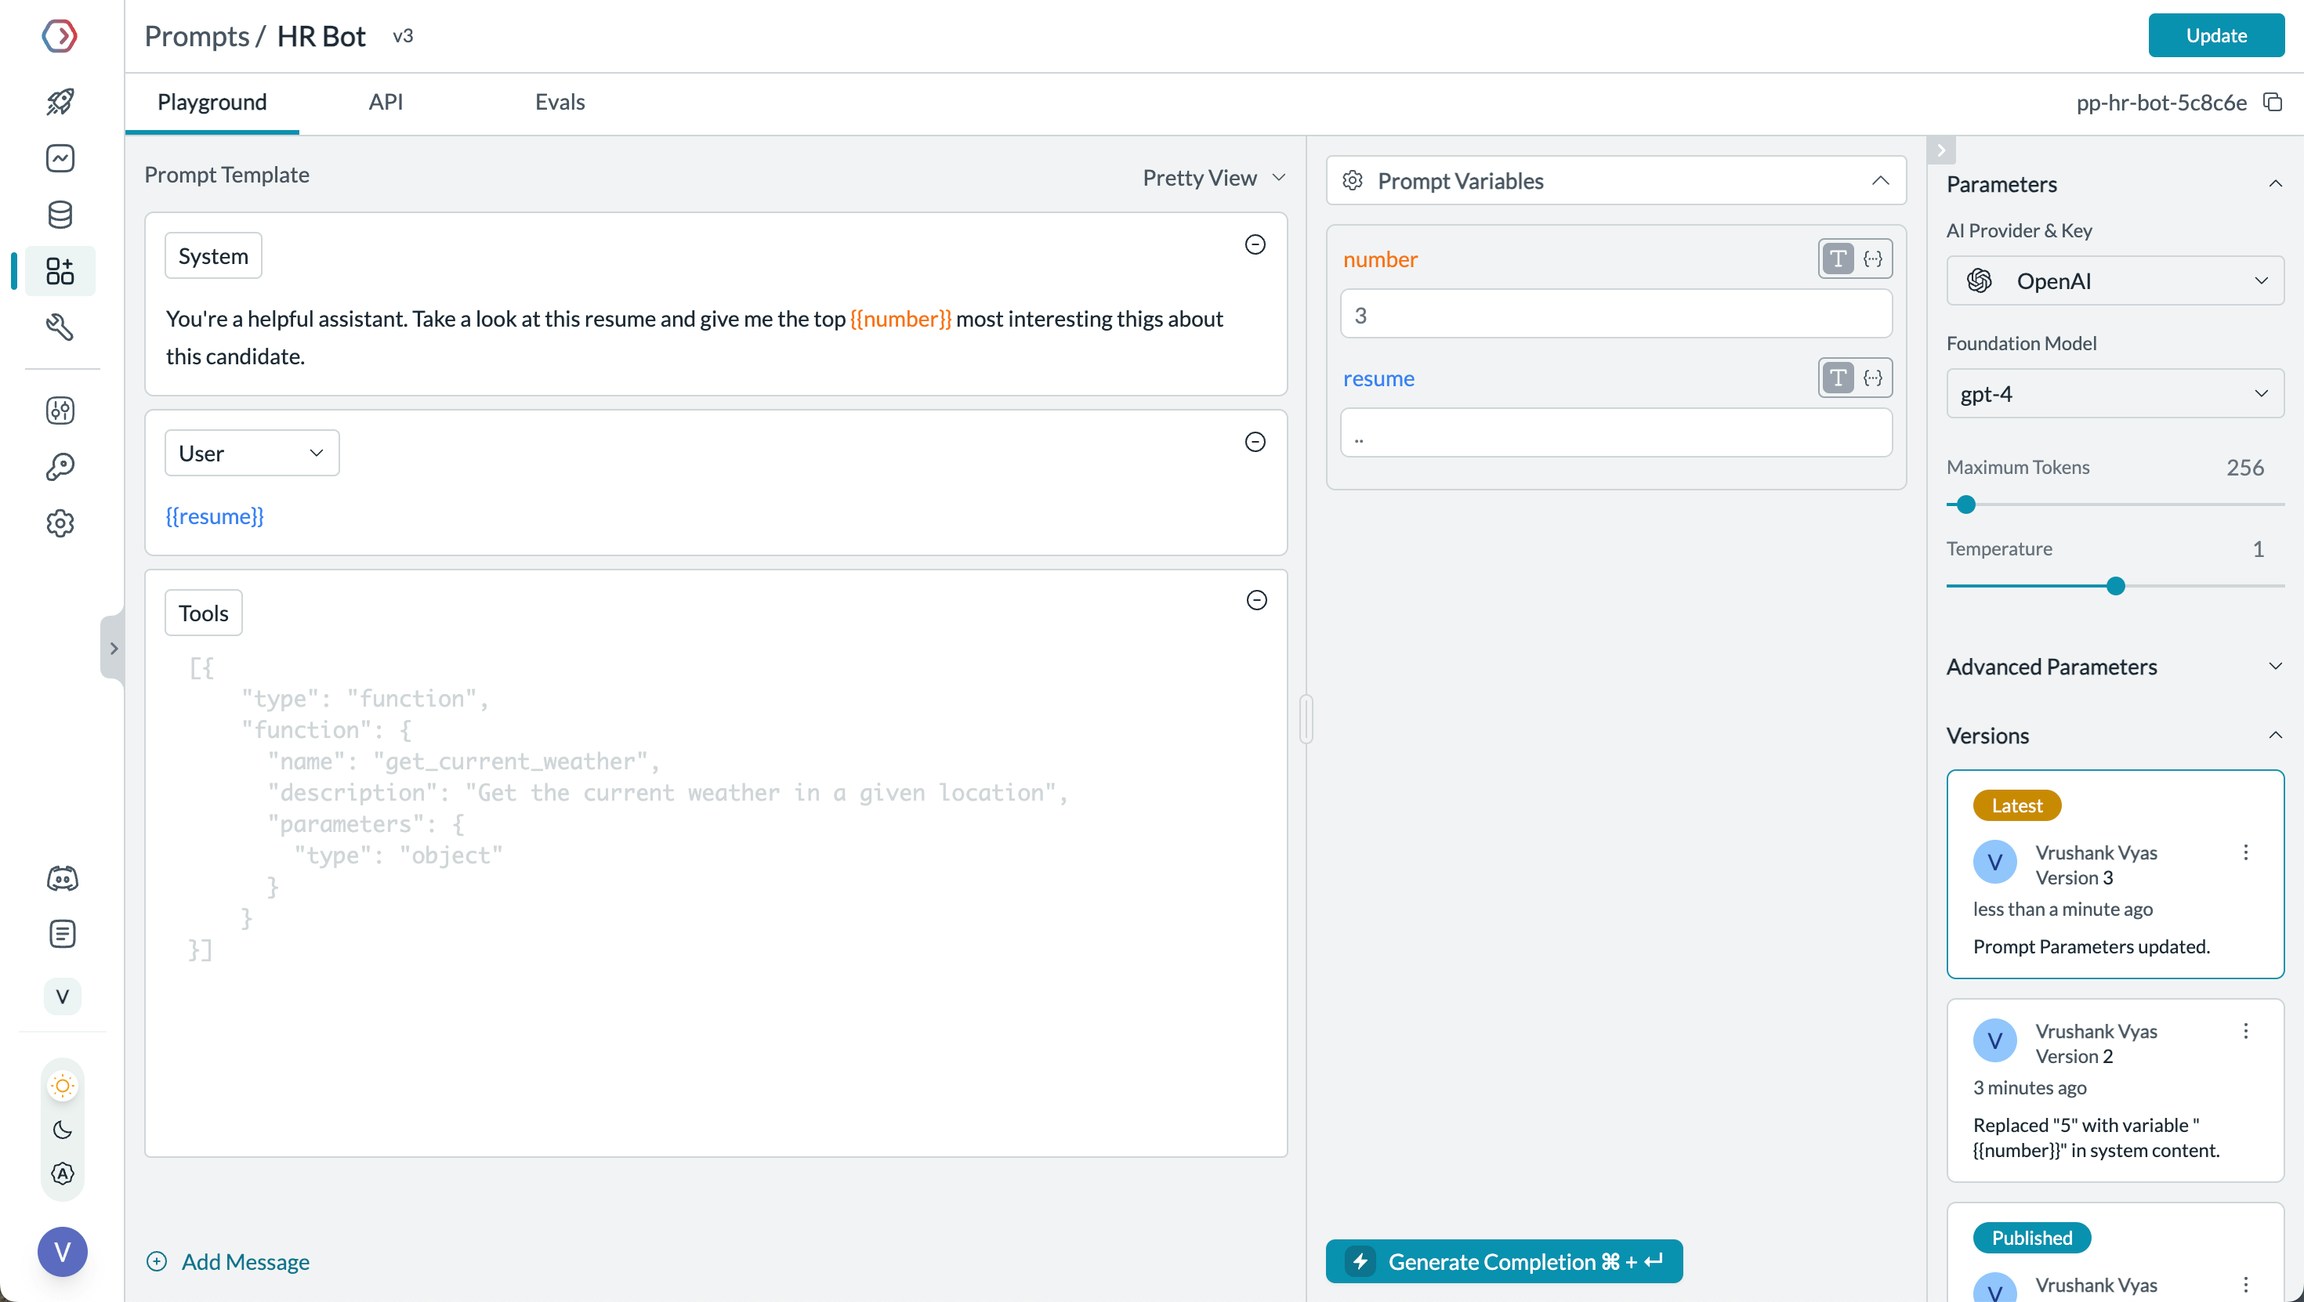
### 3. Prompting in OpenAI Agents

Portkey's Prompt Engineering Studio helps you create, manage, and optimize the prompts used in your OpenAI Agents. Instead of hardcoding prompts or instructions, use Portkey's prompt rendering API to dynamically fetch and apply your versioned prompts.

<Frame caption="Manage prompts in Portkey's Prompt Library">
  <img src="https://mintcdn.com/portkey-docs-mintlify-add-terraform-provider-docs-72855/Eu2vUGmkwROgfsEU/images/product/ai-gateway/ai-20.webp?fit=max&auto=format&n=Eu2vUGmkwROgfsEU&q=85&s=8520209c2803c97895b997487b1252a2" alt="Prompt Playground Interface" width="2304" height="1302" data-path="images/product/ai-gateway/ai-20.webp" />
</Frame>

<Tabs>
  <Tab title="Prompt Playground">
    Prompt Playground is a place to compare, test and deploy perfect prompts for your AI application. It's where you experiment with different models, test variables, compare outputs, and refine your prompt engineering strategy before deploying to production. It allows you to:

    1. Iteratively develop prompts before using them in your agents
    2. Test prompts with different variables and models
    3. Compare outputs between different prompt versions
    4. Collaborate with team members on prompt development

    This visual environment makes it easier to craft effective prompts for each step in your OpenAI Agents agent's workflow.
  </Tab>

  <Tab title="Using Prompt Templates">
    The Prompt Render API retrieves your prompt templates with all parameters configured:

    ```python theme={null}
    from openai import AsyncOpenAI
    from agents import Agent, Runner, set_default_openai_client
    import os

    # Initialize Portkey client for prompt management
    # Using Portkey SDK here is recommended; otherwise call the REST API.
    from portkey_ai import Portkey  # keep SDK only for prompt render

    portkey_client = Portkey(api_key=os.environ["PORTKEY_API_KEY"])

    # Retrieve prompt using the render API
    prompt_data = portkey_client.prompts.render(
        prompt_id="YOUR_PROMPT_ID",
        variables={
            "user_input": "Tell me about artificial intelligence",
        }
    )

    PORTKEY_GATEWAY_URL = "https://api.portkey.ai/v1"

    # Configure OpenAI client with Portkey
    openai_client = AsyncOpenAI(
        base_url=PORTKEY_GATEWAY_URL,
        api_key=os.environ["PORTKEY_API_KEY"],
    )
    set_default_openai_client(openai_client)

    # Use the rendered prompt in your OpenAI Agent
    agent = Agent(
        name="Assistant",
        instructions=prompt_data.data["messages"][0]["content"],  # Use the rendered prompt as instructions
        model="gpt-4o",
    )

    result = Runner.run_sync(agent, "Tell me about artificial intelligence")
    print(result.final_output)
    ```
  </Tab>

  <Tab title="Prompt Versioning">
    You can:

    * Create multiple versions of the same prompt
    * Compare performance between versions
    * Roll back to previous versions if needed
    * Specify which version to use in your code:

    ```python theme={null}
    # Use a specific prompt version
    prompt_data = portkey_client.prompts.render(
        prompt_id="YOUR_PROMPT_ID@version_number",
        variables={
            "user_input": "Tell me about quantum computing",
        }
    )
    ```
  </Tab>

  <Tab title="Mustache Templating for variables">
    Portkey prompts use Mustache-style templating for easy variable substitution:

    ```
    You are an AI assistant helping with {{task_type}}.

    User question: {{user_input}}

    Please respond in a {{tone}} tone and include {{required_elements}}.
    ```

    When rendering, simply pass the variables:

    ```python theme={null}
    prompt_data = portkey_client.prompts.render(
        prompt_id="YOUR_PROMPT_ID",
        variables={
            "task_type": "research",
            "user_input": "Tell me about quantum computing",
            "tone": "professional",
            "required_elements": "recent academic references",
        }
    )
    ```
  </Tab>
</Tabs>

<Card title="Prompt Engineering Studio" icon="wand-magic-sparkles" href="/product/prompt-library">
  Learn more about Portkey's prompt management features
</Card>

### 4. Guardrails for Safe Agents

Guardrails ensure your OpenAI Agents operate safely and respond appropriately in all situations.

**Why Use Guardrails?**

OpenAI Agents can experience various failure modes:

* Generating harmful or inappropriate content
* Leaking sensitive information like PII
* Hallucinating incorrect information
* Generating outputs in incorrect formats

Portkey's guardrails protect against these issues by validating both inputs and outputs.

**Implementing Guardrails**

```python theme={null}
from openai import AsyncOpenAI
from agents import set_default_openai_client
import os, json

PORTKEY_GATEWAY_URL = "https://api.portkey.ai/v1"

# Create a config with input and output guardrails. It's recommended you create Config
# in Portkey App and pass the config ID in the client.
config = {
    "input_guardrails": ["guardrails-id-xxx", "guardrails-id-yyy"],
    "output_guardrails": ["guardrails-id-xxx"],
}

# Configure OpenAI client with guardrails
portkey = AsyncOpenAI(
    base_url=PORTKEY_GATEWAY_URL,
    api_key=os.environ["PORTKEY_API_KEY"],
    default_headers={
        "x-portkey-config": json.dumps(config),
        "x-portkey-provider": "@openai-xxx",
    }
)
set_default_openai_client(portkey)
```

Portkey's guardrails can:

* Detect and redact PII in both inputs and outputs
* Filter harmful or inappropriate content
* Validate response formats against schemas
* Check for hallucinations against ground truth
* Apply custom business logic and rules

<Card title="Learn More About Guardrails" icon="shield-check" href="/product/guardrails">
  Explore Portkey's guardrail features to enhance agent safety
</Card>

### 5. User Tracking with Metadata

Track individual users through your OpenAI Agents using Portkey's metadata system.

**What is Metadata in Portkey?**

Metadata allows you to associate custom data with each request, enabling filtering, segmentation, and analytics. The special `_user` field is specifically designed for user tracking.

```python theme={null}
from openai import AsyncOpenAI
from agents import set_default_openai_client
import os, json

PORTKEY_GATEWAY_URL = "https://api.portkey.ai/v1"

# Configure client with user tracking
portkey = AsyncOpenAI(
    base_url=PORTKEY_GATEWAY_URL,
    api_key=os.environ["PORTKEY_API_KEY"],
    default_headers={
        "x-portkey-metadata": json.dumps({
            "_user": "user_123",  # Special _user field for user analytics
            "user_name": "John Doe",
            "user_tier": "premium",
            "user_company": "Acme Corp",
        })
    }
)
set_default_openai_client(portkey)
```

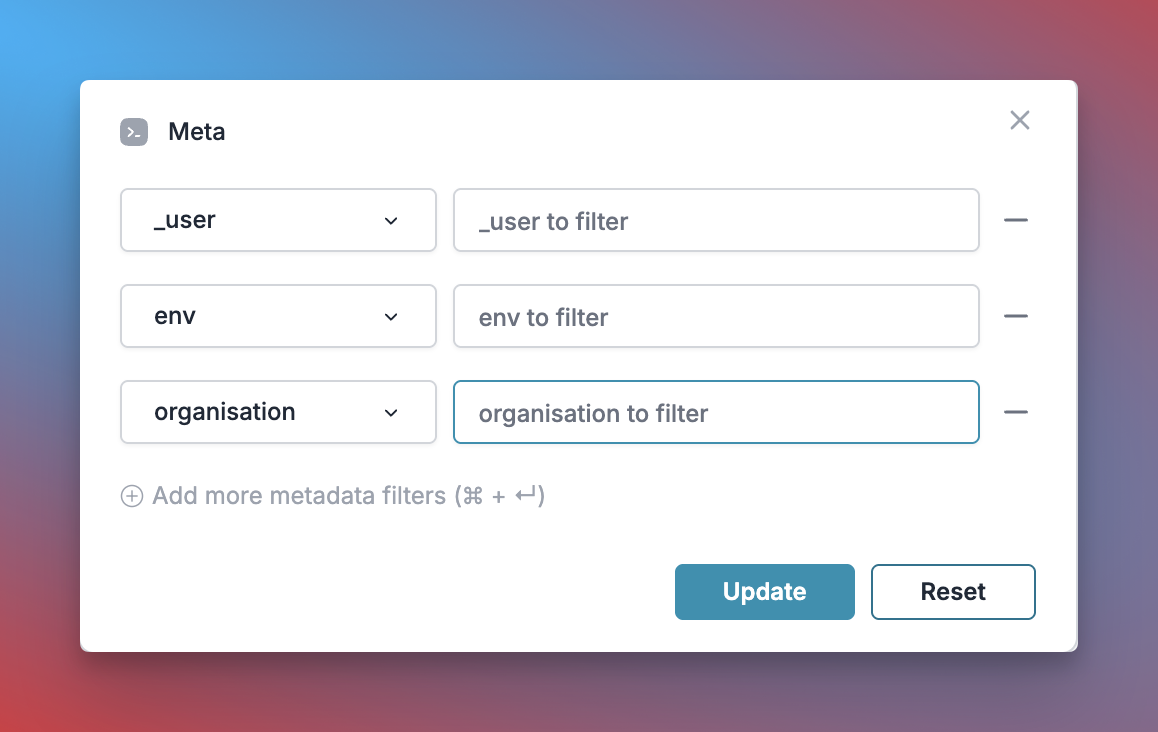
**Filter Analytics by User**

With metadata in place, you can filter analytics by user and analyze performance metrics on a per-user basis:

<Frame caption="Filter analytics by user">
  <img src="https://mintcdn.com/portkey-docs-mintlify-add-terraform-provider-docs-72855/IaH-e_OUk4WwW23Y/images/metadata-filters.png?fit=max&auto=format&n=IaH-e_OUk4WwW23Y&q=85&s=b705137f1d645c21df0b5ba6908dd33e" width="1158" height="732" data-path="images/metadata-filters.png" />
</Frame>

This enables:

* Per-user cost tracking and budgeting
* Personalized user analytics
* Team or organization-level metrics
* Environment-specific monitoring (staging vs. production)
<Card title="Learn More About Metadata" icon="tags" href="/product/observability/metadata">
  Explore how to use custom metadata to enhance your analytics
</Card>

### 6. Caching for Efficient Agents

Implement caching to make your OpenAI Agents agents more efficient and cost-effective:

<Tabs>
  <Tab title="Simple Caching">
    ```python theme={null}
    import os
    from openai import AsyncOpenAI
    from agents import set_default_openai_client

    PORTKEY_GATEWAY_URL = "https://api.portkey.ai/v1"

    portkey = AsyncOpenAI(
        base_url=PORTKEY_GATEWAY_URL,
        api_key=os.environ["PORTKEY_API_KEY"],
        default_headers={
            "x-portkey-config": "your-config-id",  # or JSON with {"cache": {"mode": "simple"}}
        }
    )
    set_default_openai_client(portkey)
    ```

    Simple caching performs exact matches on input prompts, caching identical requests to avoid redundant model executions.
  </Tab>
</Tabs>

### 7. Model Interoperability

With Portkey, you can easily switch between different LLMs in your OpenAI Agents without changing your core agent logic.

```python theme={null}
# Configure Portkey with different LLM providers via headers
from openai import AsyncOpenAI
from agents import set_default_openai_client, Agent, Runner
import os, json

PORTKEY_GATEWAY_URL = "https://api.portkey.ai/v1"

# Using OpenAI
openai_config = {
    "provider": "openai",
    "api_key": "YOUR_OPENAI_API_KEY",
    "override_params": {"model": "gpt-4o"},
}

# Using Anthropic
anthropic_config = {
    "provider": "anthropic",
    "api_key": "YOUR_ANTHROPIC_API_KEY",
    "override_params": {"model": "claude-3-opus-20240229"},
}

# Choose which config to use
active_config = openai_config  # or anthropic_config

# Configure OpenAI client with chosen provider
portkey = AsyncOpenAI(
    base_url=PORTKEY_GATEWAY_URL,
    api_key=os.environ["PORTKEY_API_KEY"],
    default_headers={
        "x-portkey-config": json.dumps(active_config),
    }
)
set_default_openai_client(portkey)

# Create and run agent - no changes needed in agent code
agent = Agent(
    name="Assistant",
    instructions="You are a helpful assistant.",
    # The model specified here will be used as a reference but the actual model
    # is determined by the active_config
    model="gpt-4o",
)

result = Runner.run_sync(agent, "Tell me about quantum computing.")
print(result.final_output)
```

Portkey provides access to over 200 LLMs through a unified interface, including:

* OpenAI (GPT-4o, GPT-4 Turbo, etc.)
* Anthropic (Claude 3.5 Sonnet, Claude 3 Opus, etc.)
* Mistral AI (Mistral Large, Mistral Medium, etc.)
* Google Vertex AI (Gemini 1.5 Pro, etc.)
* Cohere (Command, Command-R, etc.)
* AWS Bedrock (Claude, Titan, etc.)
* Local/Private Models

<Card title="Supported Providers" icon="server" href="/integrations/llms">
  See the full list of LLM providers supported by Portkey
</Card>

## Set Up Enterprise Governance for OpenAI Agents

**Why Enterprise Governance?**
If you are using OpenAI Agents inside your organization, you need to consider several governance aspects:

* **Cost Management**: Controlling and tracking AI spending across teams
* **Access Control**: Managing which teams can use specific models
* **Usage Analytics**: Understanding how AI is being used across the organization
* **Security & Compliance**: Maintaining enterprise security standards
* **Reliability**: Ensuring consistent service across all users

Portkey adds a comprehensive governance layer to address these enterprise needs. Let's implement these controls step by step.

**Enterprise Implementation Guide**

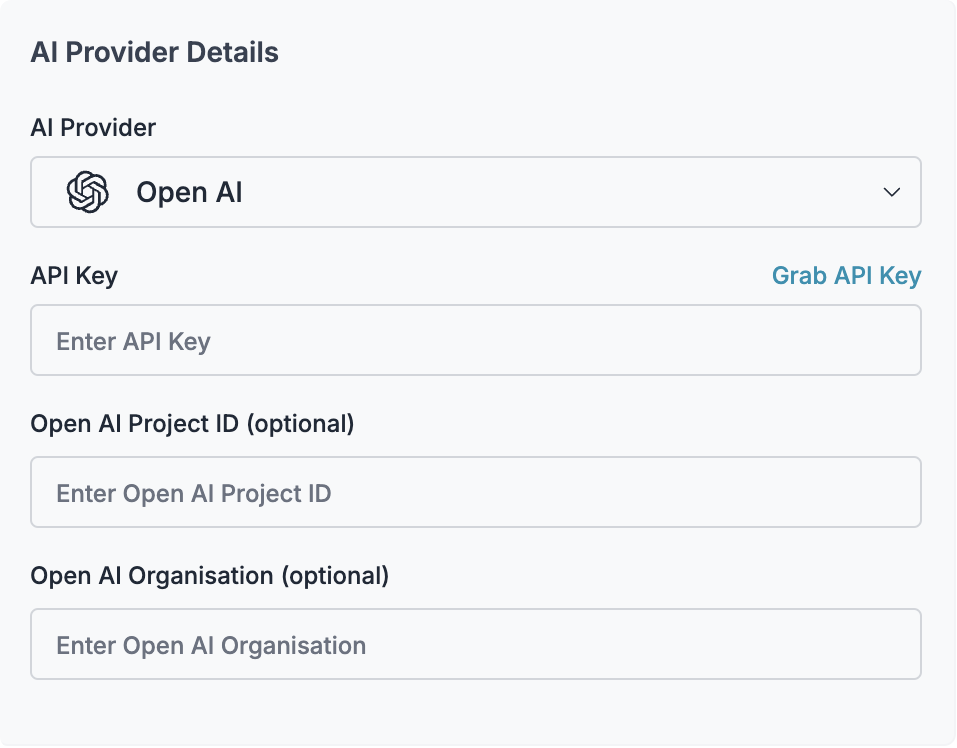
Portkey allows you to use 1600+ LLMs with your OpenAI Agents setup, with minimal configuration required. Let's set up the core components in Portkey that you'll need for integration.

<Steps>
  <Step title="Integrate your LLM">
    Virtual Keys are Portkey's secure way to manage your LLM provider API keys. Think of them like disposable credit cards for your LLM API keys, providing essential controls like:

    * Budget limits for API usage
    * Rate limiting capabilities
    * Secure API key storage

    To create a virtual key:
    Go to [Virtual Keys](https://app.portkey.ai/virtual-keys) in the Portkey App. Save and copy the virtual key ID

    <Frame>
      <img src="https://mintcdn.com/portkey-docs-mintlify-add-terraform-provider-docs-72855/2eJr0Ah02F2VMAmj/images/integrations/openai/virtual-key-2.png?fit=max&auto=format&n=2eJr0Ah02F2VMAmj&q=85&s=8a490fc918e11e50043a452f24d96db5" width="500" data-path="images/integrations/openai/virtual-key-2.png" />
    </Frame>

    <Note>
      Save your virtual key ID - you'll need it for the next step.
    </Note>
  </Step>

  <Step title="Create Default Config">
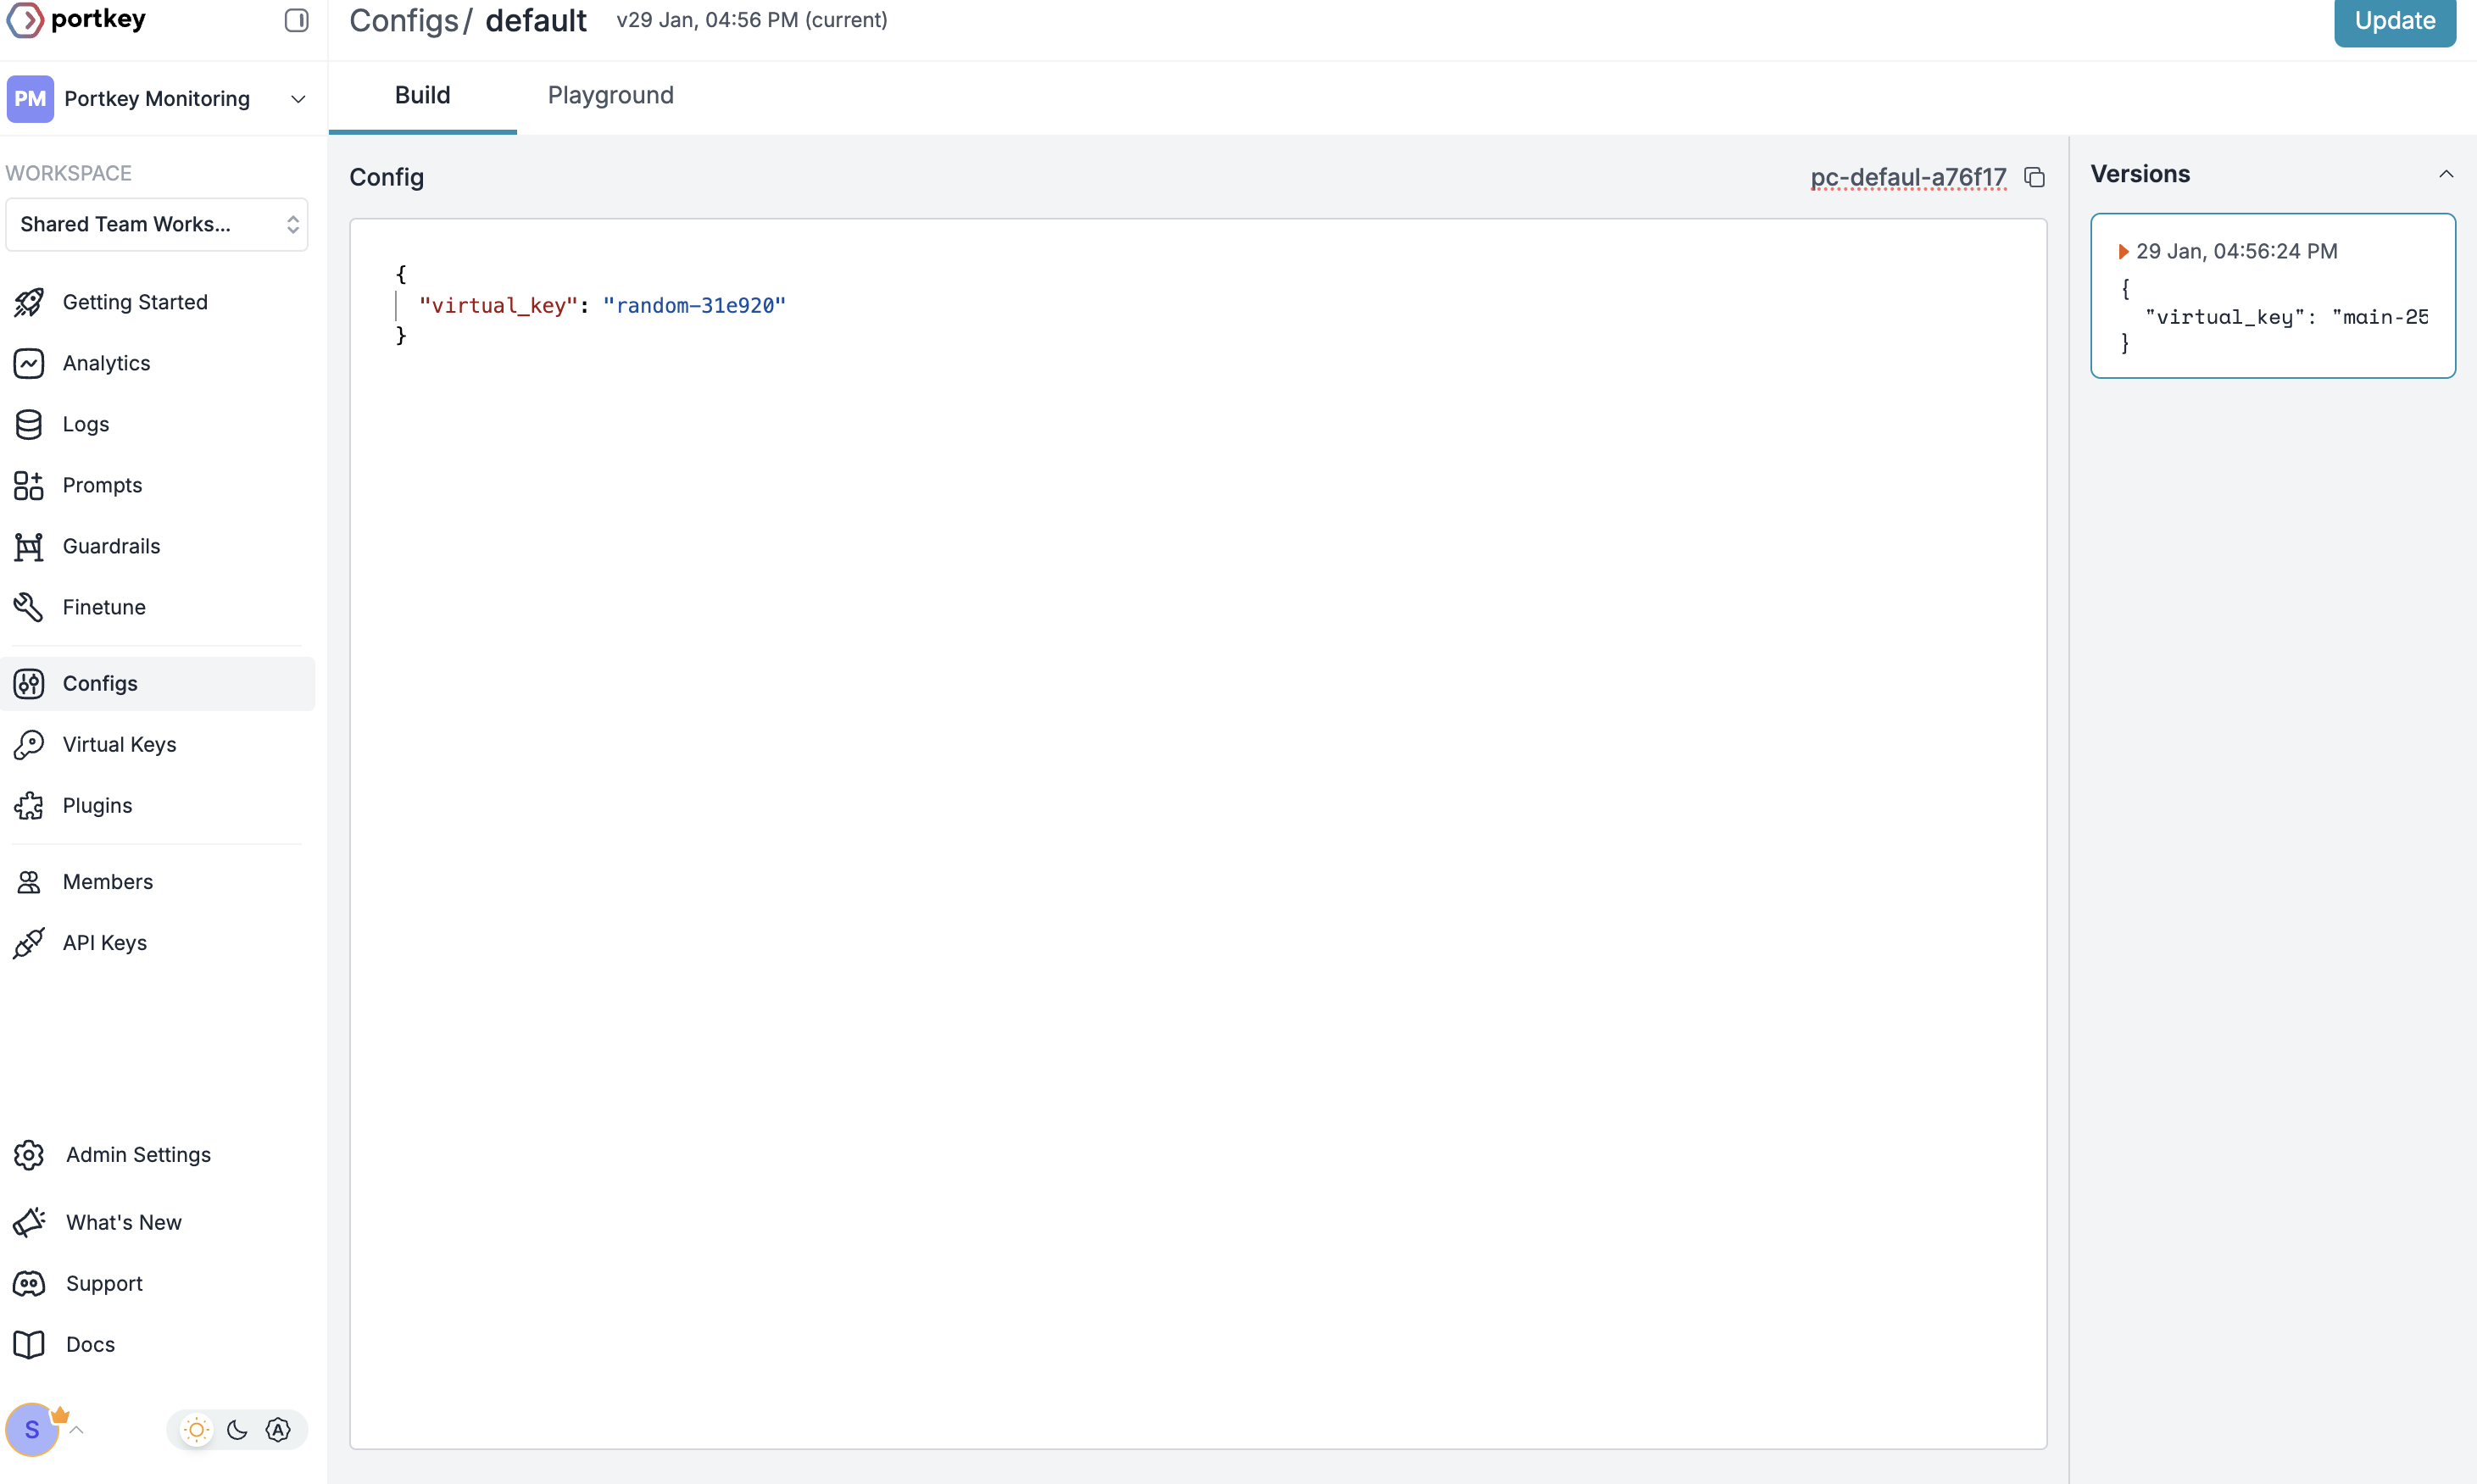
    Configs in Portkey are JSON objects that define how your requests are routed. They help with implementing features like advanced routing, fallbacks, and retries.

    We need to create a default config to route our requests to the virtual key created in Step 1.

    To create your config:

    1. Go to [Configs](https://app.portkey.ai/configs) in Portkey dashboard
    2. Create new config with:

    ```json theme={null}
    {
        "provider":"@YOUR_PROVIDER_FROM_STEP1",
        "override_params": {
          "model": "gpt-4o" // Your preferred model name
        }
    }
    ```

    3. Save and note the Config name for the next step

    <Frame>
      <img src="https://mintcdn.com/portkey-docs-mintlify-add-terraform-provider-docs-72855/2eJr0Ah02F2VMAmj/images/integrations/config.png?fit=max&auto=format&n=2eJr0Ah02F2VMAmj&q=85&s=fdfafad0d3a1d86ab5526b1c03befdd0" width="500" data-path="images/integrations/config.png" />
    </Frame>

    <Note>
      This basic config connects to your virtual key. You can add more advanced Portkey features later.
    </Note>
  </Step>

  <Step title="Configure Portkey API Key">
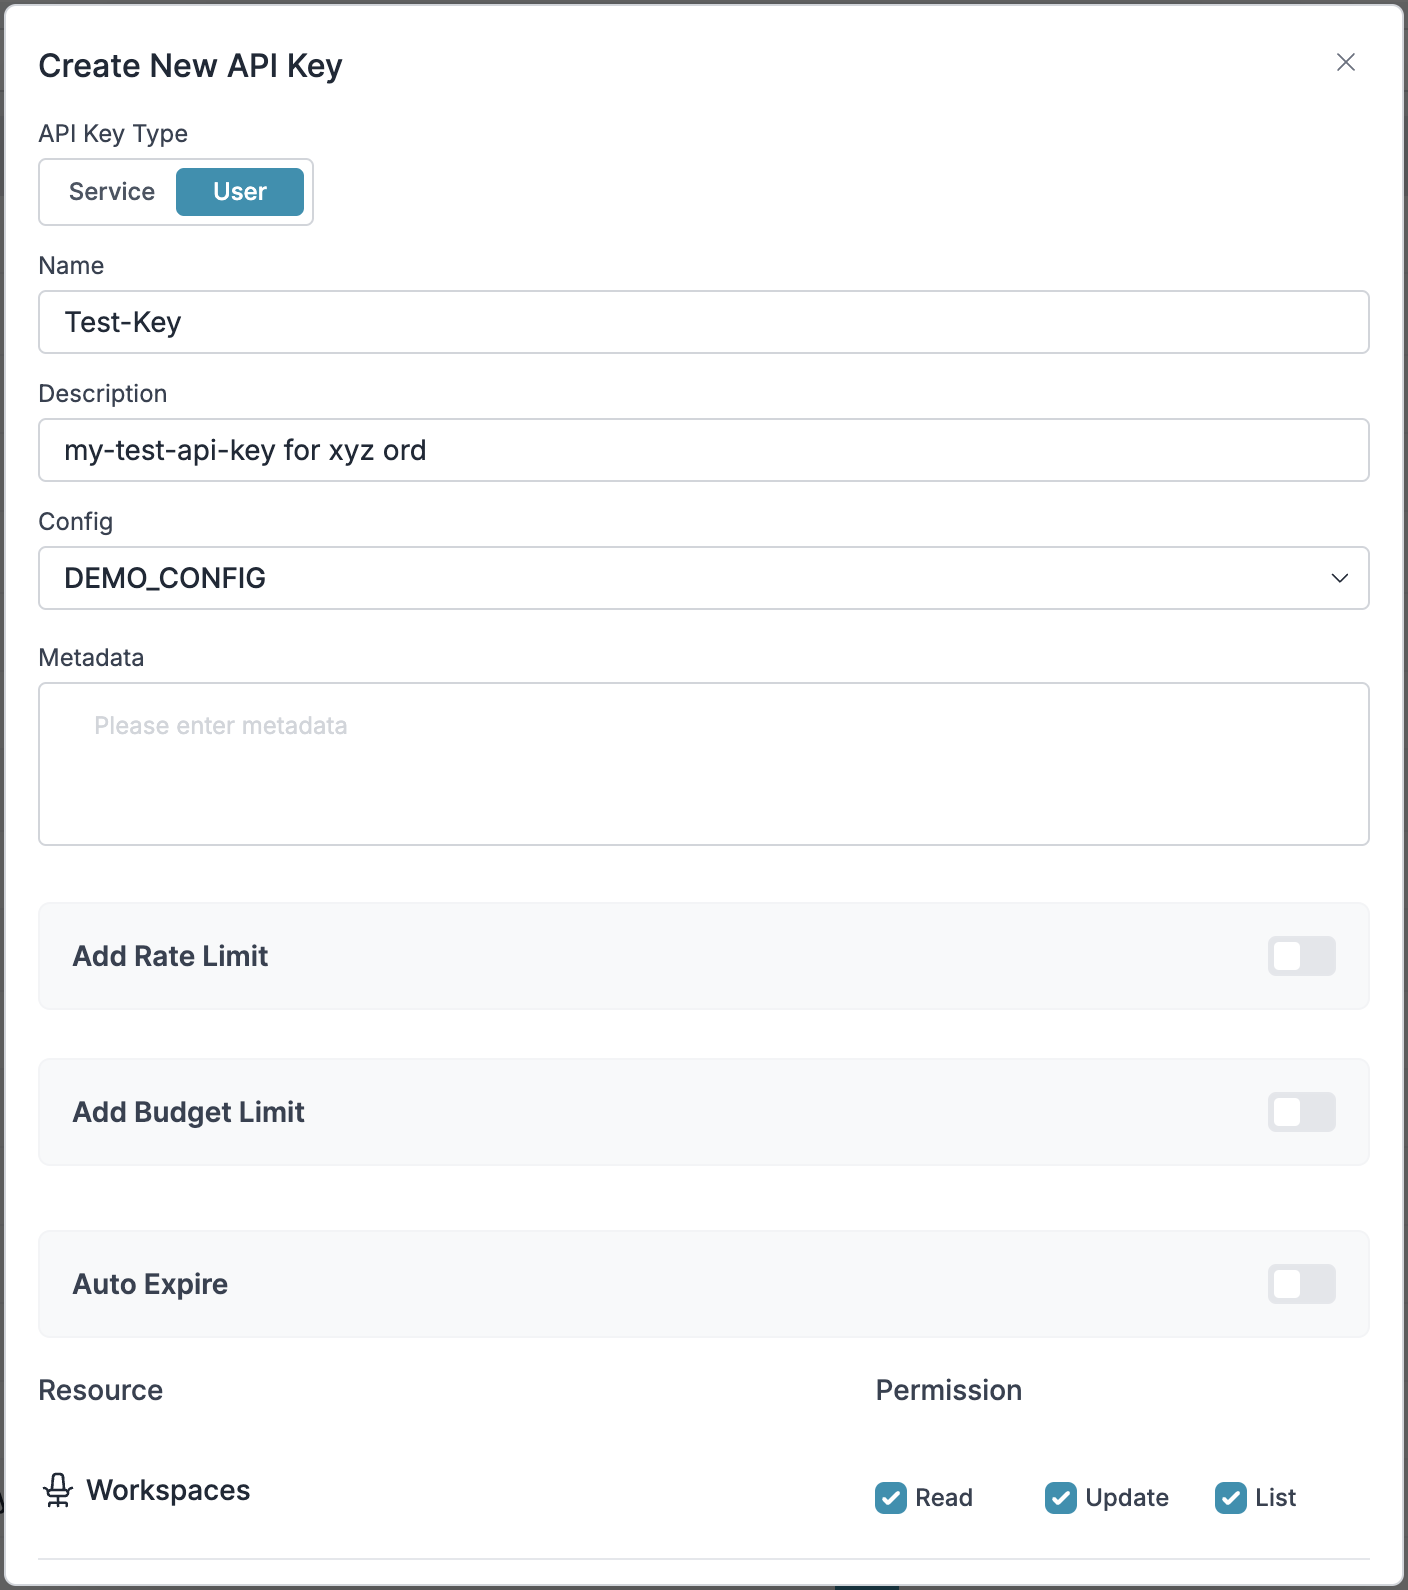
    Now create Portkey API key access point and attach the config you created in Step 2:

    1. Go to [API Keys](https://app.portkey.ai/api-keys) in Portkey and Create new API key
    2. Select your config from `Step 2`
    3. Generate and save your API key

    <Frame>
      <img src="https://mintcdn.com/portkey-docs-mintlify-add-terraform-provider-docs-72855/6LWaVLzZXH3ffglG/images/integrations/api-key.png?fit=max&auto=format&n=6LWaVLzZXH3ffglG&q=85&s=b17358a88cae39149f0a7a9c1627f463" width="500" data-path="images/integrations/api-key.png" />
    </Frame>

    <Note>
      Save your API key securely - you'll need it for OpenAI Agents integration.
    </Note>
  </Step>

  <Step>
    Once you have created your API Key after attaching default config, you can directly pass the API key + base URL in the OpenAI client. Here's how:

    ```python theme={null}
    from openai import AsyncOpenAI
    import os

    PORTKEY_GATEWAY_URL = "https://api.portkey.ai/v1"

    client = AsyncOpenAI(
        api_key=os.environ["PORTKEY_API_KEY"],  # Your Portkey API Key from Step 3
        base_url=PORTKEY_GATEWAY_URL,
    )

    # your rest of the code remains same
    ```
  </Step>
</Steps>

<AccordionGroup>
  <Accordion title="Step 1: Implement Budget Controls & Rate Limits">
    ### Step 1: Implement Budget Controls & Rate Limits

    Virtual Keys enable granular control over LLM access at the team/department level. This helps you:

    * Set up [budget limits](/product/ai-gateway/virtual-keys/budget-limits)
    * Prevent unexpected usage spikes using Rate limits
    * Track departmental spending

    #### Setting Up Department-Specific Controls:

    1. Navigate to [Virtual Keys](https://app.portkey.ai/virtual-keys) in Portkey dashboard
    2. Create new Virtual Key for each department with budget limits and rate limits
    3. Configure department-specific limits

    <Frame>
      <img src="https://mintcdn.com/portkey-docs-mintlify-add-terraform-provider-docs-72855/2eJr0Ah02F2VMAmj/images/integrations/openai/virtual-key-2.png?fit=max&auto=format&n=2eJr0Ah02F2VMAmj&q=85&s=8a490fc918e11e50043a452f24d96db5" width="500" data-path="images/integrations/openai/virtual-key-2.png" />
    </Frame>
  </Accordion>

  <Accordion title="Step 2: Define Model Access Rules">
    ### Step 2: Define Model Access Rules

    As your AI usage scales, controlling which teams can access specific models becomes crucial. Portkey Configs provide this control layer with features like:

    #### Access Control Features:

    * **Model Restrictions**: Limit access to specific models
    * **Data Protection**: Implement guardrails for sensitive data
    * **Reliability Controls**: Add fallbacks and retry logic

    #### Example Configuration:

    Here's a basic configuration to route requests to OpenAI, specifically using GPT-4o:

    ```json theme={null}
    {
    	"strategy": {
    		"mode": "single"
    	},
    	"targets": [
    		{
    			"provider":"@YOUR_OPENAI_PROVIDER",
    			"override_params": {
    				"model": "gpt-4o"
    			}
    		}
    	]
    }
    ```

    Create your config on the [Configs page](https://app.portkey.ai/configs) in your Portkey dashboard. You'll need the config ID for connecting to OpenAI Agents's setup.

    <Note>
      Configs can be updated anytime to adjust controls without affecting running applications.
    </Note>
  </Accordion>

  <Accordion title="Step 3: Implement Access Controls">
    ### Step 3: Implement Access Controls

    Create User-specific API keys that automatically:

    * Track usage per user/team with the help of metadata
    * Apply appropriate configs to route requests
    * Collect relevant metadata to filter logs
    * Enforce access permissions

    Create API keys through:

    * [Portkey App](https://app.portkey.ai/)
    * [API Key Management API](/api-reference/admin-api/control-plane/api-keys/create-api-key)

    Example using Python SDK:

    ```python theme={null}
    from portkey_ai import Portkey

    portkey = Portkey(api_key="YOUR_ADMIN_API_KEY")

    api_key = portkey.api_keys.create(
        name="engineering-team",
        type="organisation",
        workspace_id="YOUR_WORKSPACE_ID",
        defaults={
            "config_id": "your-config-id",
            "metadata": {
                "environment": "production",
                "department": "engineering",
            },
        },
        scopes=["logs.view", "configs.read"],
    )
    ```

    For detailed key management instructions, see our [API Keys documentation](/api-reference/admin-api/control-plane/api-keys/create-api-key).
  </Accordion>

  <Accordion title="Step 4: Deploy & Monitor">
    ### Step 4: Deploy & Monitor

    After distributing API keys to your team members, your enterprise-ready OpenAI Agents setup is ready to go. Each team member can now use their designated API keys with appropriate access levels and budget controls.
    Apply your governance setup using the integration steps from earlier sections
    Monitor usage in Portkey dashboard:

    * Cost tracking by department
    * Model usage patterns
    * Request volumes
    * Error rates
  </Accordion>
</AccordionGroup>

<Check>
  ### Enterprise Features Now Available

  **OpenAI Agents now has:**

  * Departmental budget controls
  * Model access governance
  * Usage tracking & attribution
  * Security guardrails
  * Reliability features
</Check>

## Frequently Asked Questions

<AccordionGroup>
  <Accordion title="How does Portkey enhance OpenAI Agents?">
    Portkey adds production-readiness to OpenAI Agents through comprehensive observability (traces, logs, metrics), reliability features (fallbacks, retries, caching), and access to 1600+ LLMs through a unified interface. This makes it easier to debug, optimize, and scale your agent applications.
  </Accordion>

  <Accordion title="Can I use Portkey with existing OpenAI Agents?">
    Yes! Portkey integrates seamlessly with existing OpenAI Agents. You only need to replace your client initialization code with the Portkey-enabled version. The rest of your agent code remains unchanged.
  </Accordion>

  <Accordion title="Does Portkey work with all OpenAI Agents features?">
    Portkey supports all OpenAI Agents SDK features, including tool use, memory, planning, and more. It adds observability and reliability without limiting any of the SDK's functionality.
  </Accordion>

  <Accordion title="How does Portkey handle streaming in OpenAI Agents?">
    Portkey fully supports streaming responses in OpenAI Agents. You can enable streaming by using the appropriate methods in the OpenAI Agents SDK, and Portkey will properly track and log the streaming interactions.
  </Accordion>

  <Accordion title="How do I filter logs and traces for specific agent runs?">
    Portkey allows you to add custom metadata to your agent runs, which you can then use for filtering. Add fields like `agent_name`, `agent_type`, or `session_id` to easily find and analyze specific agent executions.
  </Accordion>

  <Accordion title="Can I use my own API keys with Portkey?">
    Yes! Portkey uses your own API keys for the various LLM providers. It securely stores them, allowing you to easily manage and rotate keys without changing your code.
  </Accordion>
</AccordionGroup>

## Resources

<CardGroup cols="3">
  <Card title="OpenAI Agents Docs" href="https://openai.github.io/openai-agents-python/">
    <p>Official OpenAI Agents SDK documentation</p>
  </Card>

  <Card title="Agent Examples" href="https://github.com/openai/openai-agents-python/tree/main/examples">
    <p>Example implementations for various use cases</p>
  </Card>

  <Card title="Book a Demo" href="https://portkey.sh/openai-agents">
    <p>Get personalized guidance on implementing this integration</p>
  </Card>
</CardGroup>