> ## Documentation Index
> Fetch the complete documentation index at: https://portkey-docs-mintlify-add-terraform-provider-docs-72855.mintlify.site/llms.txt
> Use this file to discover all available pages before exploring further.
# Portkey with Any OpenAI Compatible Project
> Learn how to integrate Portkey's enterprise features with any OpenAI Compliant project for enhanced observability, reliability and governance.
Portkey enhances any OpenAI API compliant project by adding enterprise-grade features like observability, reliability, rate limiting, access control, and budget management—all without requiring code changes.
It is a drop-in replacement for your existing OpenAI-compatible applications. This guide explains how to integrate Portkey with minimal changes to your project settings.
While OpenAI (or any other provider) provides an API for AI model access. Commercial usage often require additional features like:
* **Advanced Observability**: Real-time usage tracking for 40+ key metrics and logs for every request
* **Unified AI Gateway** - Single interface for 250+ LLMs with API key management
* **Governance** - Real-time spend tracking, set budget limits and RBAC in your AI systems
* **Security Guardrails** - PII detection, content filtering, and compliance controls
# 1. Getting Started with Portkey
Portkey allows you to use 1600+ LLMs with your n8n setup, with minimal configuration required. Let's set up the core components in Portkey that you'll need for integration.
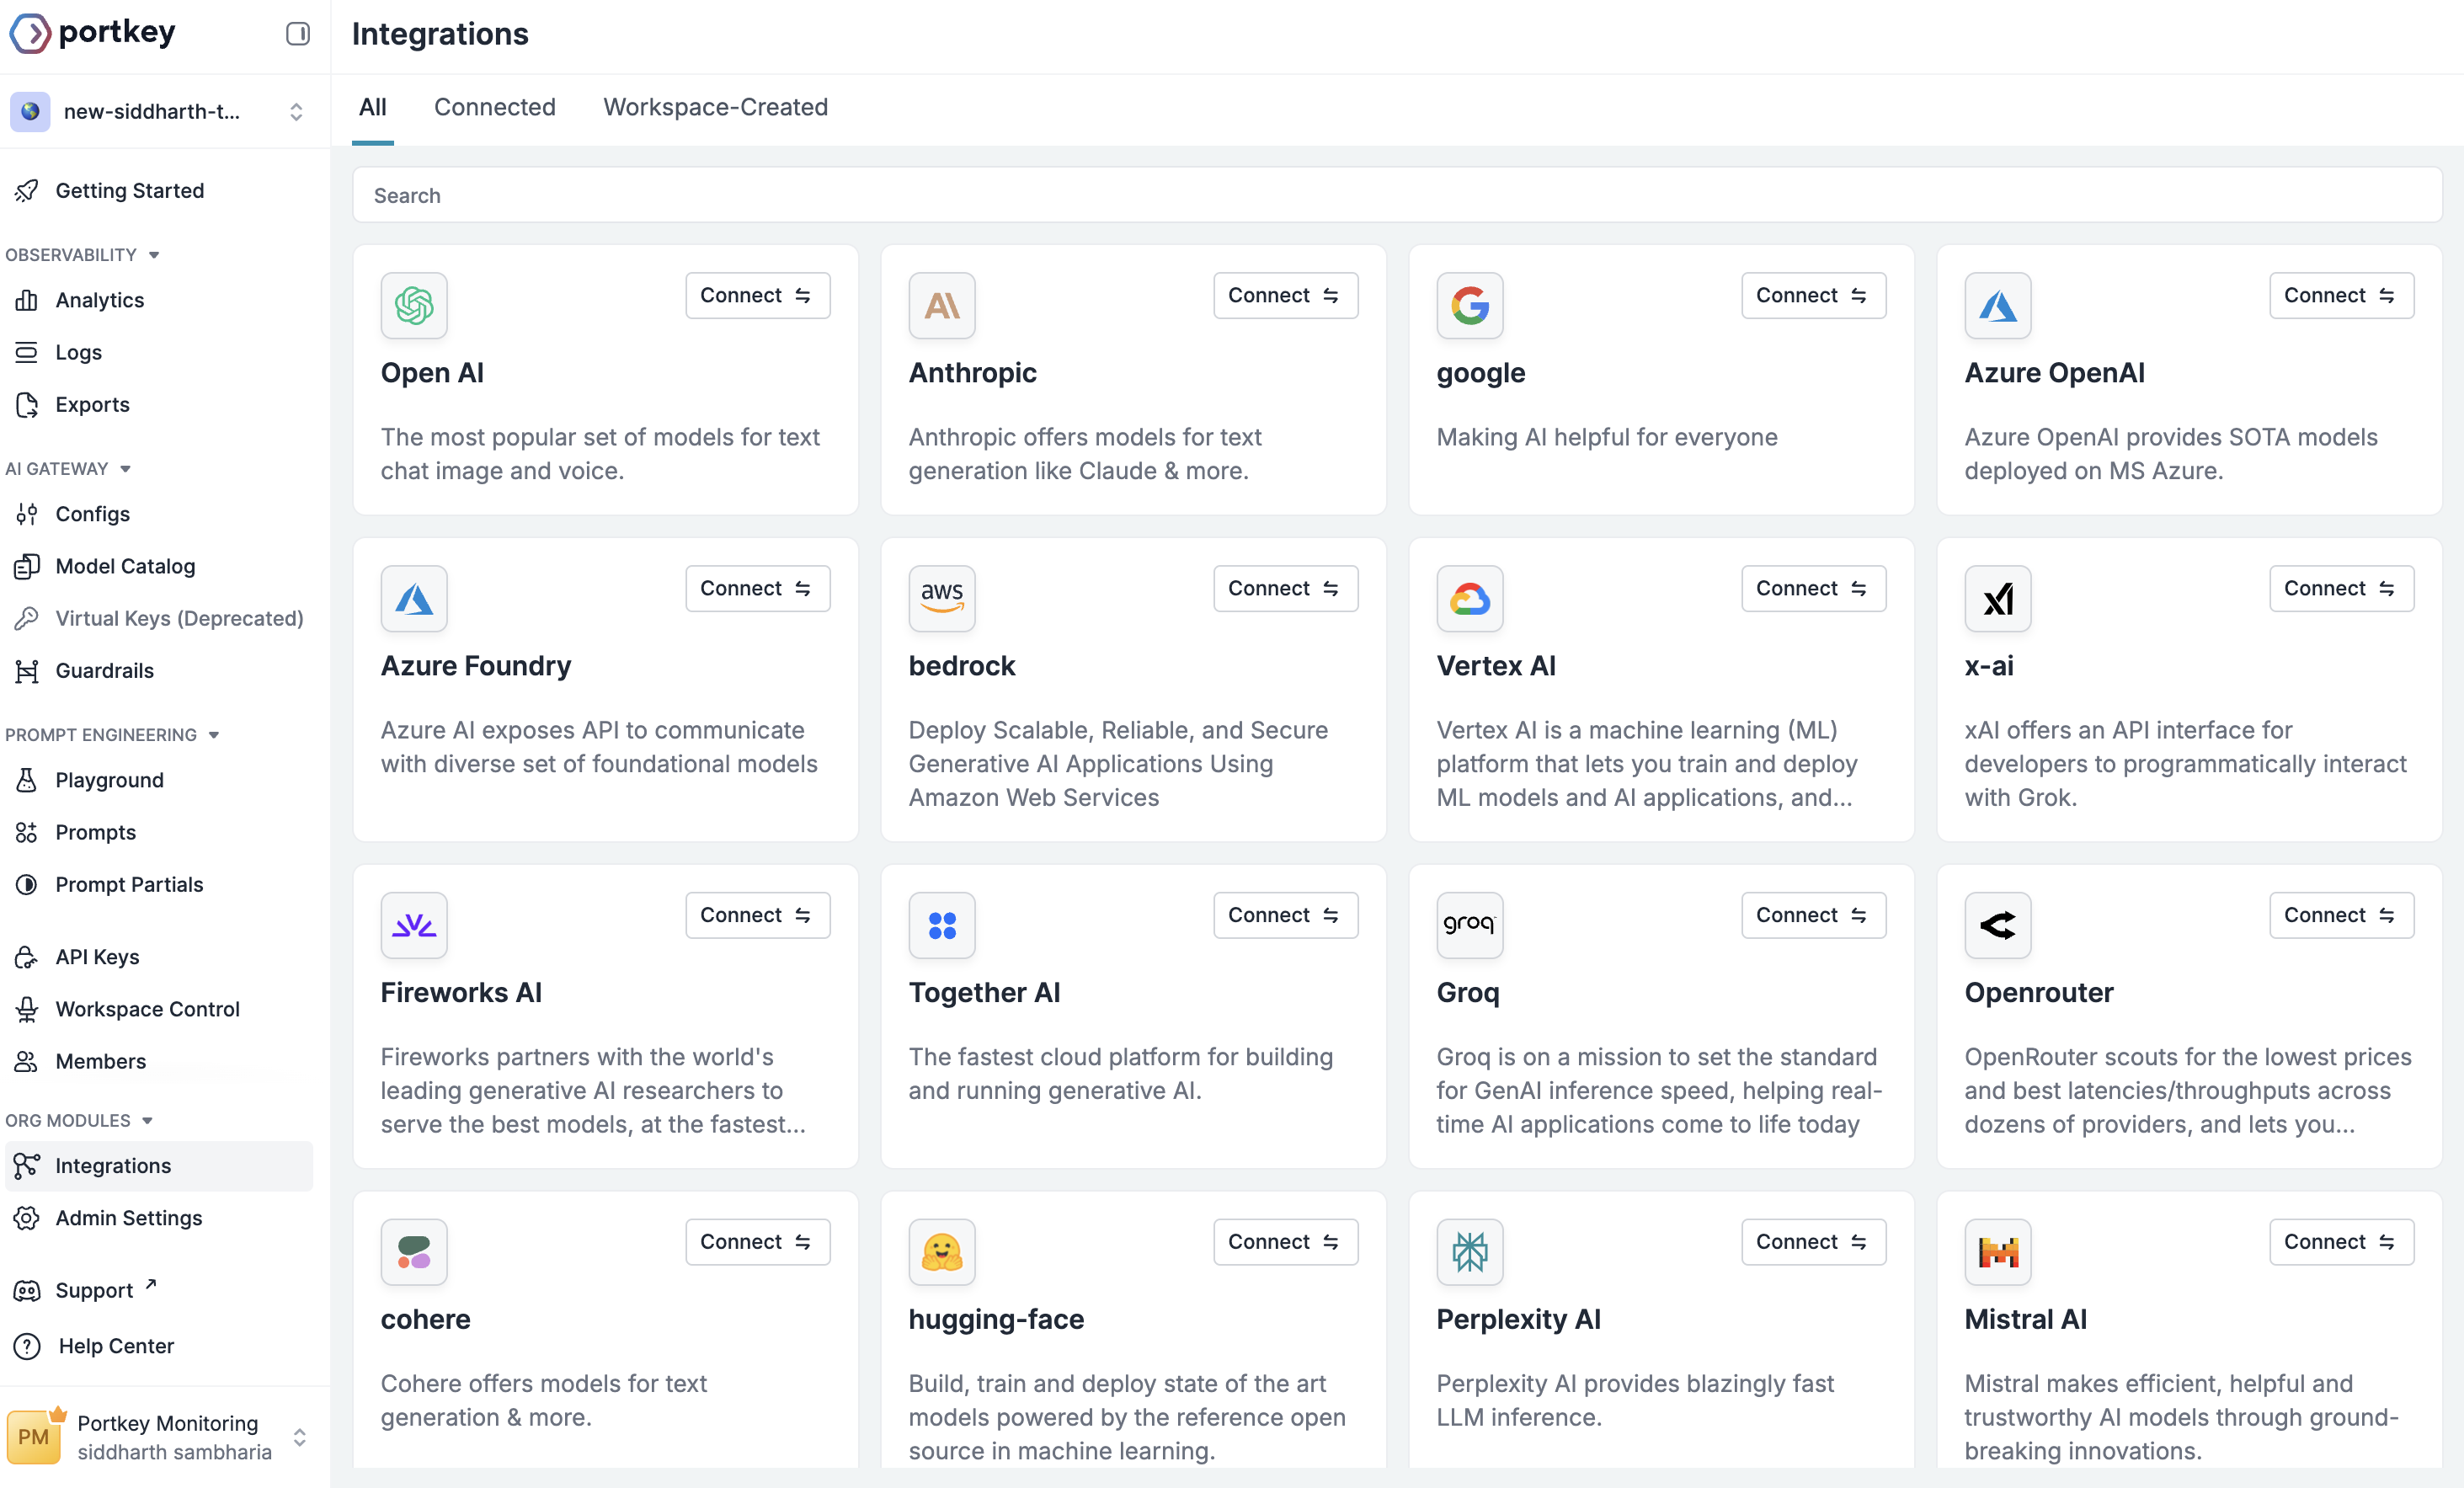
Navigate to the [Integrations](https://app.portkey.ai/integrations) section on Portkey's Sidebar. This is where you'll connect your LLM providers.
1. Find your preferred provider (e.g., OpenAI, Anthropic, etc.)
2. Click **Connect** on the provider card
3. In the "Create New Integration" window:
* Enter a **Name** for reference
* Enter a **Slug** for the integration
* Enter your **API Key and other provider specific details** for the provider
4. Click **Next Step**
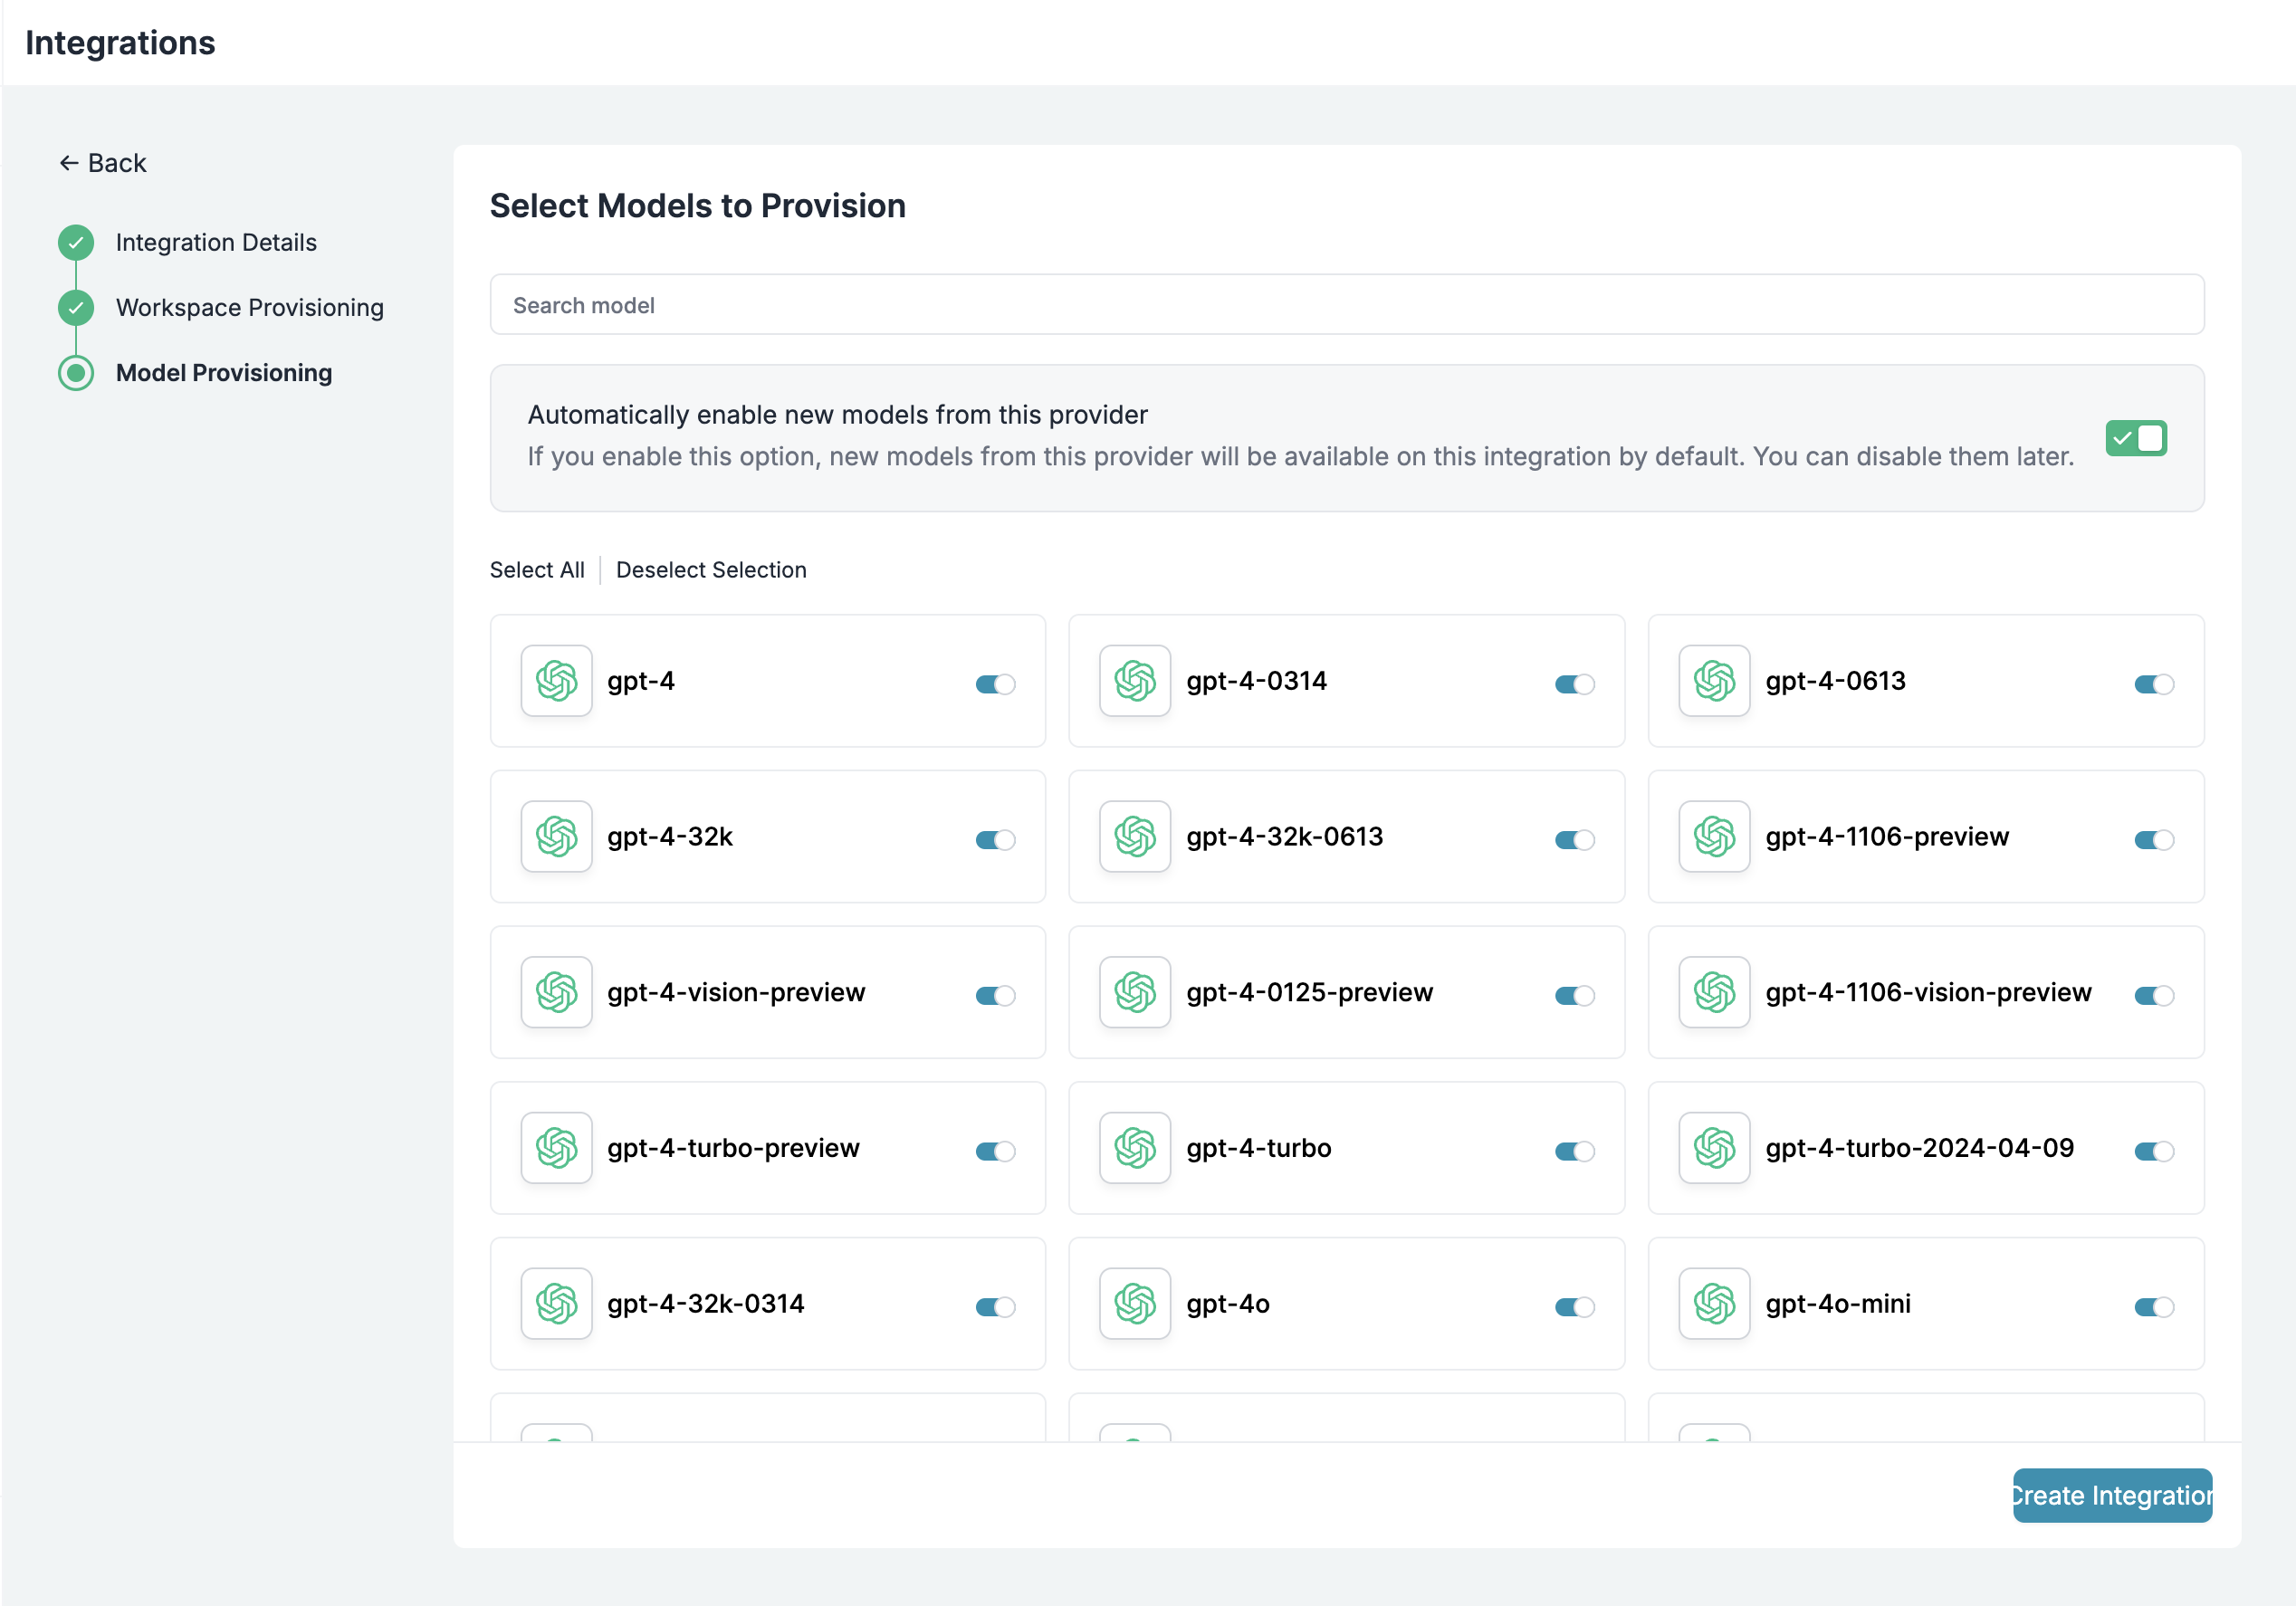
 In your next step you'll see workspace provisioning options. You can select the default "Shared Team Workspace" if this is your first time OR chose your current one.
On the model provisioning page:
* Leave all models selected (or customize)
* Toggle Automatically enable new models if desired
Click **Create Integration** to complete the integration
In your next step you'll see workspace provisioning options. You can select the default "Shared Team Workspace" if this is your first time OR chose your current one.
On the model provisioning page:
* Leave all models selected (or customize)
* Toggle Automatically enable new models if desired
Click **Create Integration** to complete the integration
 Once your Integration is created:
1. Go to [Model Catalog](https://app.portkey.ai/model-catalog) → **Models** tab
2. Find and click on you your model button (if your model is not visible, you need to edit your integration from the last step)
3. Copy the **slug** (e.g., `@openai-dev/gpt-4o`)
We recommend clicking the `Run Test Request` button on this step to verify your integration. If you see the error: `You do not have enough permissions to execute this request`, you’ll need to create a **User API Key** for this step to work properly.
You can create one [here](https://app.portkey.ai/api-keys). You should be able to see simple chat request output on this step.
Once your Integration is created:
1. Go to [Model Catalog](https://app.portkey.ai/model-catalog) → **Models** tab
2. Find and click on you your model button (if your model is not visible, you need to edit your integration from the last step)
3. Copy the **slug** (e.g., `@openai-dev/gpt-4o`)
We recommend clicking the `Run Test Request` button on this step to verify your integration. If you see the error: `You do not have enough permissions to execute this request`, you’ll need to create a **User API Key** for this step to work properly.
You can create one [here](https://app.portkey.ai/api-keys). You should be able to see simple chat request output on this step.
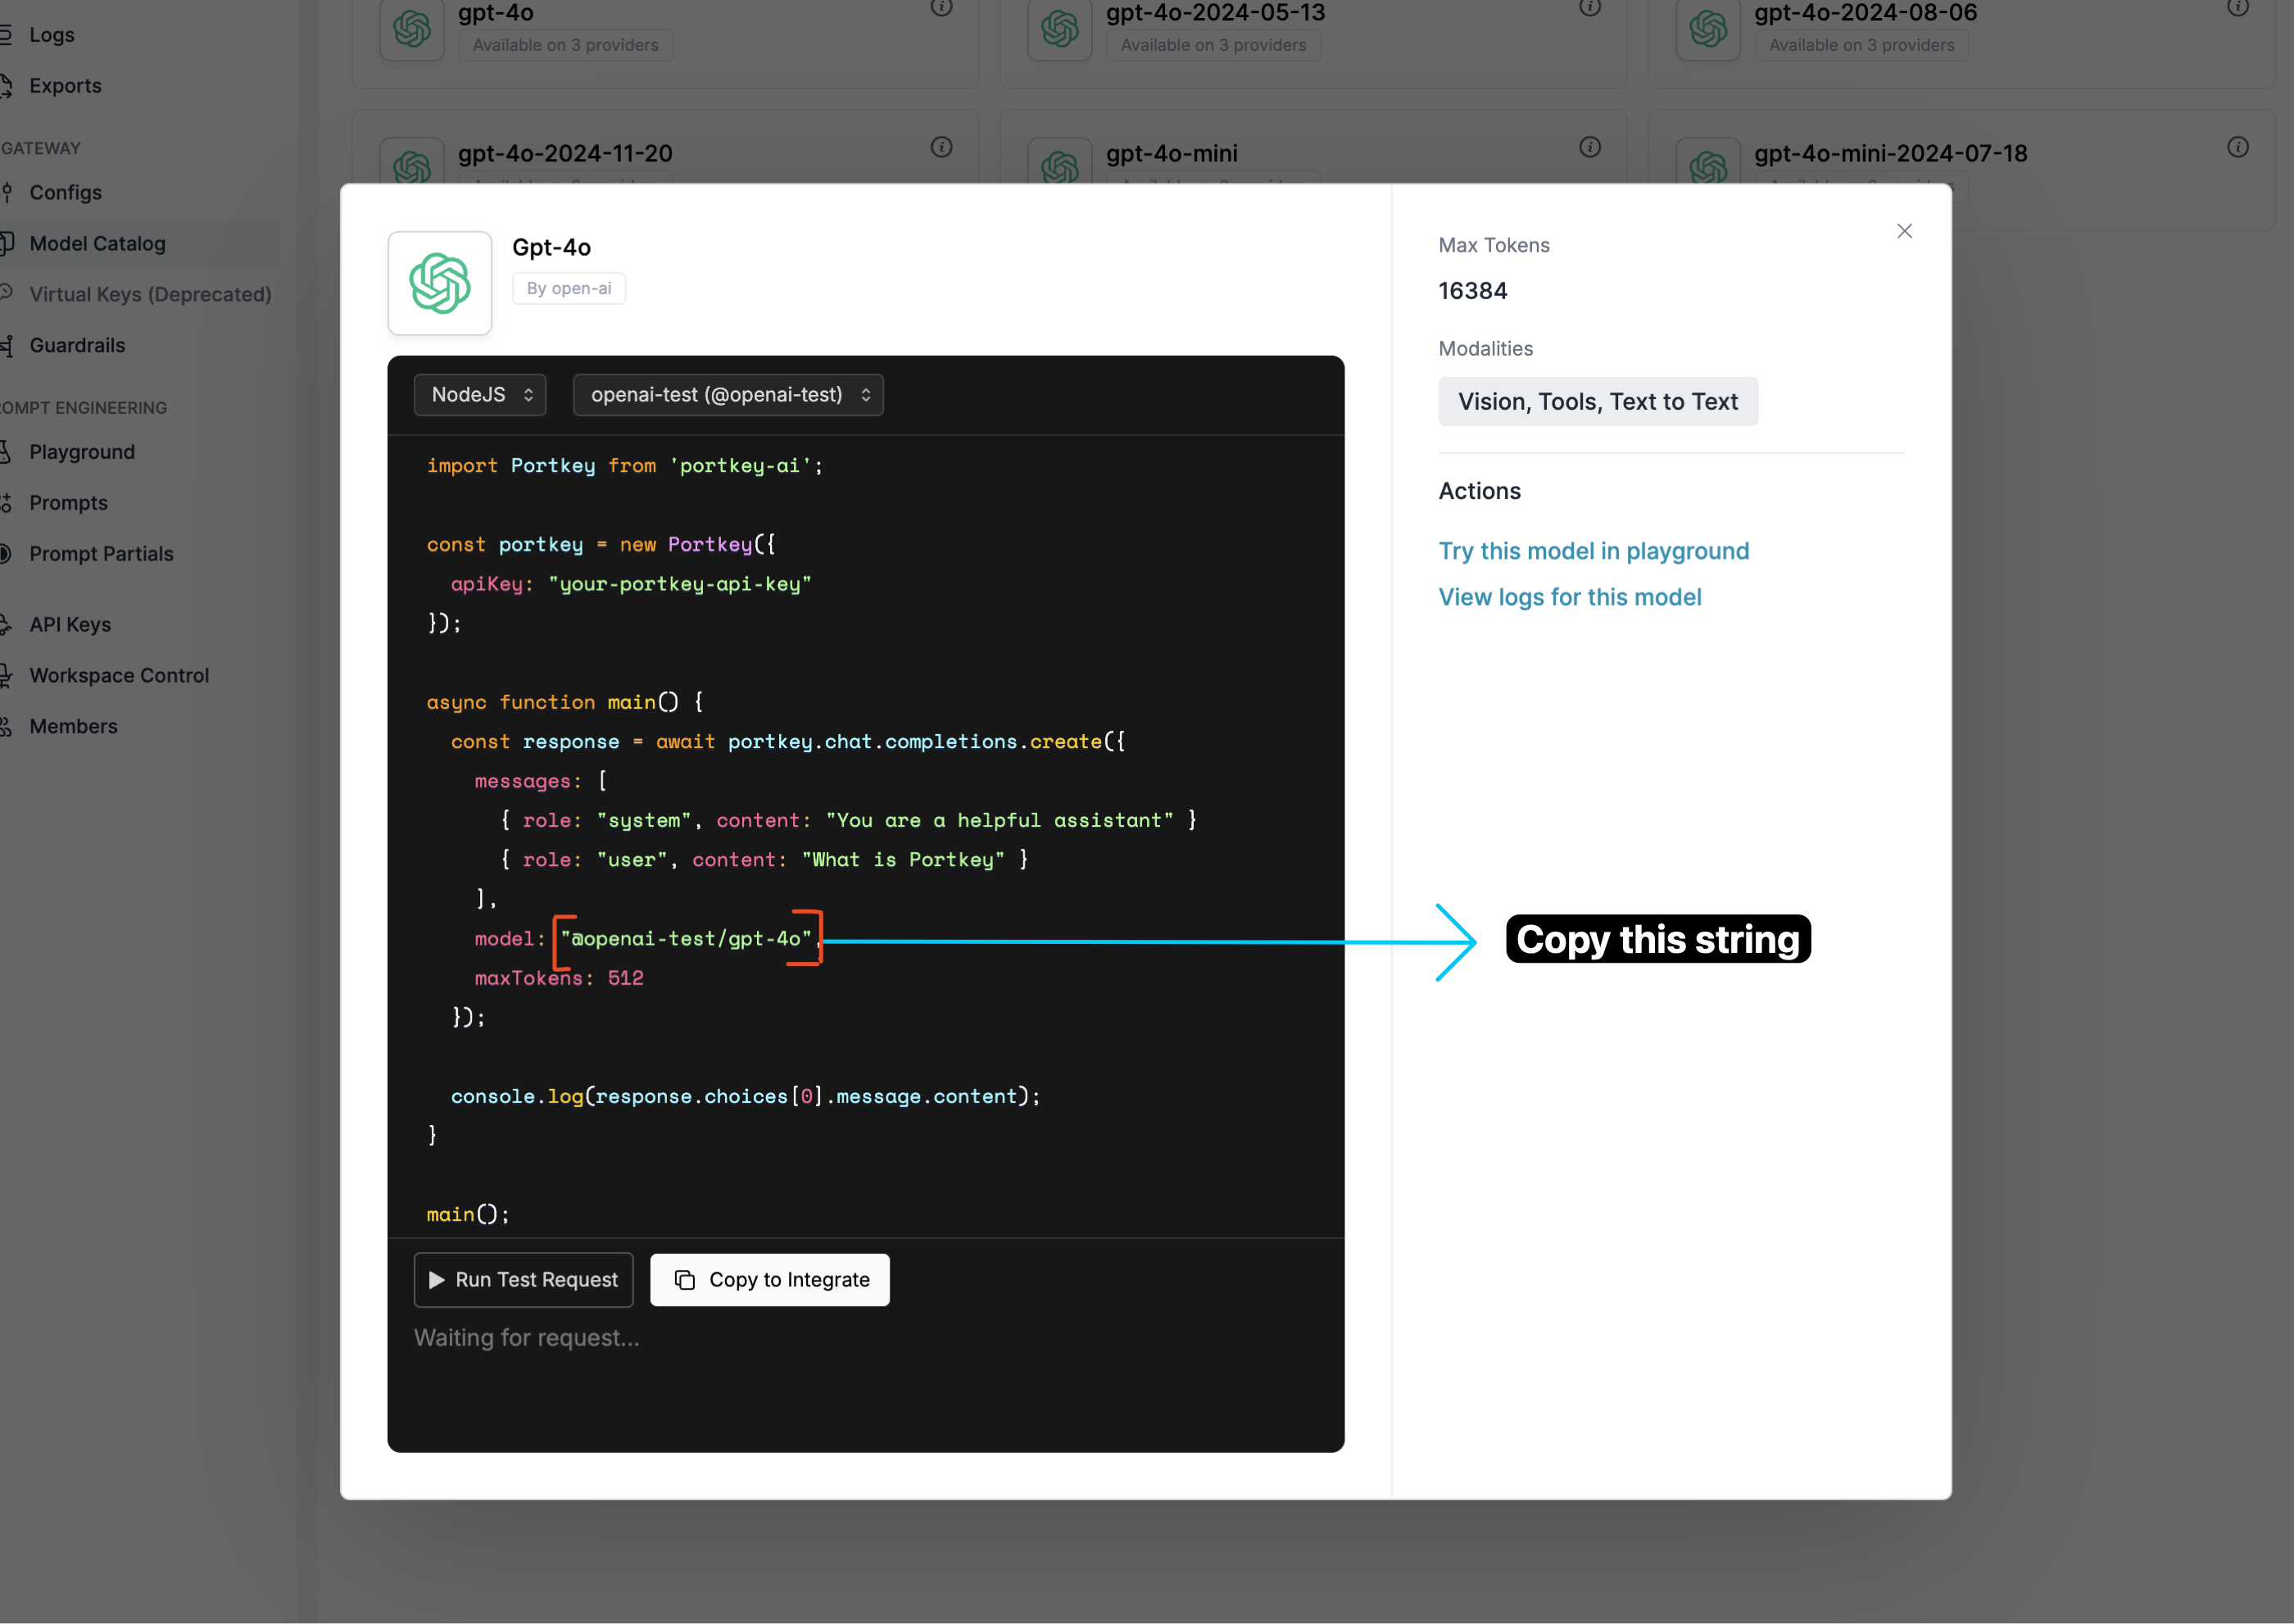 This is your unique identifier - you'll need it for the next step. This slug is basically `@your-provider-slug/your-model-name`
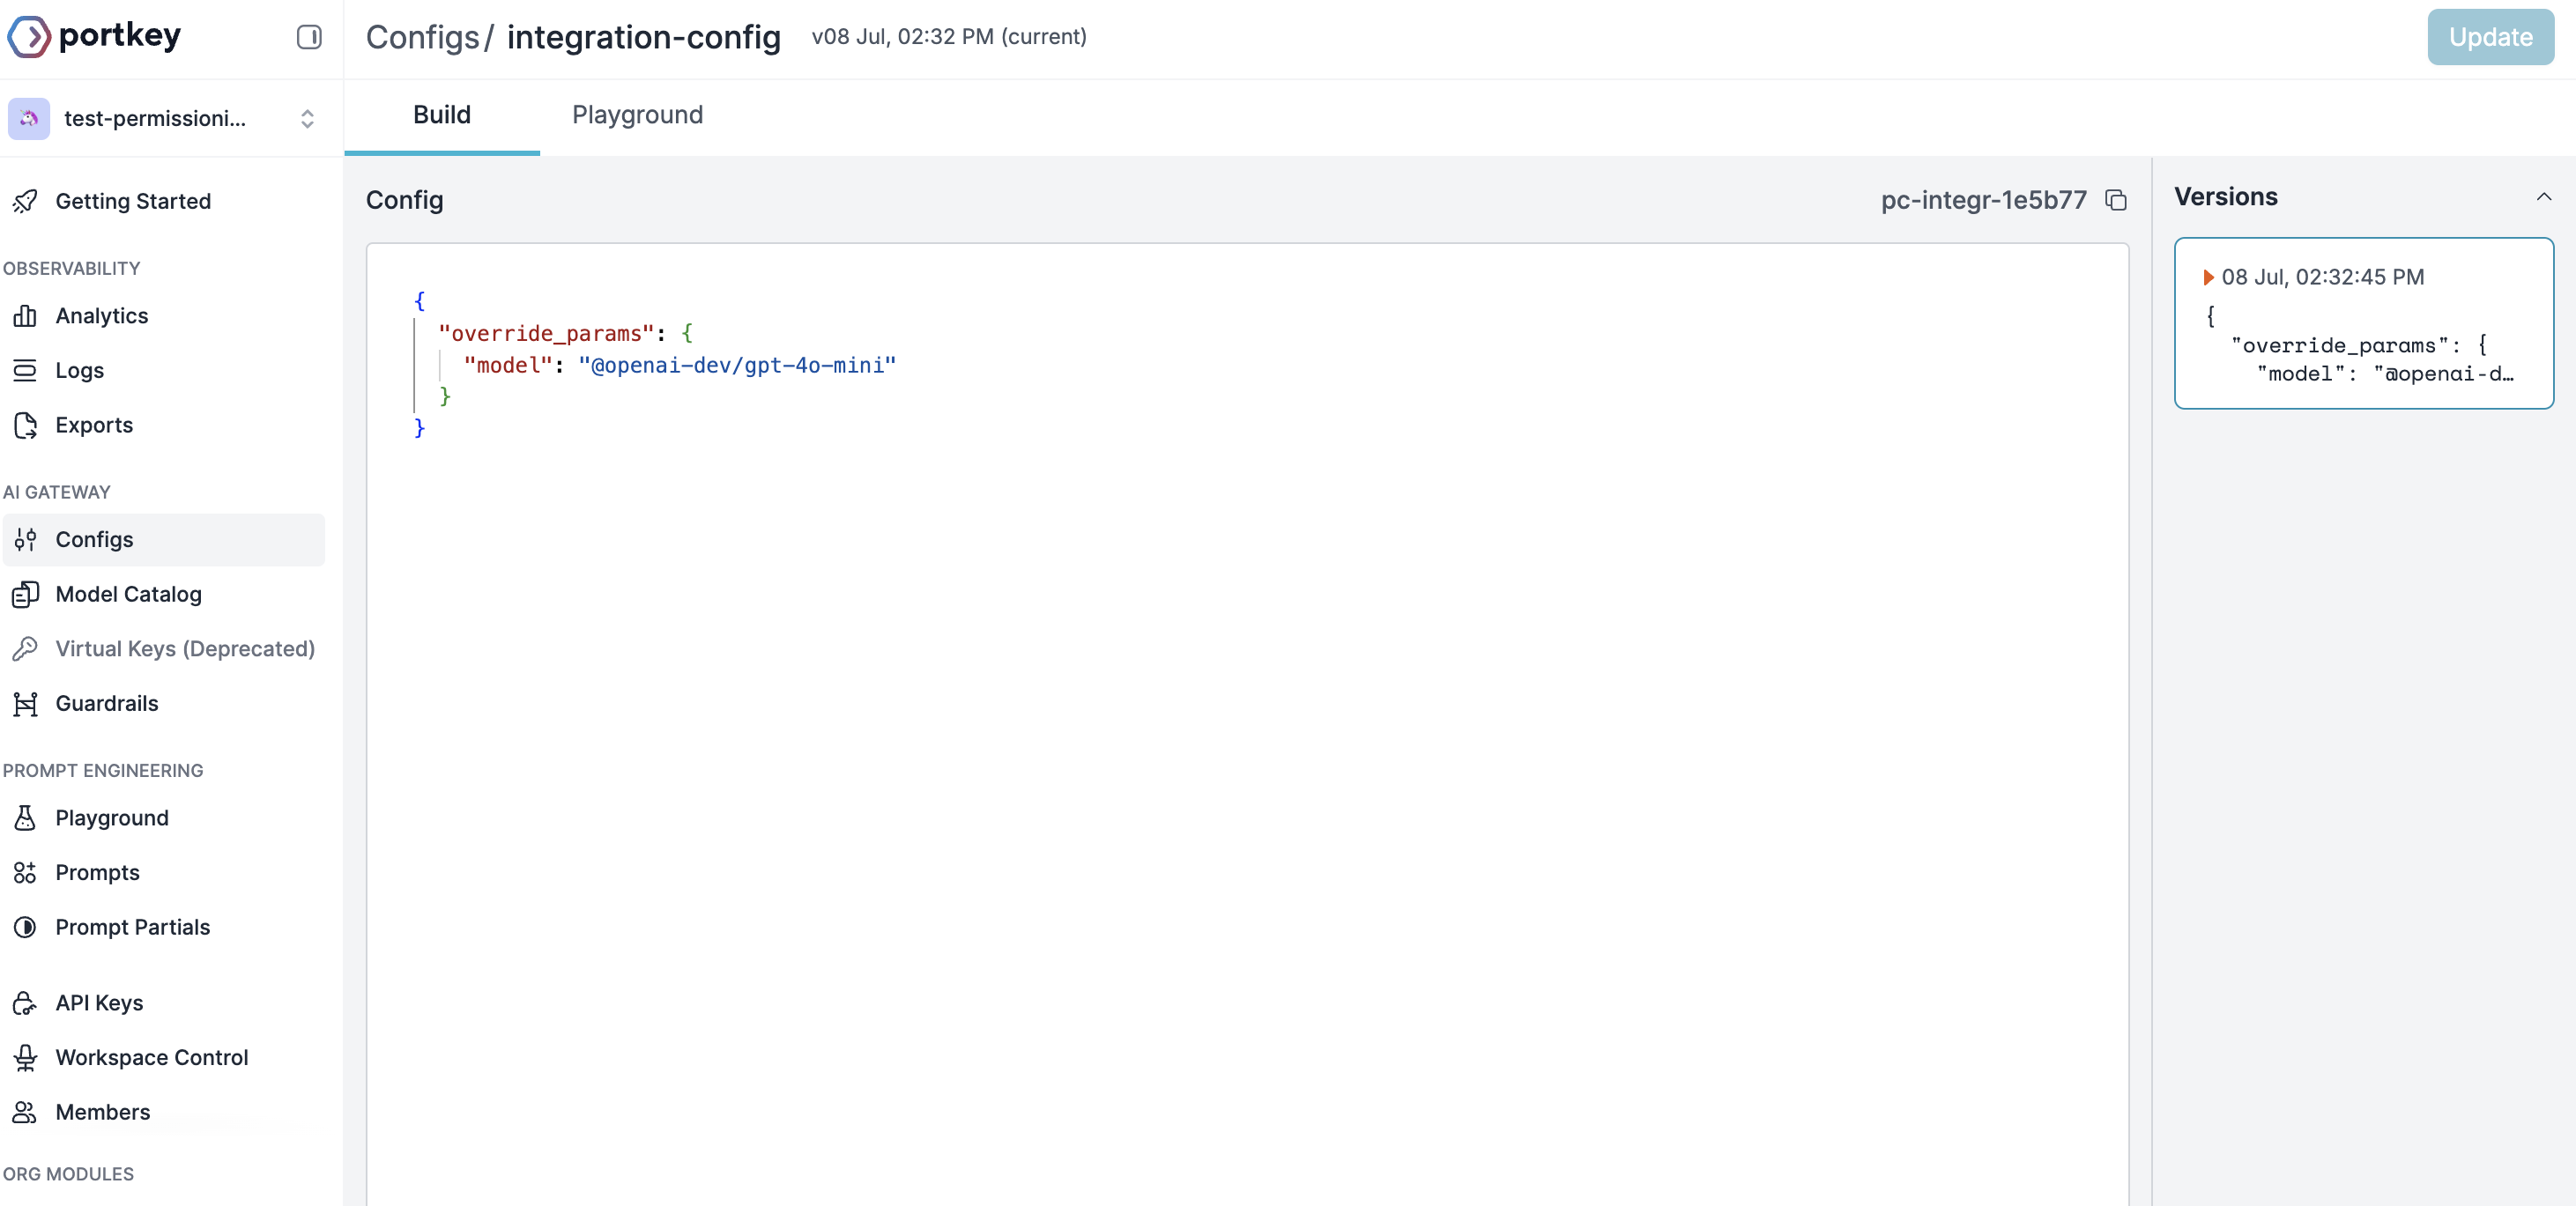
Portkey's [config](/product/ai-gateway/configs) is a JSON object used to define routing rules for requests to your gateway. You can create these configs in the Portkey app and reference them in requests via the config ID. For this setup, we’ll create a simple config using your provider (OpenAI) and model (gpt-4o).
1. Go to [Configs](https://app.portkey.ai/configs) in Portkey dashboard
2. Create new config with:
```json theme={null}
{
"override_params": {
"model": "@YOUR_SLUG-FROM-LAST_STEP" // example: @openai-test/gpt-4o-mini
}
}
```
3. Save and note the Config ID & Name for the next step
This is your unique identifier - you'll need it for the next step. This slug is basically `@your-provider-slug/your-model-name`
Portkey's [config](/product/ai-gateway/configs) is a JSON object used to define routing rules for requests to your gateway. You can create these configs in the Portkey app and reference them in requests via the config ID. For this setup, we’ll create a simple config using your provider (OpenAI) and model (gpt-4o).
1. Go to [Configs](https://app.portkey.ai/configs) in Portkey dashboard
2. Create new config with:
```json theme={null}
{
"override_params": {
"model": "@YOUR_SLUG-FROM-LAST_STEP" // example: @openai-test/gpt-4o-mini
}
}
```
3. Save and note the Config ID & Name for the next step
 Finally, create a Portkey API key:
1. Go to [API Keys](https://app.portkey.ai/api-keys) in Portkey
2. Create new API key
3. Select the config that you create from previous step
4. Generate and save your API key
Finally, create a Portkey API key:
1. Go to [API Keys](https://app.portkey.ai/api-keys) in Portkey
2. Create new API key
3. Select the config that you create from previous step
4. Generate and save your API key
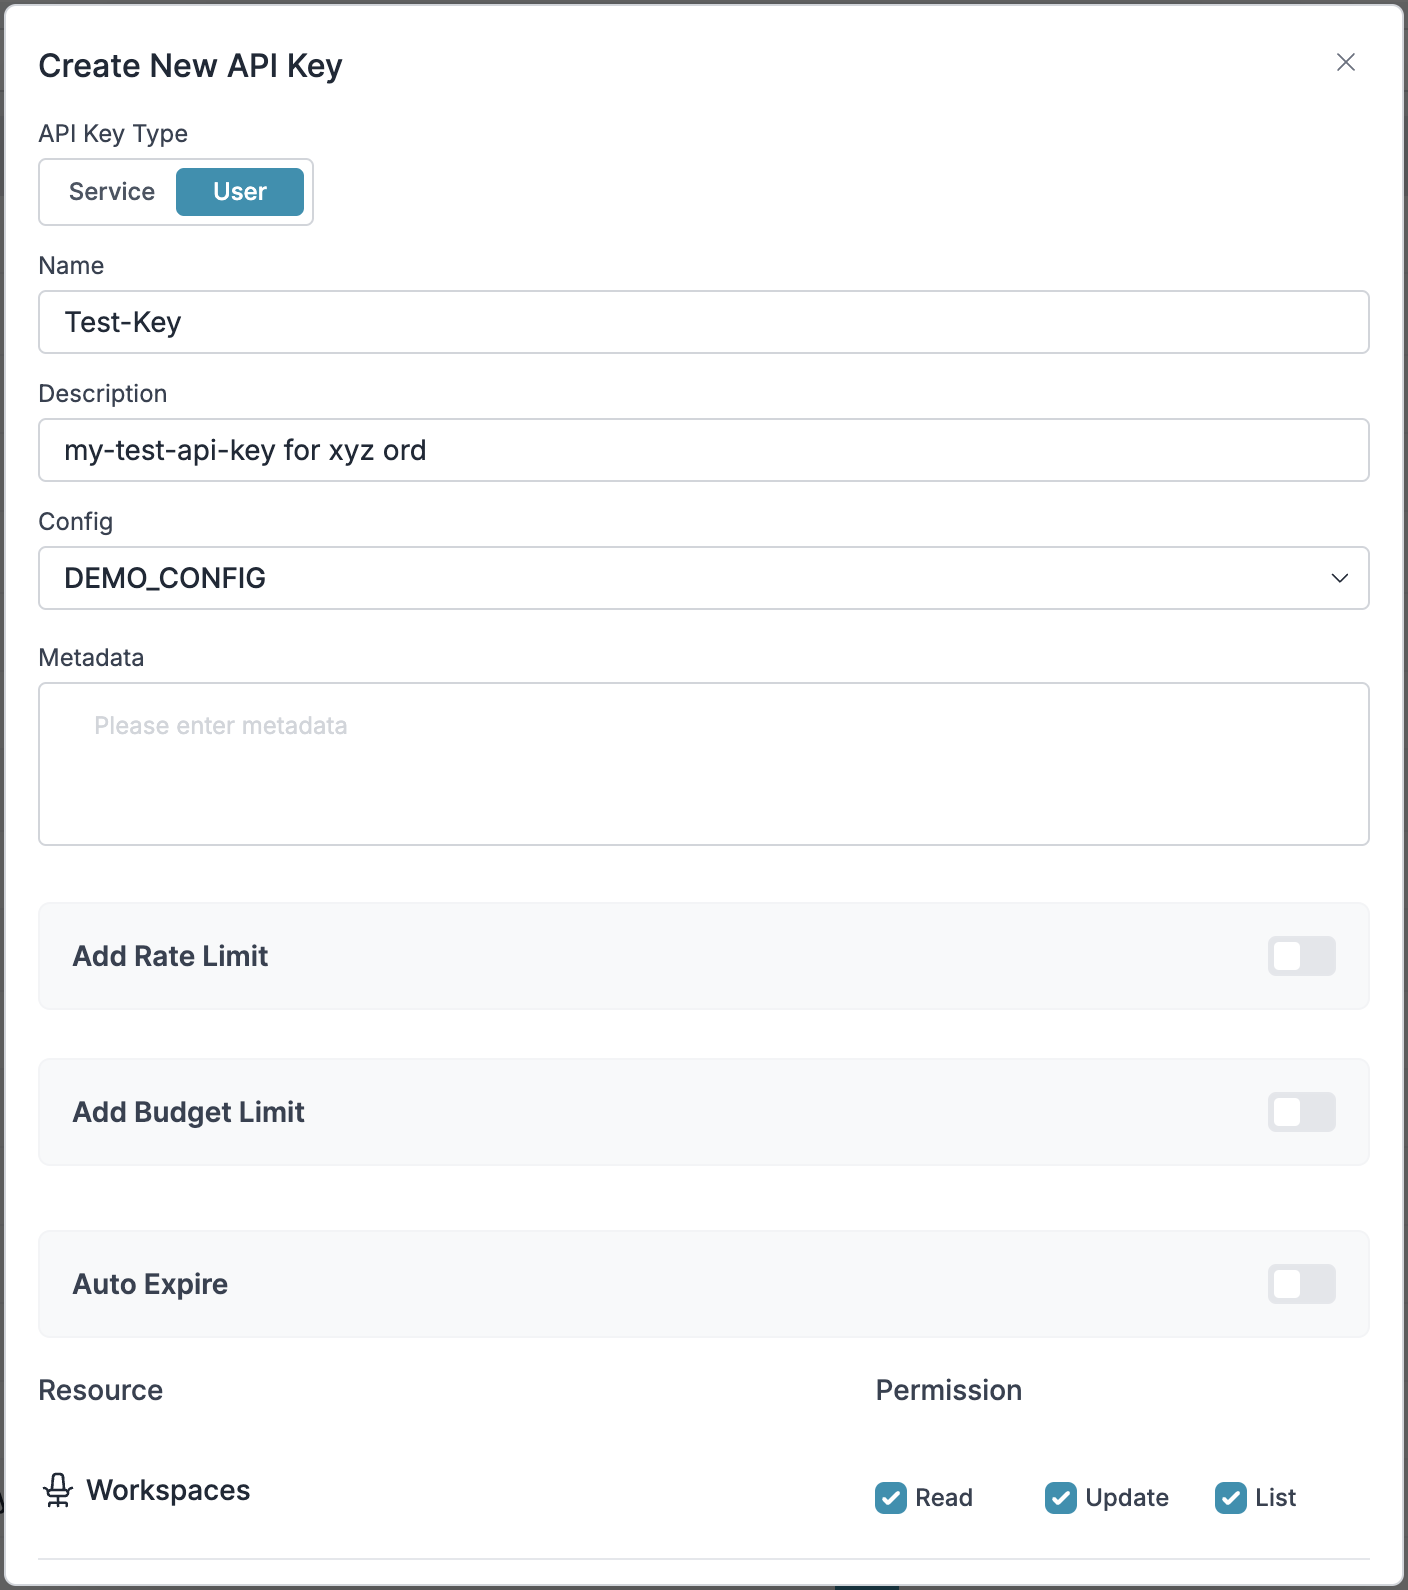 Save your API key securely - you'll need it for n8n integration.
🎉 Voila, Setup complete! You now have everything needed to integrate Portkey with your application.
# 2. Integrating Portkey with Your Project
You can integrate Portkey with any OpenAI API-compatible project through a simple configuration change. This integration enables advanced monitoring, security features, and analytics for your LLM applications. Here's how you do it:
1. **Locate LLM Settings**
Navigate to your project's LLM settings page and find the OpenAI configuration section (usually labeled 'OpenAI-Compatible' or 'Generic OpenAI')."
2. **Configure Base URL**
Set the base URL to:
```
https://api.portkey.ai/v1
```
3. **Add API Key**
Enter your Portkey API key in the appropriate field. You can generate this key from your Portkey dashboard under API Keys section.
4. **Configure Model Settings**
If your integration allows direct model configuration, you can specify it in the LLM settings. Otherwise, create a configuration object:
```json theme={null}
{
"provider":"@",
"override_params": {
"model": "gpt-4o" // Specify your desired model
}
}
```
# 3. Set Up Enterprise Governance for Your Project
**Why Enterprise Governance?**
If you are using Your Project inside your orgnaization, you need to consider several governance aspects:
* **Cost Management**: Controlling and tracking AI spending across teams
* **Access Control**: Managing team access and workspaces
* **Usage Analytics**: Understanding how AI is being used across the organization
* **Security & Compliance**: Maintaining enterprise security standards
* **Reliability**: Ensuring consistent service across all users
* **Model Management**: Managing what models are being used in your setup
Portkey adds a comprehensive governance layer to address these enterprise
**Enterprise Implementation Guide**
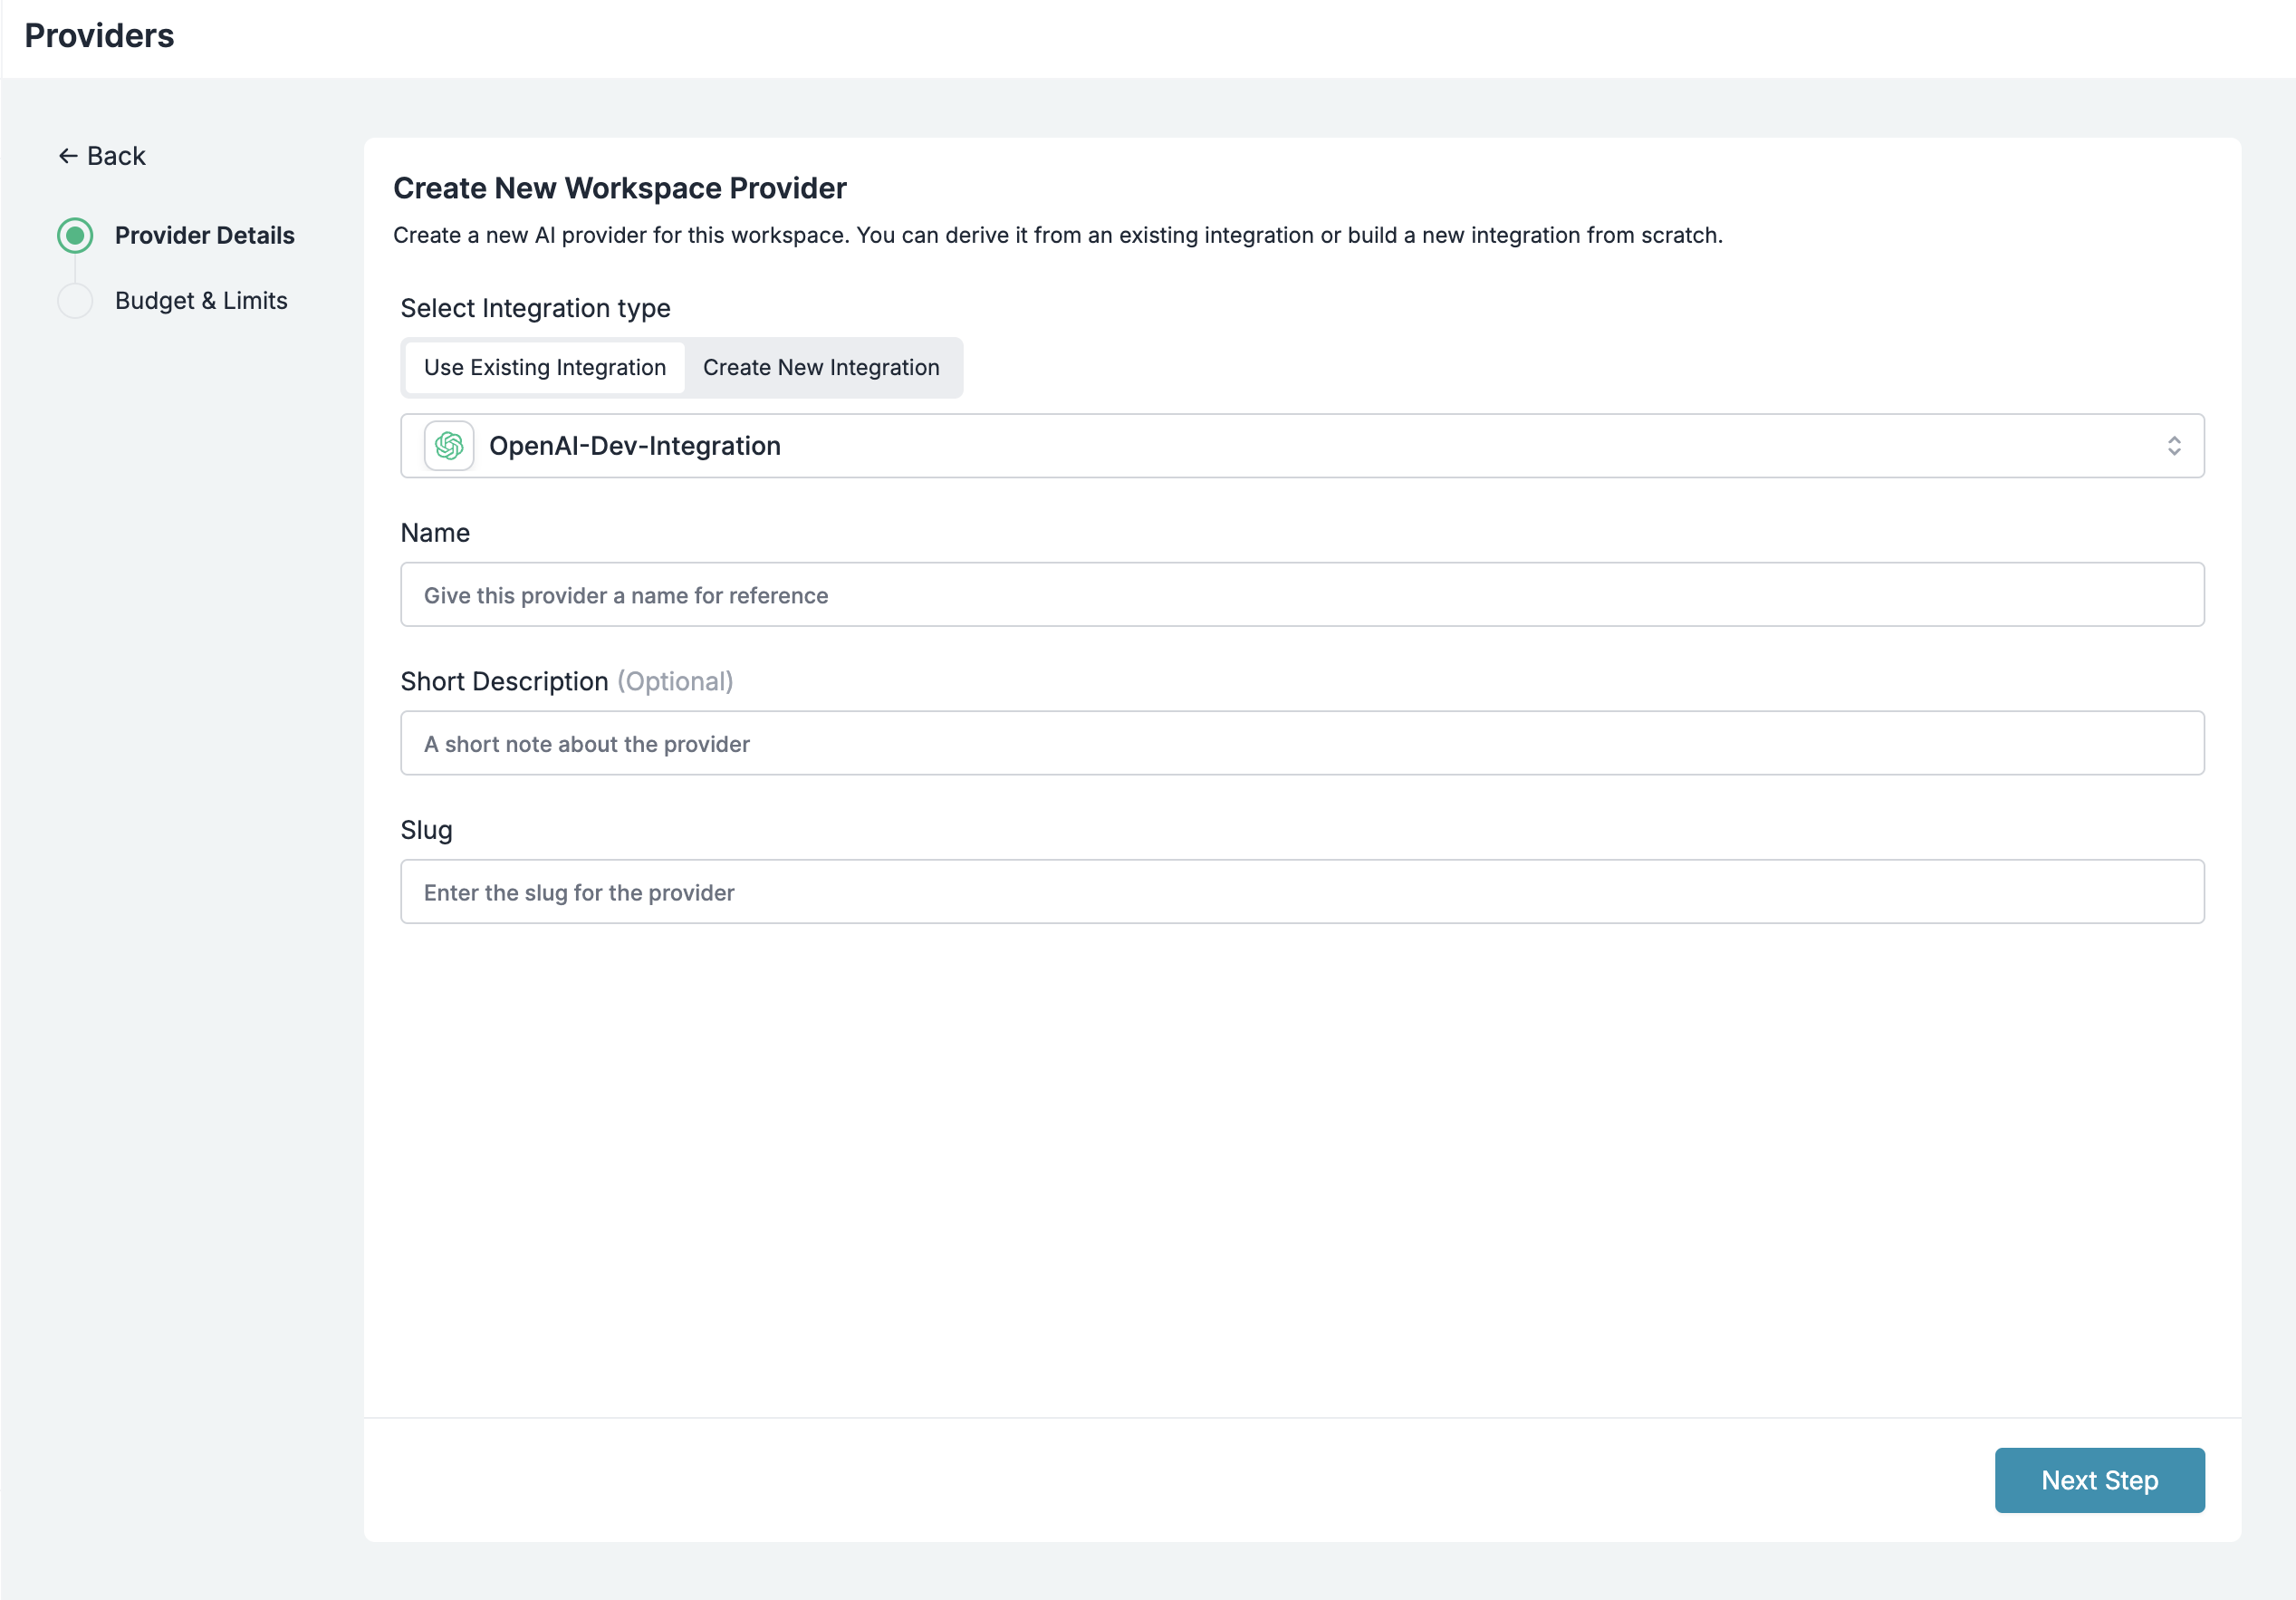
### Step 1: Implement Budget Controls & Rate Limits
Model Catalog enables you to have granular control over LLM access at the team/department level. This helps you:
* Set up [budget limits](/product/ai-gateway/virtual-keys/budget-limits)
* Prevent unexpected usage spikes using Rate limits
* Track departmental spending
#### Setting Up Department-Specific Controls:
1. Navigate to [Model Catalog](https://app.portkey.ai/model-catalog) in Portkey dashboard
2. Create new Provider for each engineering team with budget limits and rate limits
3. Configure department-specific limits
Save your API key securely - you'll need it for n8n integration.
🎉 Voila, Setup complete! You now have everything needed to integrate Portkey with your application.
# 2. Integrating Portkey with Your Project
You can integrate Portkey with any OpenAI API-compatible project through a simple configuration change. This integration enables advanced monitoring, security features, and analytics for your LLM applications. Here's how you do it:
1. **Locate LLM Settings**
Navigate to your project's LLM settings page and find the OpenAI configuration section (usually labeled 'OpenAI-Compatible' or 'Generic OpenAI')."
2. **Configure Base URL**
Set the base URL to:
```
https://api.portkey.ai/v1
```
3. **Add API Key**
Enter your Portkey API key in the appropriate field. You can generate this key from your Portkey dashboard under API Keys section.
4. **Configure Model Settings**
If your integration allows direct model configuration, you can specify it in the LLM settings. Otherwise, create a configuration object:
```json theme={null}
{
"provider":"@",
"override_params": {
"model": "gpt-4o" // Specify your desired model
}
}
```
# 3. Set Up Enterprise Governance for Your Project
**Why Enterprise Governance?**
If you are using Your Project inside your orgnaization, you need to consider several governance aspects:
* **Cost Management**: Controlling and tracking AI spending across teams
* **Access Control**: Managing team access and workspaces
* **Usage Analytics**: Understanding how AI is being used across the organization
* **Security & Compliance**: Maintaining enterprise security standards
* **Reliability**: Ensuring consistent service across all users
* **Model Management**: Managing what models are being used in your setup
Portkey adds a comprehensive governance layer to address these enterprise
**Enterprise Implementation Guide**
### Step 1: Implement Budget Controls & Rate Limits
Model Catalog enables you to have granular control over LLM access at the team/department level. This helps you:
* Set up [budget limits](/product/ai-gateway/virtual-keys/budget-limits)
* Prevent unexpected usage spikes using Rate limits
* Track departmental spending
#### Setting Up Department-Specific Controls:
1. Navigate to [Model Catalog](https://app.portkey.ai/model-catalog) in Portkey dashboard
2. Create new Provider for each engineering team with budget limits and rate limits
3. Configure department-specific limits
 ### Step 2: Define Model Access Rules
As your AI usage scales, controlling which teams can access specific models becomes crucial. You can simply manage AI models in your org by provisioning model at the top integration level.
Portkey allows you to control your routing logic very simply with it's Configs feature. Portkey Configs provide this control layer with things like:
* **Data Protection**: Implement guardrails for sensitive code and data
* **Reliability Controls**: Add fallbacks, load-balance, retry and smart conditional routing logic
* **Caching**: Implement Simple and Semantic Caching. and more....
#### Example Configuration:
Here's a basic configuration to load-balance requests to OpenAI and Anthropic:
```json theme={null}
{
"strategy": {
"mode": "load-balance"
},
"targets": [
{
"override_params": {
"model": "@YOUR_OPENAI_PROVIDER_SLUG/gpt-model"
}
},
{
"override_params": {
"model": "@YOUR_ANTHROPIC_PROVIDER/claude-sonnet-model"
}
}
]
}
```
Create your config on the [Configs page](https://app.portkey.ai/configs) in your Portkey dashboard. You'll need the config ID for connecting to Your Project's setup.
Configs can be updated anytime to adjust controls without affecting running applications.
### Step 3: Implement Access Controls
Create User-specific API keys that automatically:
* Track usage per developer/team with the help of metadata
* Apply appropriate configs to route requests
* Collect relevant metadata to filter logs
* Enforce access permissions
Create API keys through:
* [Portkey App](https://app.portkey.ai/)
* [API Key Management API](/api-reference/admin-api/control-plane/api-keys/create-api-key)
Example using Python SDK:
```python theme={null}
from portkey_ai import Portkey
portkey = Portkey(api_key="YOUR_ADMIN_API_KEY")
api_key = portkey.api_keys.create(
name="frontend-engineering",
type="organisation",
workspace_id="YOUR_WORKSPACE_ID",
defaults={
"config_id": "your-config-id",
"metadata": {
"environment": "development",
"department": "engineering",
"team": "frontend"
}
},
scopes=["logs.view", "configs.read"]
)
```
For detailed key management instructions, see our [API Keys documentation](/api-reference/admin-api/control-plane/api-keys/create-api-key).
### Step 4: Deploy & Monitor
After distributing API keys to your engineering teams, your enterprise-ready Your Project setup is ready to go. Each developer can now use their designated API keys with appropriate access levels and budget controls.
Apply your governance setup using the integration steps from earlier sections
Monitor usage in Portkey dashboard:
* Cost tracking by engineering team
* Model usage patterns for AI agent tasks
* Request volumes
* Error rates and debugging logs
### Enterprise Features Now Available
**Your Project now has:**
* Departmental budget controls
* Model access governance
* Usage tracking & attribution
* Security guardrails
* Reliability features
# Portkey Features
Now that you have set up your enterprise-grade Project environment, let's explore the comprehensive features Portkey provides to ensure secure, efficient, and cost-effective AI operations.
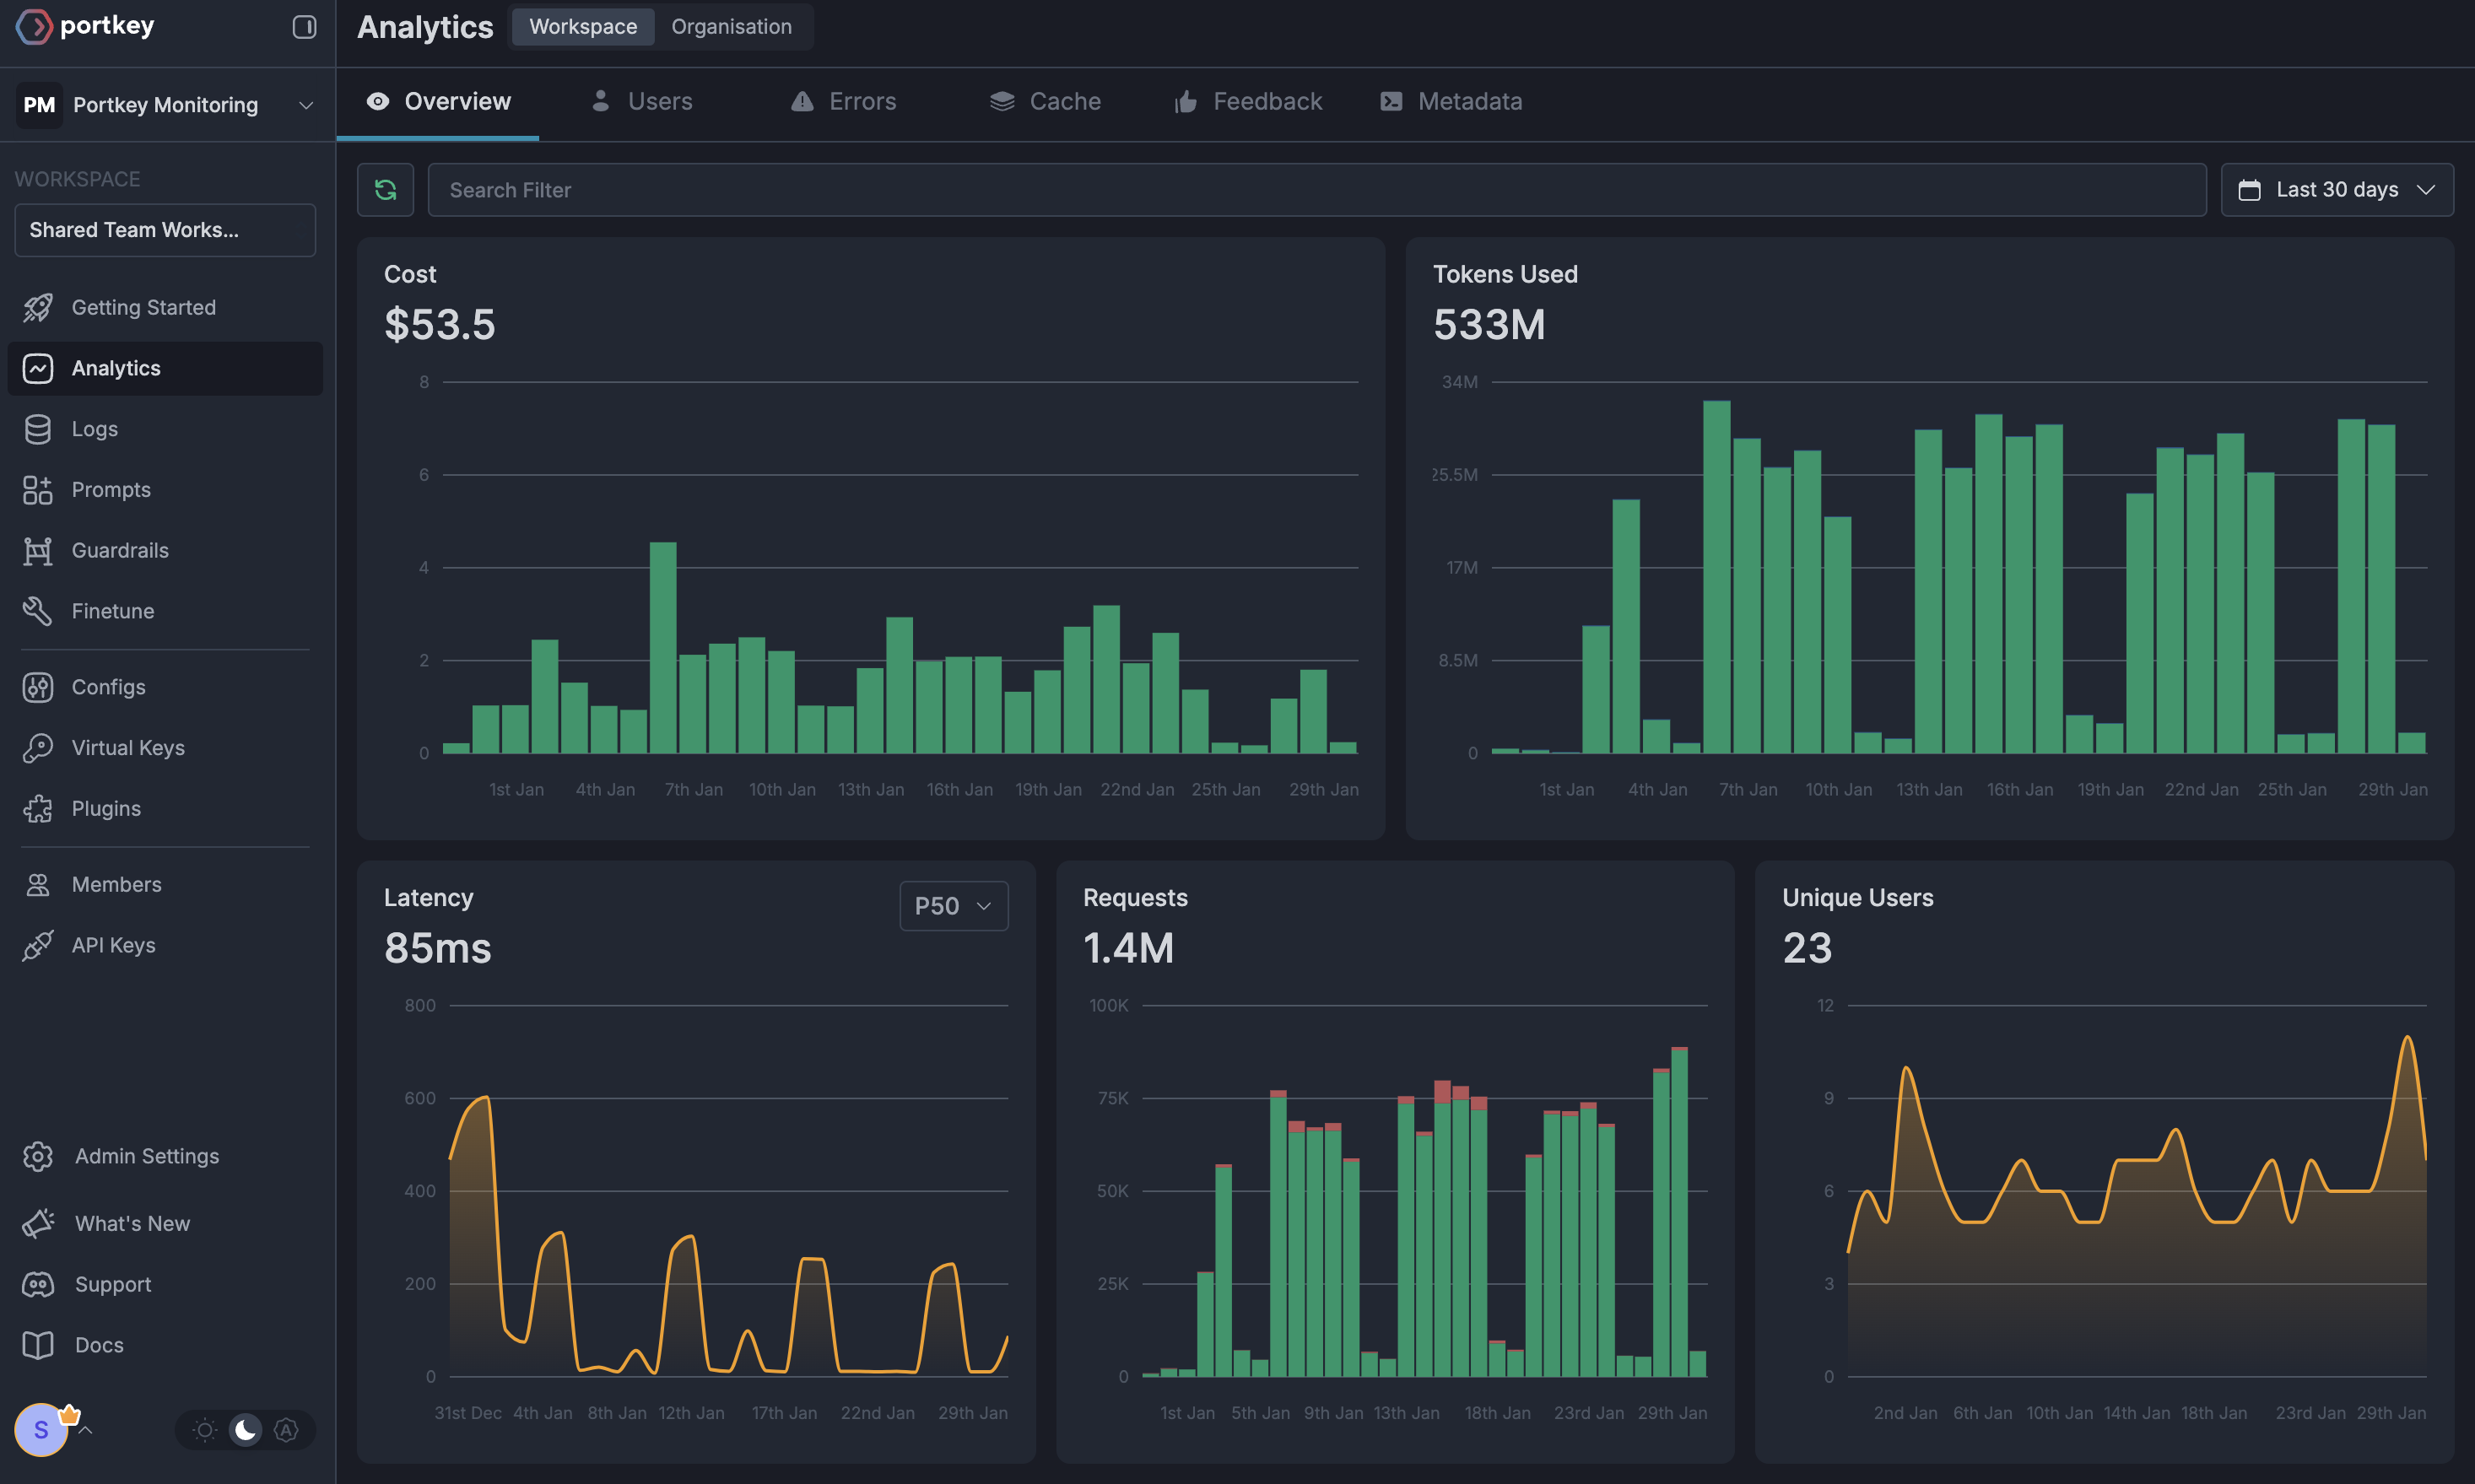
### 1. Comprehensive Metrics
Using Portkey you can track 40+ key metrics including cost, token usage, response time, and performance across all your LLM providers in real time. You can also filter these metrics based on custom metadata that you can set in your configs. Learn more about metadata here.
### Step 2: Define Model Access Rules
As your AI usage scales, controlling which teams can access specific models becomes crucial. You can simply manage AI models in your org by provisioning model at the top integration level.
Portkey allows you to control your routing logic very simply with it's Configs feature. Portkey Configs provide this control layer with things like:
* **Data Protection**: Implement guardrails for sensitive code and data
* **Reliability Controls**: Add fallbacks, load-balance, retry and smart conditional routing logic
* **Caching**: Implement Simple and Semantic Caching. and more....
#### Example Configuration:
Here's a basic configuration to load-balance requests to OpenAI and Anthropic:
```json theme={null}
{
"strategy": {
"mode": "load-balance"
},
"targets": [
{
"override_params": {
"model": "@YOUR_OPENAI_PROVIDER_SLUG/gpt-model"
}
},
{
"override_params": {
"model": "@YOUR_ANTHROPIC_PROVIDER/claude-sonnet-model"
}
}
]
}
```
Create your config on the [Configs page](https://app.portkey.ai/configs) in your Portkey dashboard. You'll need the config ID for connecting to Your Project's setup.
Configs can be updated anytime to adjust controls without affecting running applications.
### Step 3: Implement Access Controls
Create User-specific API keys that automatically:
* Track usage per developer/team with the help of metadata
* Apply appropriate configs to route requests
* Collect relevant metadata to filter logs
* Enforce access permissions
Create API keys through:
* [Portkey App](https://app.portkey.ai/)
* [API Key Management API](/api-reference/admin-api/control-plane/api-keys/create-api-key)
Example using Python SDK:
```python theme={null}
from portkey_ai import Portkey
portkey = Portkey(api_key="YOUR_ADMIN_API_KEY")
api_key = portkey.api_keys.create(
name="frontend-engineering",
type="organisation",
workspace_id="YOUR_WORKSPACE_ID",
defaults={
"config_id": "your-config-id",
"metadata": {
"environment": "development",
"department": "engineering",
"team": "frontend"
}
},
scopes=["logs.view", "configs.read"]
)
```
For detailed key management instructions, see our [API Keys documentation](/api-reference/admin-api/control-plane/api-keys/create-api-key).
### Step 4: Deploy & Monitor
After distributing API keys to your engineering teams, your enterprise-ready Your Project setup is ready to go. Each developer can now use their designated API keys with appropriate access levels and budget controls.
Apply your governance setup using the integration steps from earlier sections
Monitor usage in Portkey dashboard:
* Cost tracking by engineering team
* Model usage patterns for AI agent tasks
* Request volumes
* Error rates and debugging logs
### Enterprise Features Now Available
**Your Project now has:**
* Departmental budget controls
* Model access governance
* Usage tracking & attribution
* Security guardrails
* Reliability features
# Portkey Features
Now that you have set up your enterprise-grade Project environment, let's explore the comprehensive features Portkey provides to ensure secure, efficient, and cost-effective AI operations.
### 1. Comprehensive Metrics
Using Portkey you can track 40+ key metrics including cost, token usage, response time, and performance across all your LLM providers in real time. You can also filter these metrics based on custom metadata that you can set in your configs. Learn more about metadata here.
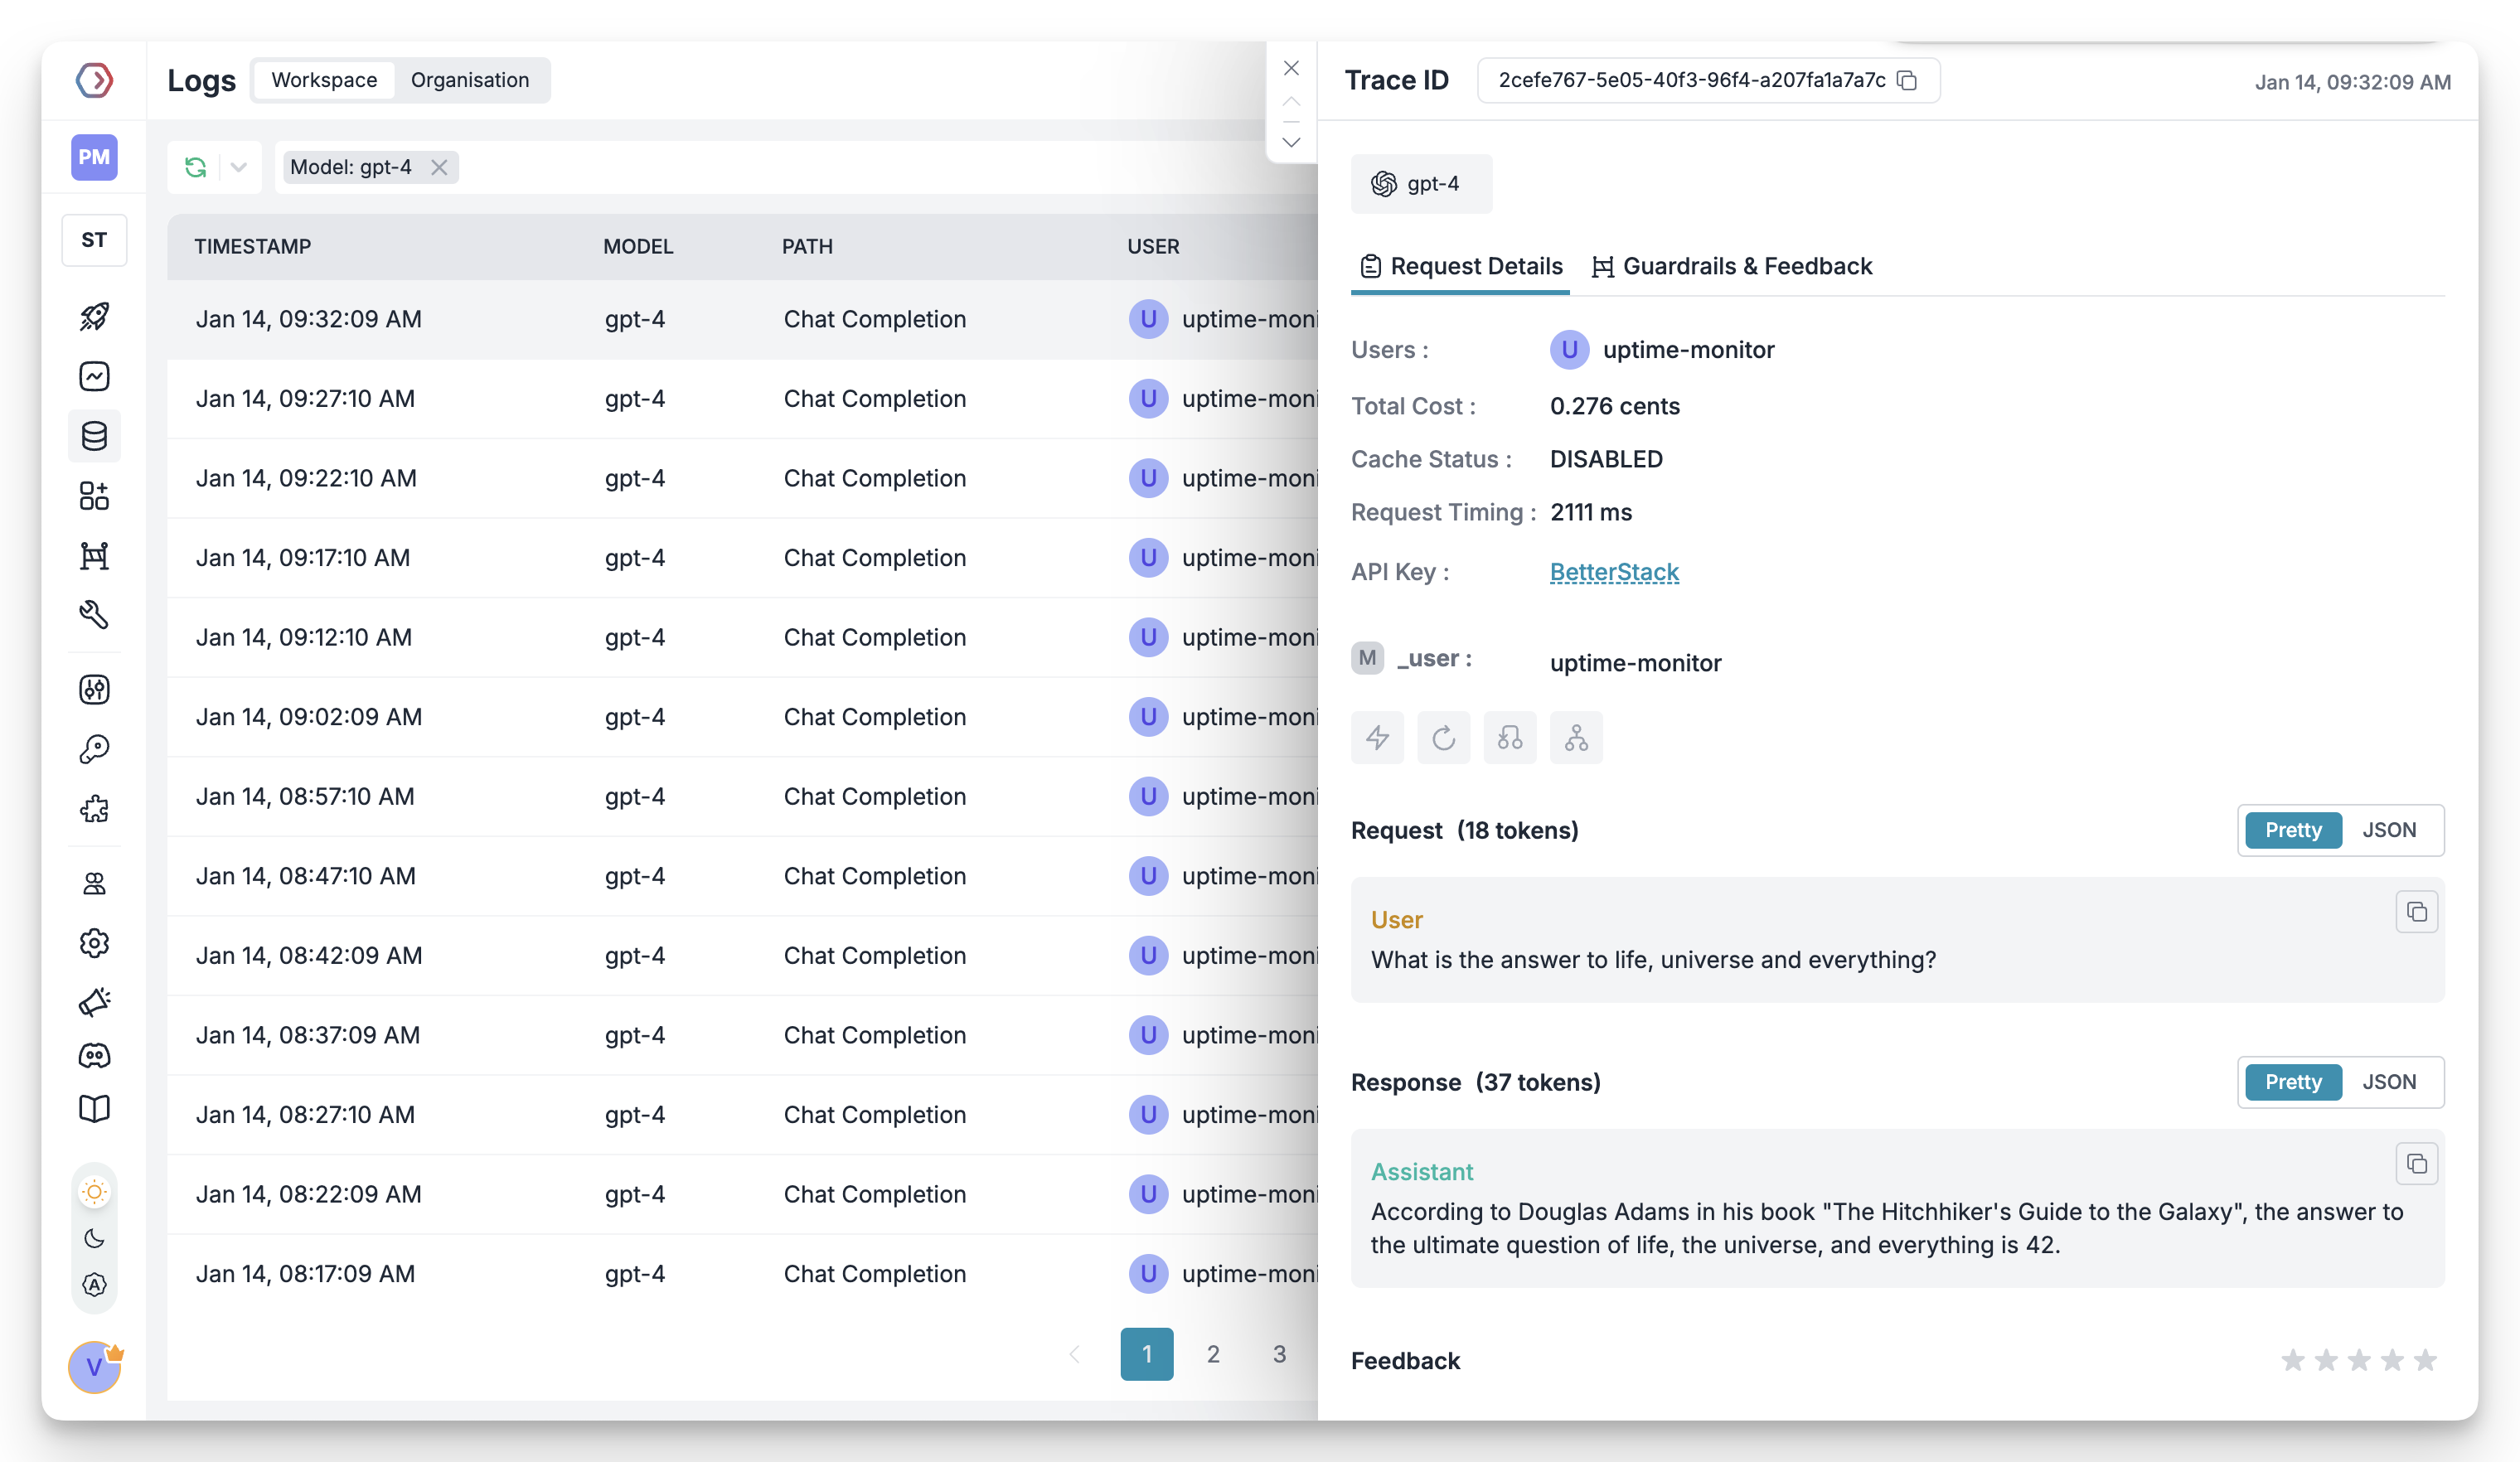
 ### 2. Advanced Logs
Portkey's logging dashboard provides detailed logs for every request made to your LLMs. These logs include:
* Complete request and response tracking
* Metadata tags for filtering
* Cost attribution and much more...
### 2. Advanced Logs
Portkey's logging dashboard provides detailed logs for every request made to your LLMs. These logs include:
* Complete request and response tracking
* Metadata tags for filtering
* Cost attribution and much more...
 ### 3. Unified Access to 250+ LLMs
You can easily switch between 250+ LLMs. Call various LLMs such as Anthropic, Gemini, Mistral, Azure OpenAI, Google Vertex AI, AWS Bedrock, and many more by simply changing the `virtual key` in your default `config` object.
### 4. Advanced Metadata Tracking
Using Portkey, you can add custom metadata to your LLM requests for detailed tracking and analytics. Use metadata tags to filter logs, track usage, and attribute costs across departments and teams.
### 5. Enterprise Access Management
Set and manage spending limits across teams and departments. Control costs with granular budget limits and usage tracking.
Enterprise-grade SSO integration with support for SAML 2.0, Okta, Azure AD, and custom providers for secure authentication.
Hierarchical organization structure with workspaces, teams, and role-based access control for enterprise-scale deployments.
Comprehensive access control rules and detailed audit logging for security compliance and usage tracking.
### 6. Reliability Features
Automatically switch to backup targets if the primary target fails.
Route requests to different targets based on specified conditions.
Distribute requests across multiple targets based on defined weights.
Enable caching of responses to improve performance and reduce costs.
Automatic retry handling with exponential backoff for failed requests
Set and manage budget limits across teams and departments. Control costs with granular budget limits and usage tracking.
### 7. Advanced Guardrails
Protect your Project's data and enhance reliability with real-time checks on LLM inputs and outputs. Leverage guardrails to:
* Prevent sensitive data leaks
* Enforce compliance with organizational policies
* PII detection and masking
* Content filtering
* Custom security rules
* Data compliance checks
Implement real-time protection for your LLM interactions with automatic detection and filtering of sensitive content, PII, and custom security rules. Enable comprehensive data protection while maintaining compliance with organizational policies.
# FAQs
You can update your Virtual Key limits at any time from the Portkey dashboard:1. Go to Virtual Keys section2. Click on the Virtual Key you want to modify3. Update the budget or rate limits4. Save your changes
Yes! You can create multiple Virtual Keys (one for each provider) and attach them to a single config. This config can then be connected to your API key, allowing you to use multiple providers through a single API key.
Portkey provides several ways to track team costs:
* Create separate Virtual Keys for each team
* Use metadata tags in your configs
* Set up team-specific API keys
* Monitor usage in the analytics dashboard
When a team reaches their budget limit:
1. Further requests will be blocked
2. Team admins receive notifications
3. Usage statistics remain available in dashboard
4. Limits can be adjusted if needed
# Next Steps
**Join our Community**
* [Discord Community](https://portkey.sh/discord-report)
* [GitHub Repository](https://github.com/Portkey-AI)
For enterprise support and custom features, contact our [enterprise team](https://portkey.sh/chat-ui-docs).
### 3. Unified Access to 250+ LLMs
You can easily switch between 250+ LLMs. Call various LLMs such as Anthropic, Gemini, Mistral, Azure OpenAI, Google Vertex AI, AWS Bedrock, and many more by simply changing the `virtual key` in your default `config` object.
### 4. Advanced Metadata Tracking
Using Portkey, you can add custom metadata to your LLM requests for detailed tracking and analytics. Use metadata tags to filter logs, track usage, and attribute costs across departments and teams.
### 5. Enterprise Access Management
Set and manage spending limits across teams and departments. Control costs with granular budget limits and usage tracking.
Enterprise-grade SSO integration with support for SAML 2.0, Okta, Azure AD, and custom providers for secure authentication.
Hierarchical organization structure with workspaces, teams, and role-based access control for enterprise-scale deployments.
Comprehensive access control rules and detailed audit logging for security compliance and usage tracking.
### 6. Reliability Features
Automatically switch to backup targets if the primary target fails.
Route requests to different targets based on specified conditions.
Distribute requests across multiple targets based on defined weights.
Enable caching of responses to improve performance and reduce costs.
Automatic retry handling with exponential backoff for failed requests
Set and manage budget limits across teams and departments. Control costs with granular budget limits and usage tracking.
### 7. Advanced Guardrails
Protect your Project's data and enhance reliability with real-time checks on LLM inputs and outputs. Leverage guardrails to:
* Prevent sensitive data leaks
* Enforce compliance with organizational policies
* PII detection and masking
* Content filtering
* Custom security rules
* Data compliance checks
Implement real-time protection for your LLM interactions with automatic detection and filtering of sensitive content, PII, and custom security rules. Enable comprehensive data protection while maintaining compliance with organizational policies.
# FAQs
You can update your Virtual Key limits at any time from the Portkey dashboard:1. Go to Virtual Keys section2. Click on the Virtual Key you want to modify3. Update the budget or rate limits4. Save your changes
Yes! You can create multiple Virtual Keys (one for each provider) and attach them to a single config. This config can then be connected to your API key, allowing you to use multiple providers through a single API key.
Portkey provides several ways to track team costs:
* Create separate Virtual Keys for each team
* Use metadata tags in your configs
* Set up team-specific API keys
* Monitor usage in the analytics dashboard
When a team reaches their budget limit:
1. Further requests will be blocked
2. Team admins receive notifications
3. Usage statistics remain available in dashboard
4. Limits can be adjusted if needed
# Next Steps
**Join our Community**
* [Discord Community](https://portkey.sh/discord-report)
* [GitHub Repository](https://github.com/Portkey-AI)
For enterprise support and custom features, contact our [enterprise team](https://portkey.sh/chat-ui-docs).