> ## Documentation Index
> Fetch the complete documentation index at: https://portkey-docs-mintlify-add-terraform-provider-docs-72855.mintlify.site/llms.txt
> Use this file to discover all available pages before exploring further.
# Azure AI Foundry
> Learn how to integrate Azure AI Foundry with Portkey to access a wide range of AI models with enhanced observability and reliability features.
Azure AI Foundry provides a unified platform for enterprise AI operations, model building, and application development. With Portkey, you can seamlessly integrate with various models available on Azure AI Foundry and take advantage of features like observability, prompt management, fallbacks, and more.
## Understanding Azure AI Foundry Deployments
Azure AI Foundry offers three different ways to deploy models, each with unique endpoints and configurations:
1. **AI Services**: Azure-managed models accessed through Azure AI Services endpoints
2. **Managed**: User-managed deployments running on dedicated Azure compute resources
3. **Serverless**: Seamless, scalable deployment without managing infrastructure
You can learn more about the Azure AI Foundry deployment [here](https://learn.microsoft.com/en-us/azure/ai-foundry/concepts/deployments-overview).
If you're specifically looking to use OpenAI models on Azure, you should use [Azure OpenAI](/integrations/llms/azure-openai) instead, which is optimized for OpenAI models.
If you are looking to use Anthropic Models on Azure. Check this.
## Integrate
To integrate Azure AI Foundry with Portkey, you'll need to create a virtual key. Integrations securely store your Azure AI Foundry credentials in Portkey's vault, allowing you to use a simple identifier in your code instead of handling sensitive authentication details directly.
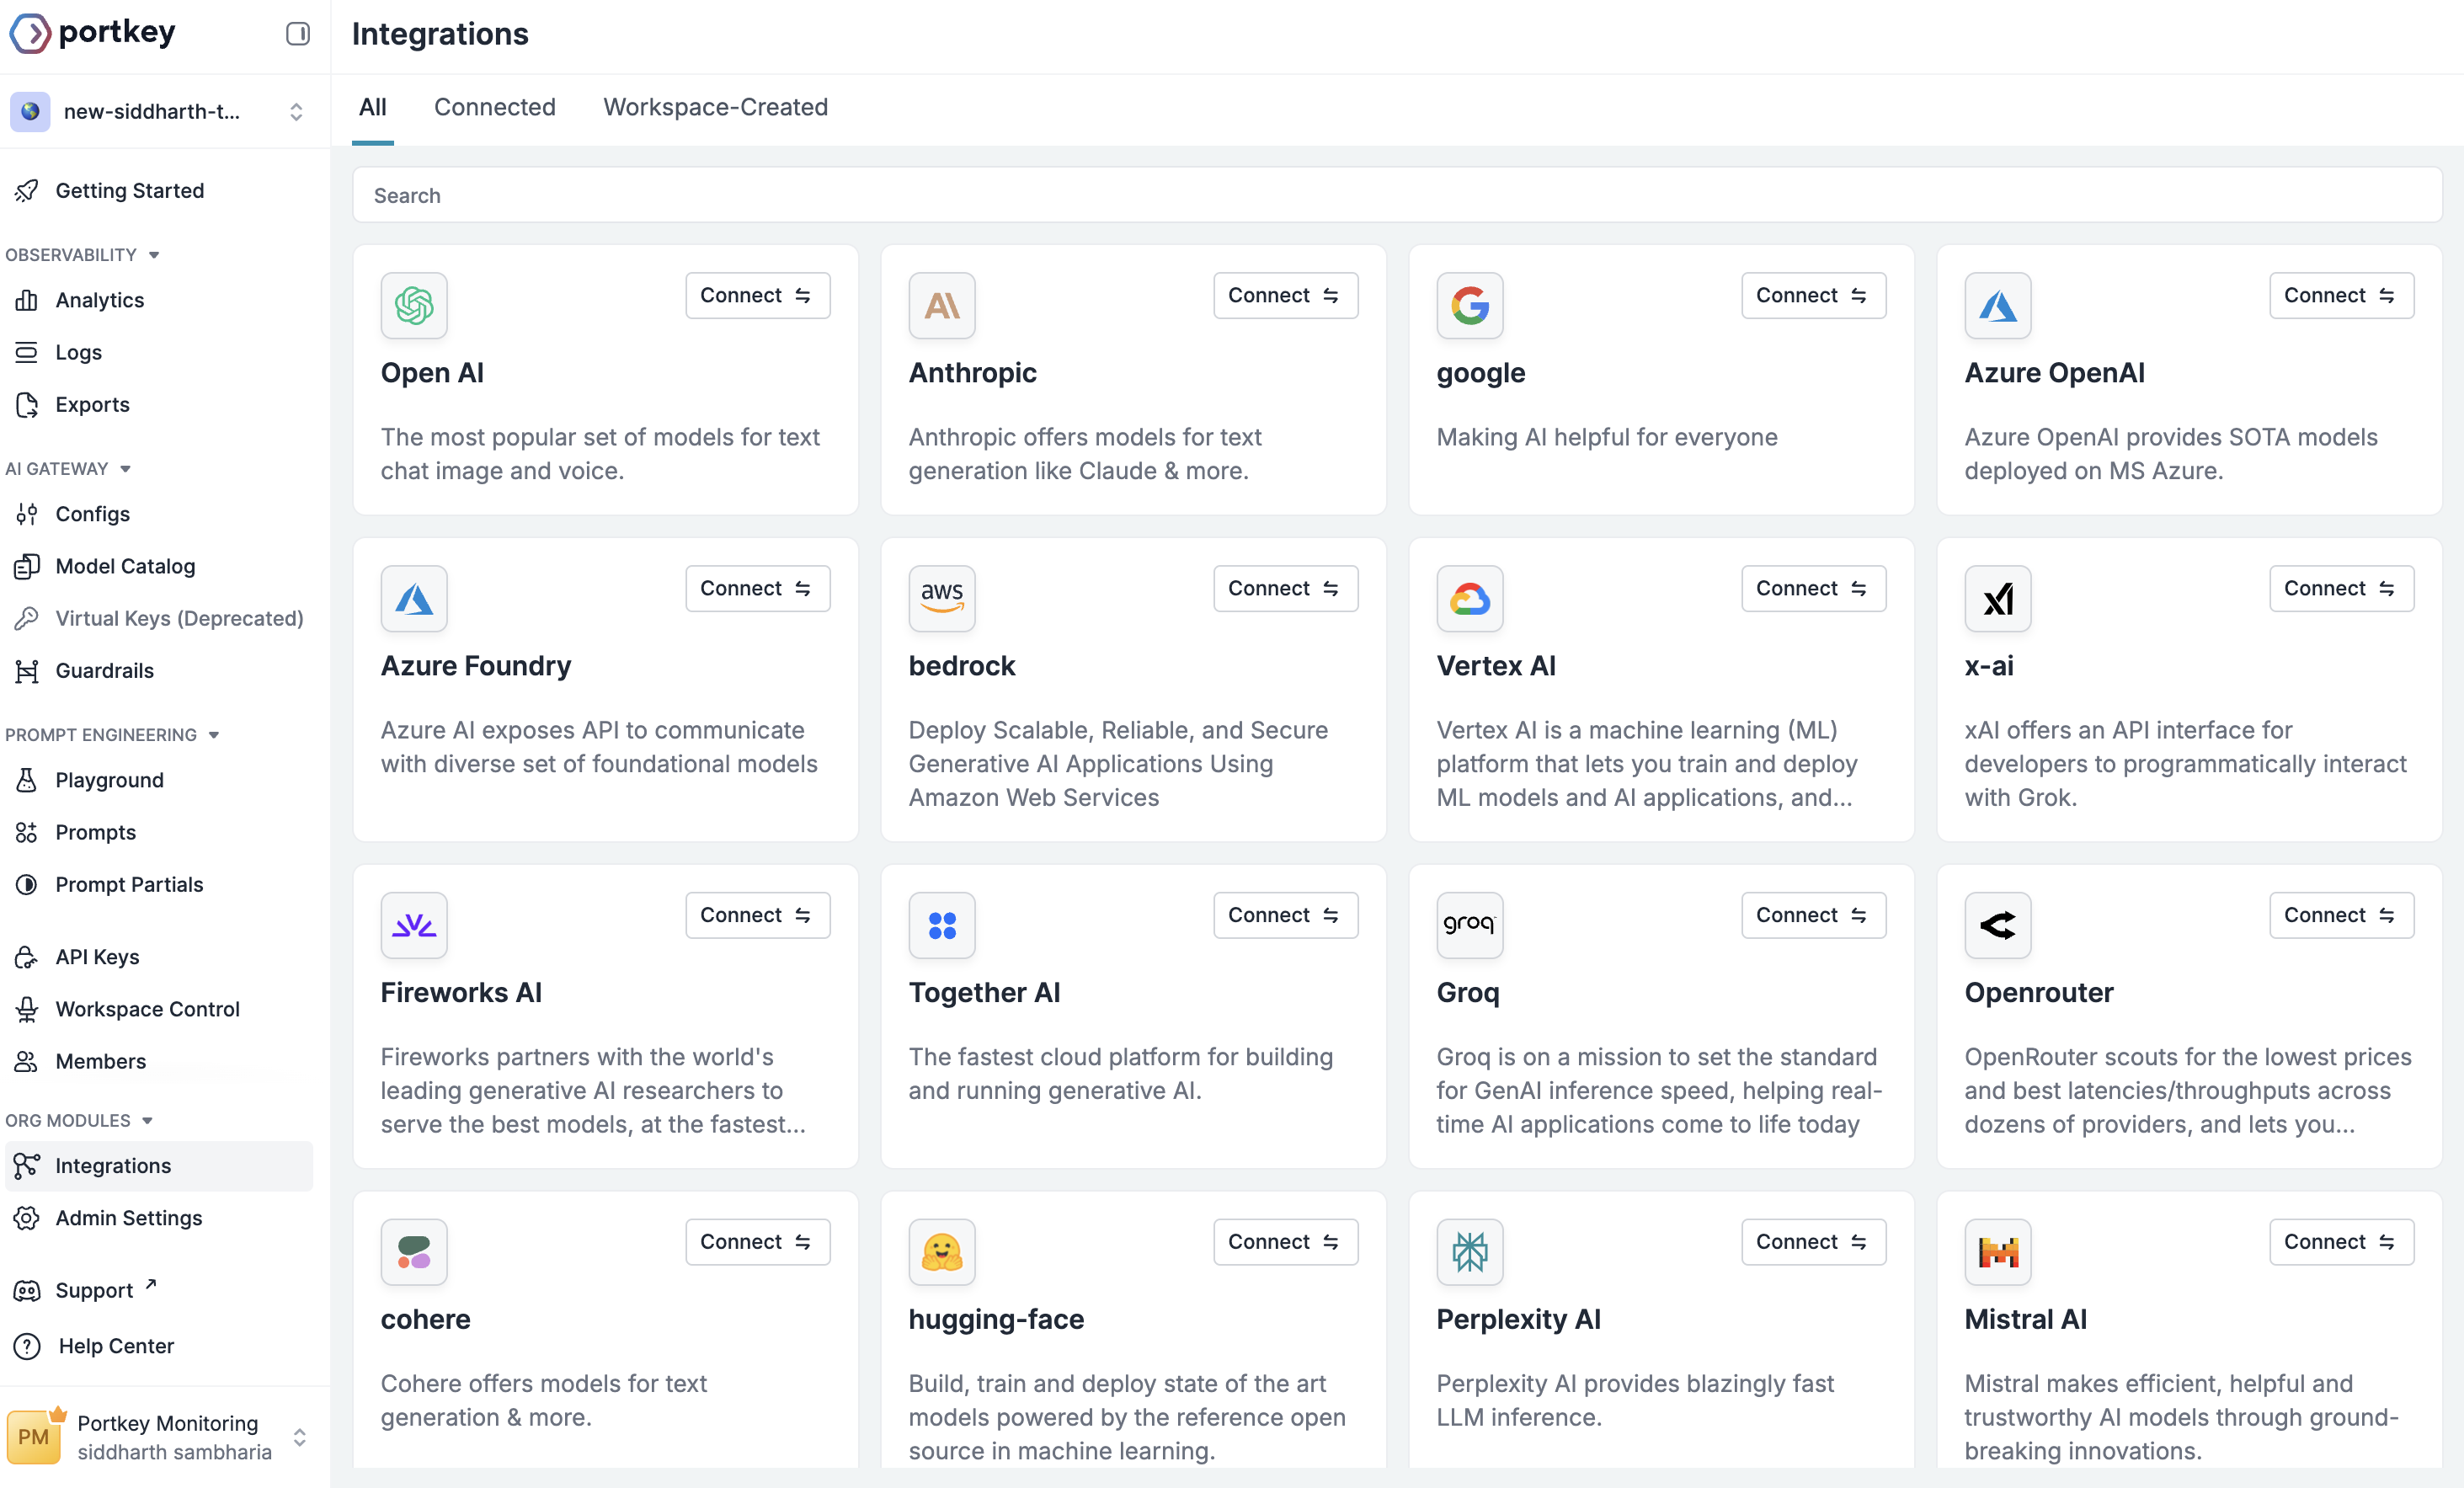
Navigate to the [Inteagrations](https://app.portkey.ai/integrations) section in Portkey and select "Azure AI Foundry" as your provider.
## Creating Your Azure AI Foundry Integration
Integrate Azure AI Foundry with Portkey to centrally manage your AI models and deployments. This guide walks you through setting up the integration using API key authentication.
### Prerequisites
Before creating your integration, you'll need:
* An active Azure AI Foundry account
* Access to your Azure AI Foundry portal
* A deployed model on Azure Foundry
### Step 1: Start Creating Your Integration
Navigate to the Integrations page in your Portkey dashboard and Select **Azure AI Foundry** as your provider.
 ### Step 2: Configure Integration Details
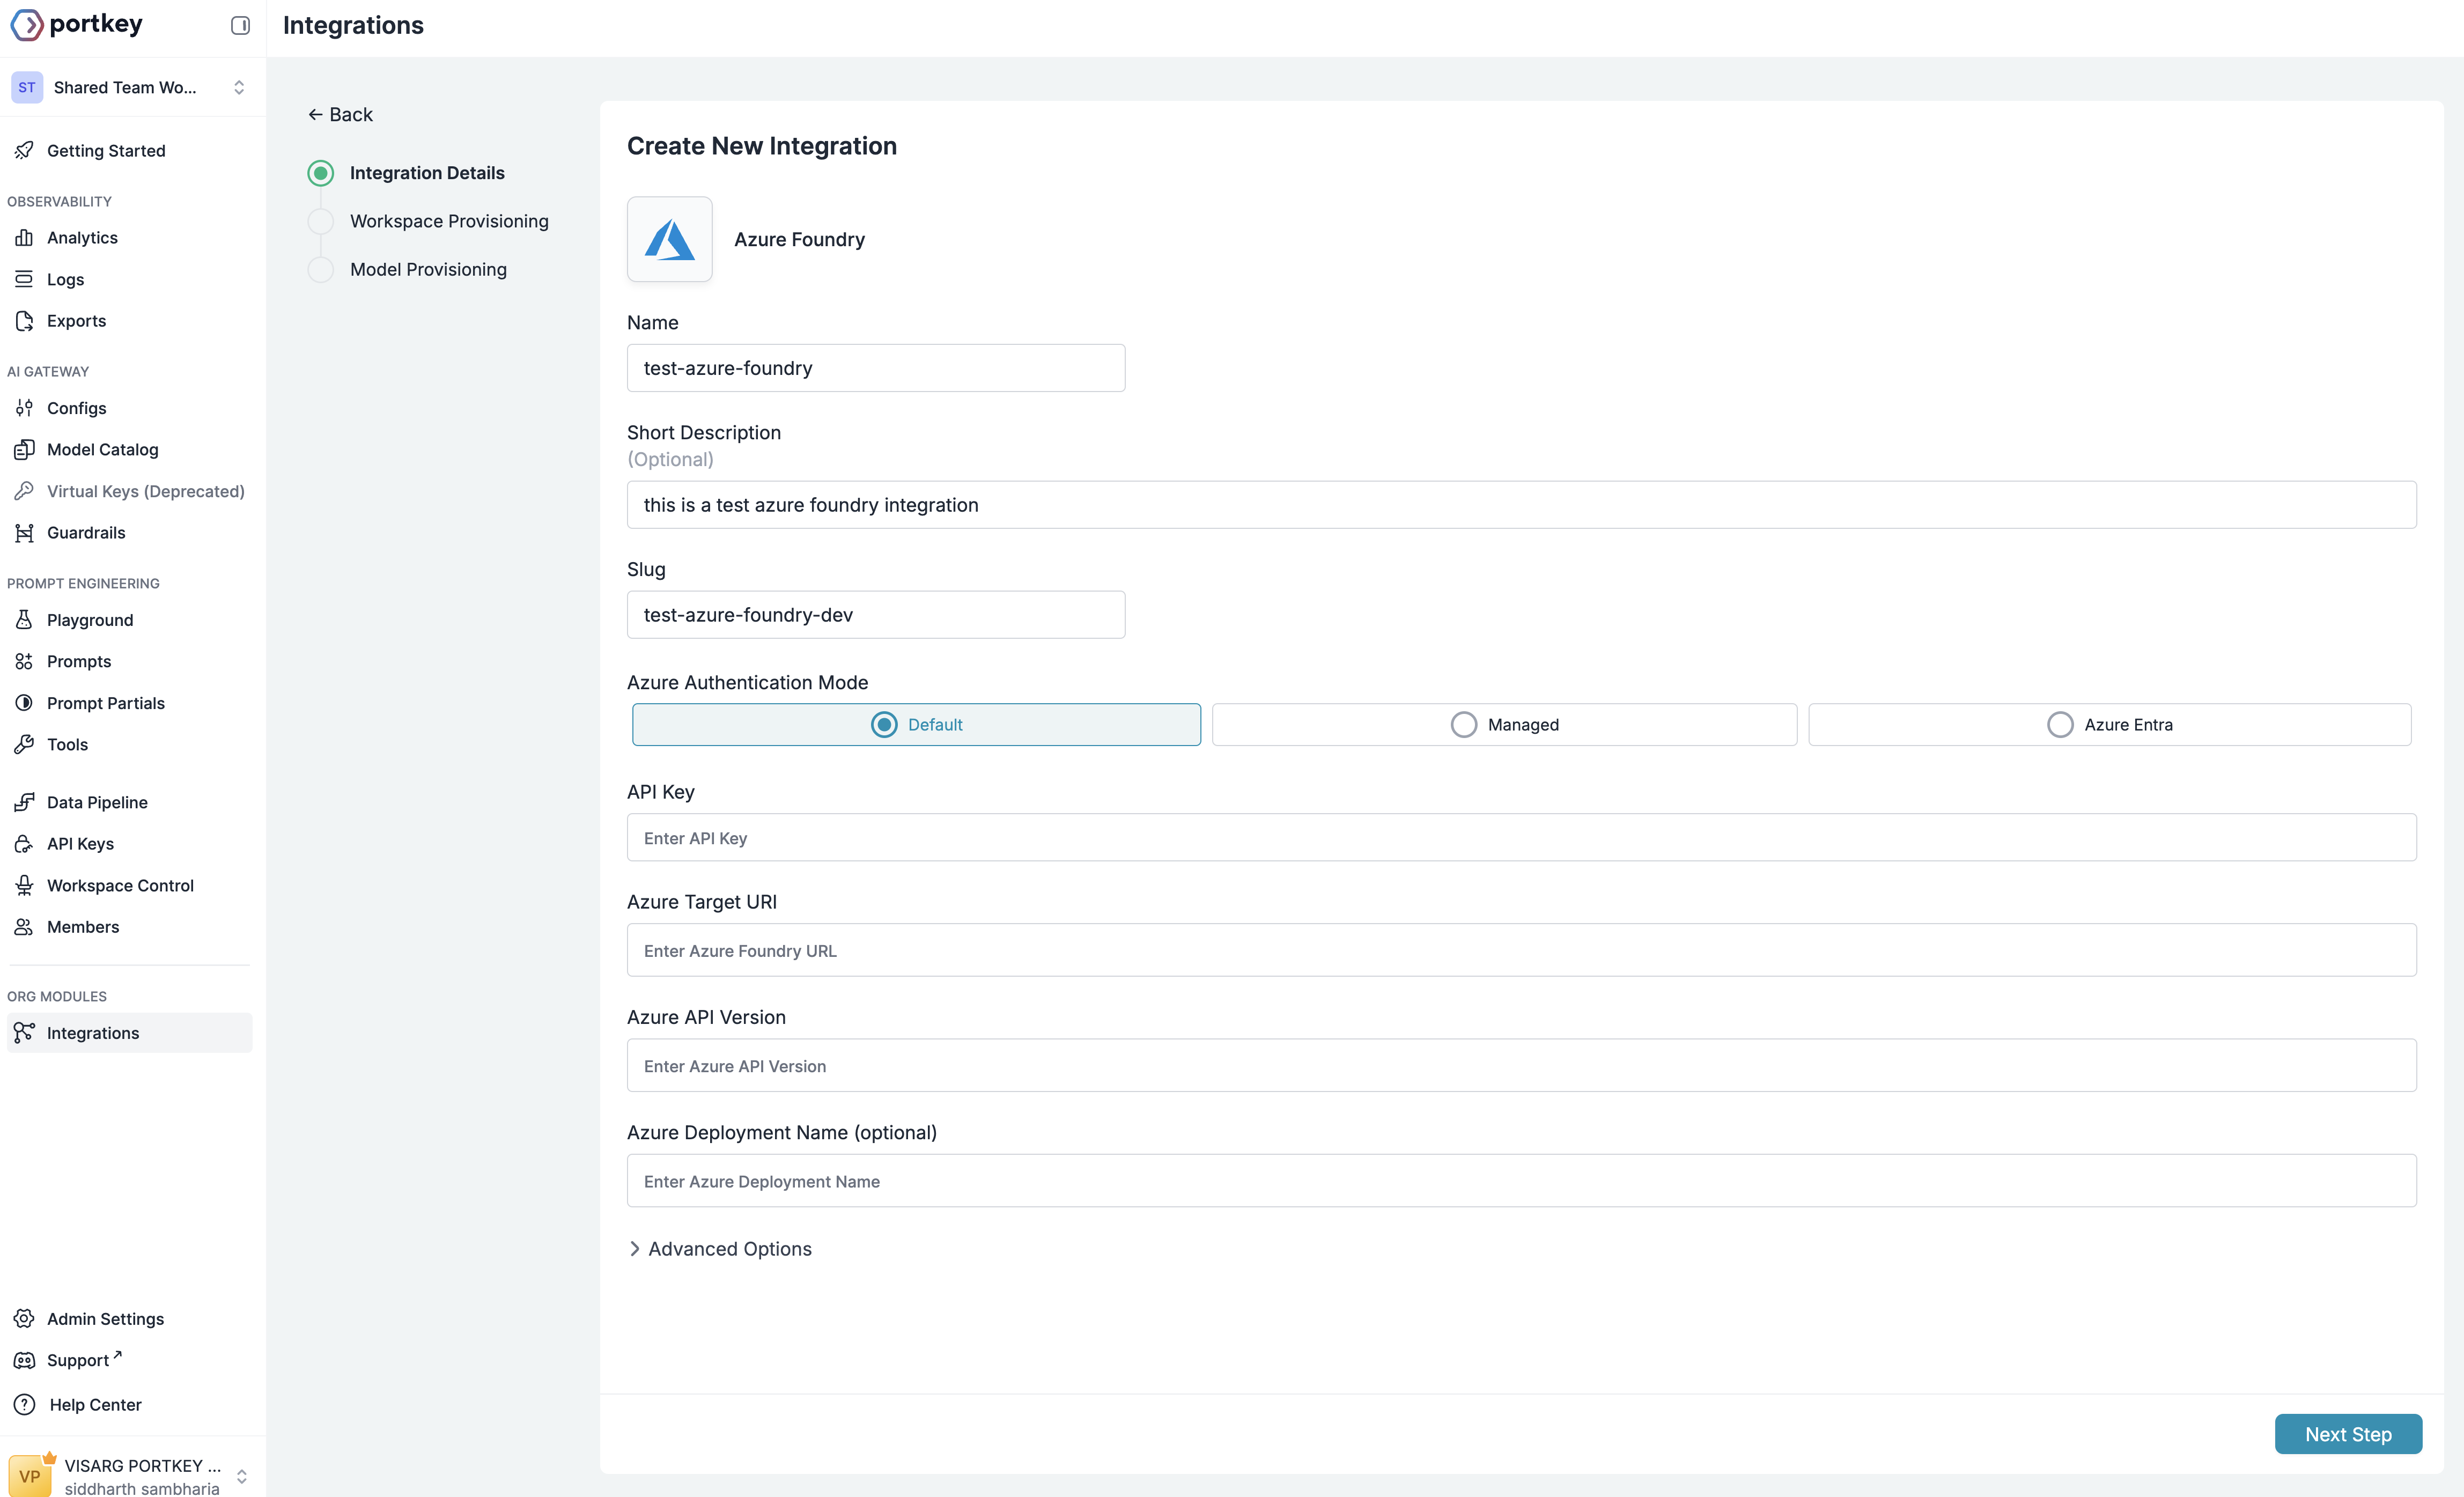
Fill in the basic information for your integration:
* **Name**: A descriptive name for this integration (e.g., "Azure AI Production")
* **Short Description**: Optional context about this integration's purpose
* **Slug**: A unique identifier used in API calls (e.g., "azure-ai-prod")
### Step 2: Configure Integration Details
Fill in the basic information for your integration:
* **Name**: A descriptive name for this integration (e.g., "Azure AI Production")
* **Short Description**: Optional context about this integration's purpose
* **Slug**: A unique identifier used in API calls (e.g., "azure-ai-prod")
 ### Step 3: Set Up Authentication
Portkey supports three authentication methods for Azure AI Foundry. For most use cases, we recommend using the **Default (API Key)** method.
### Gather Your Azure Credentials
From your Azure AI Foundry portal, you'll need to collect:
### Step 3: Set Up Authentication
Portkey supports three authentication methods for Azure AI Foundry. For most use cases, we recommend using the **Default (API Key)** method.
### Gather Your Azure Credentials
From your Azure AI Foundry portal, you'll need to collect:
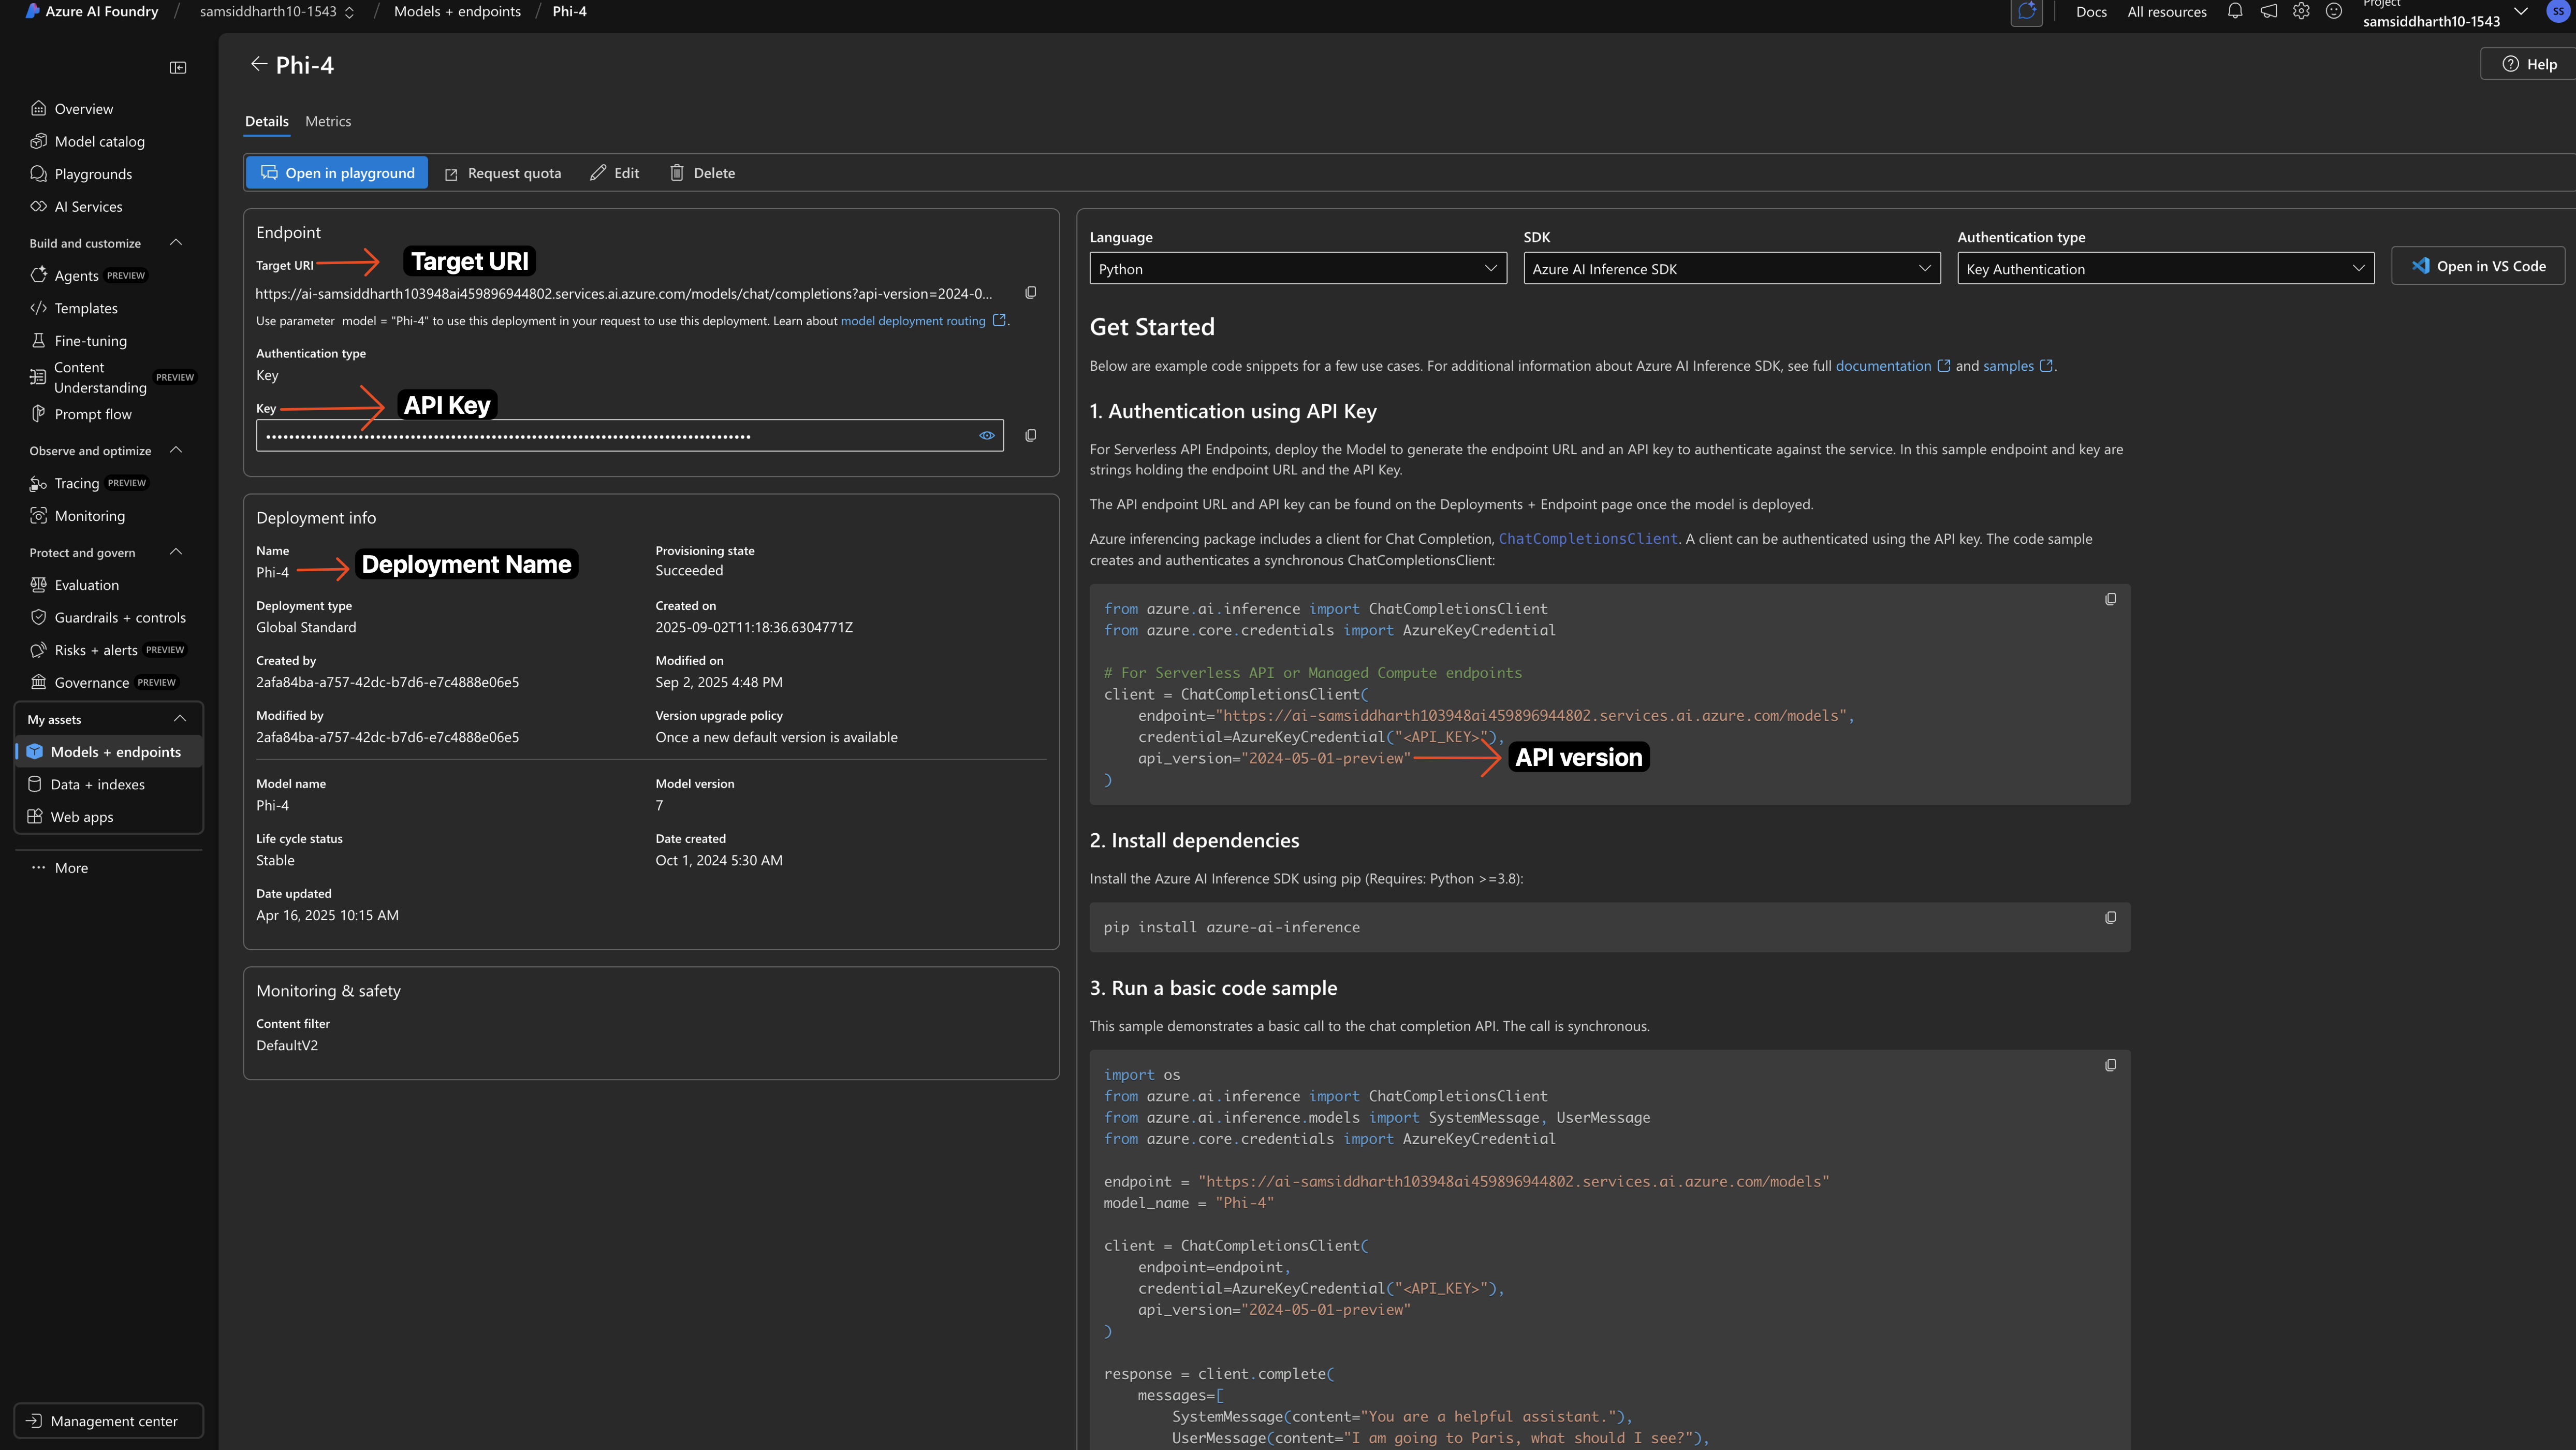 1. Navigate to your model deployment in Azure AI Foundry
2. Click on the deployment to view details
3. Copy the **API Key** from the authentication section
4. Copy the **Target URI** - this is your endpoint URL
5. Note the **API Version** from your deployment URL
6. **Azure Deployment Name** (Optional): Only required for Managed Services deployments
#### Enter Credentials in Portkey
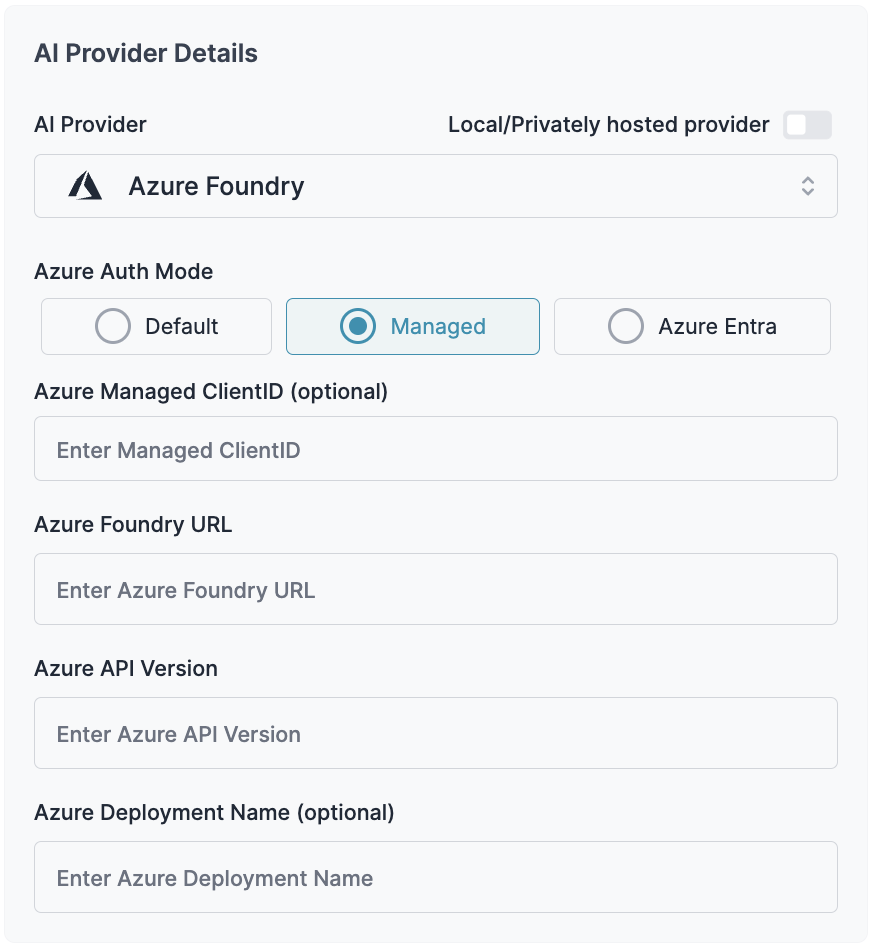
For managed Azure deployments:
Required parameters:
* **Azure Managed ClientID**: Your managed client ID
* **Azure Foundry URL**: The base endpoint URL for your deployment, formatted according to your deployment type:
* For AI Services: `https://your-resource-name.services.ai.azure.com/models`
* For Managed: `https://your-model-name.region.inference.ml.azure.com/score`
* For Serverless: `https://your-model-name.region.models.ai.azure.com`
* **Azure API Version**: The API version to use (e.g., "2024-05-01-preview"). This is required if you have api version in your deployment url. **Examples:**
* If your URL is `https://mycompany-ai.westus2.services.ai.azure.com/models?api-version=2024-05-01-preview`, the API version is `2024-05-01-preview`
* **Azure Deployment Name**: (Optional) Required only when a single resource contains multiple deployments.
1. Navigate to your model deployment in Azure AI Foundry
2. Click on the deployment to view details
3. Copy the **API Key** from the authentication section
4. Copy the **Target URI** - this is your endpoint URL
5. Note the **API Version** from your deployment URL
6. **Azure Deployment Name** (Optional): Only required for Managed Services deployments
#### Enter Credentials in Portkey
For managed Azure deployments:
Required parameters:
* **Azure Managed ClientID**: Your managed client ID
* **Azure Foundry URL**: The base endpoint URL for your deployment, formatted according to your deployment type:
* For AI Services: `https://your-resource-name.services.ai.azure.com/models`
* For Managed: `https://your-model-name.region.inference.ml.azure.com/score`
* For Serverless: `https://your-model-name.region.models.ai.azure.com`
* **Azure API Version**: The API version to use (e.g., "2024-05-01-preview"). This is required if you have api version in your deployment url. **Examples:**
* If your URL is `https://mycompany-ai.westus2.services.ai.azure.com/models?api-version=2024-05-01-preview`, the API version is `2024-05-01-preview`
* **Azure Deployment Name**: (Optional) Required only when a single resource contains multiple deployments.
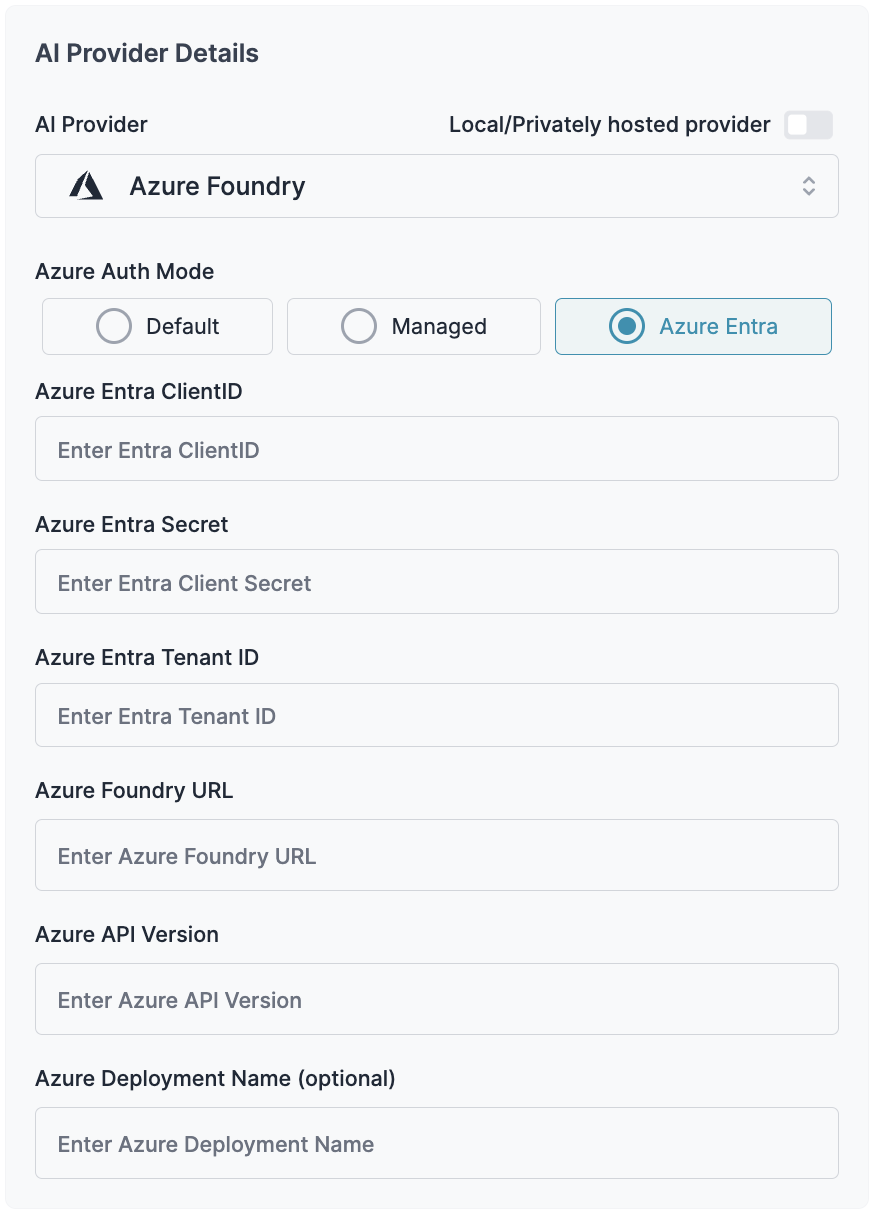
 To use this authentication your azure application need to have the role of: `conginitive services user`. Enterprise-level authentication with Azure Entra ID:
Required parameters:
* **Azure Entra ClientID**: Your Azure Entra client ID
* **Azure Entra Secret**: Your client secret
* **Azure Entra Tenant ID**: Your tenant ID
* **Azure Foundry URL**: The base endpoint URL for your deployment, formatted according to your deployment type:
* For AI Services: `https://your-resource-name.services.ai.azure.com/models`
* For Managed: `https://your-model-name.region.inference.ml.azure.com/score`
* For Serverless: `https://your-model-name.region.models.ai.azure.com`
* **Azure API Version**: The API version to use (e.g., "2024-05-01-preview"). This is required if you have api version in your deployment url. **Examples:**
* If your URL is `https://mycompany-ai.westus2.services.ai.azure.com/models?api-version=2024-05-01-preview`, the API version is `2024-05-01-preview`
* **Azure Deployment Name**: (Optional) Required only when a single resource contains multiple deployments. Common in Managed deployments.
You can Learn more about these [Azure Entra Resources here](https://learn.microsoft.com/en-us/azure/ai-services/authentication)
To use this authentication your azure application need to have the role of: `conginitive services user`. Enterprise-level authentication with Azure Entra ID:
Required parameters:
* **Azure Entra ClientID**: Your Azure Entra client ID
* **Azure Entra Secret**: Your client secret
* **Azure Entra Tenant ID**: Your tenant ID
* **Azure Foundry URL**: The base endpoint URL for your deployment, formatted according to your deployment type:
* For AI Services: `https://your-resource-name.services.ai.azure.com/models`
* For Managed: `https://your-model-name.region.inference.ml.azure.com/score`
* For Serverless: `https://your-model-name.region.models.ai.azure.com`
* **Azure API Version**: The API version to use (e.g., "2024-05-01-preview"). This is required if you have api version in your deployment url. **Examples:**
* If your URL is `https://mycompany-ai.westus2.services.ai.azure.com/models?api-version=2024-05-01-preview`, the API version is `2024-05-01-preview`
* **Azure Deployment Name**: (Optional) Required only when a single resource contains multiple deployments. Common in Managed deployments.
You can Learn more about these [Azure Entra Resources here](https://learn.microsoft.com/en-us/azure/ai-services/authentication)
 ## Adding Multiple Models to Your Azure AI Foundry Integration
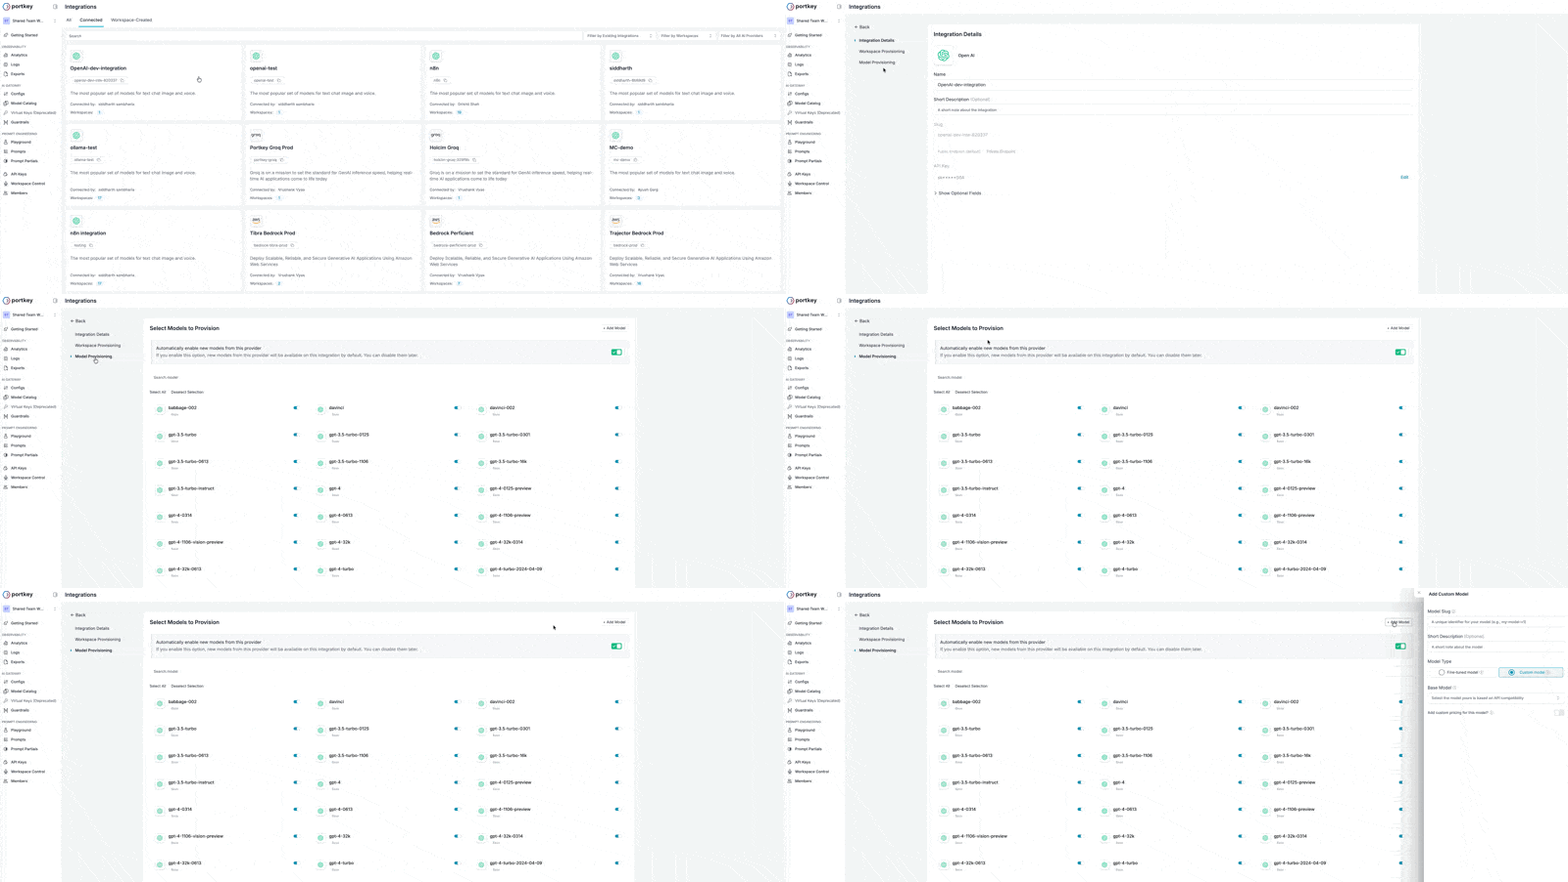
You can deploy multiple models through a single Azure AI Foundry integration by using Portkey's custom models feature.
### Steps to Add Additional Models
1. Navigate to your Azure AI Foundry integration in Portkey
2. Select the **Model Provisioning** step
3. Click **Add Model** in the top-right corner
## Adding Multiple Models to Your Azure AI Foundry Integration
You can deploy multiple models through a single Azure AI Foundry integration by using Portkey's custom models feature.
### Steps to Add Additional Models
1. Navigate to your Azure AI Foundry integration in Portkey
2. Select the **Model Provisioning** step
3. Click **Add Model** in the top-right corner
 #### Configure Your Model
Enter the following details for your Azure deployment:
**Model Slug**: Use your Azure Model Deployment name exactly as it appears in Azure AI Foundry
**Short Description**: Optional description for team reference
**Model Type**: Select "Custom model"
**Base Model**: Choose the model that matches your deployment's API structure (e.g., select `gpt-4` for GPT-4 deployments)
This is just for reference. If you can't find the particular model, you can just choose a similar model.
**Custom Pricing**: Enable to track costs with your negotiated rates
Once configured, this model will be available alongside others in your integration, allowing you to manage multiple Azure deployments through a single set of credentials.
## Using Anthropic Models on Azure AI Foundry
Azure AI Foundry supports Anthropic models (Claude) through a slightly different configuration process. Follow these steps to integrate Anthropic models with Portkey.
### Step 1: Create an Azure Foundry Integration
When creating the integration for Anthropic models, you'll need to configure the following:
1. **Azure API Key**: Copy this from your Azure Foundry console
2. **Azure Target URI**: From your Foundry console, you'll get a URL like:
```
https://resource-name-swedencentral.services.ai.azure.com/anthropic/v1/messages
```
You need to strip your URL till `/anthropic`:
```
https://resource-name-swedencentral.services.ai.azure.com/anthropic
```
For Anthropic models on Azure Foundry, you don't need to provide the **Azure API Version** or **Deployment Name** fields.
### Step 2: Configure Workspace Provisioning
After setting up the integration credentials, proceed with the workspace provisioning step as usual.
### Step 3: Add Your Anthropic Model
In the **Model Provisioning** step:
1. Click the **+ Add Model** button at the top
2. Configure the model with these details:
* **Model Slug**: Enter your deployment name from the Azure Foundry console
* **Base Model**: Search for and select your Anthropic model (e.g., `claude-opus-4-1-20250805`, `claude-sonnet-4-20250514`, etc.)
3. Save the configuration
### Making Requests to Anthropic Models
Once configured, you can call your Anthropic model using the Model Slug you saved:
```javascript theme={null}
import Portkey from 'portkey-ai';
const client = new Portkey({
apiKey: 'PORTKEY_API_KEY',
provider: '@AZURE_FOUNDRY_ANTHROPIC_PROVIDER'
});
const response = await client.chat.completions.create({
messages: [{ role: "user", content: "Hello, Claude!" }],
model: "your-azure-deployment-name", // Use the Model Slug you configured
});
console.log(response.choices[0].message.content);
```
```python theme={null}
from portkey_ai import Portkey
client = Portkey(
api_key="PORTKEY_API_KEY",
virtual_key="AZURE_FOUNDRY_ANTHROPIC_PROVIDER"
)
response = client.chat.completions.create(
model="your-azure-deployment-name", # Use the Model Slug you configured
messages=[
{"role": "user", "content": "Hello, Claude!"}
]
)
print(response.choices[0].message.content)
```
```sh theme={null}
curl https://api.portkey.ai/v1/chat/completions \
-H "Content-Type: application/json" \
-H "x-portkey-api-key: $PORTKEY_API_KEY" \
-H "x-portkey-provider: $AZURE_FOUNDRY_ANTHROPIC_PROVIDER" \
-d '{
"model": "your-azure-deployment-name",
"messages": [
{ "role": "user", "content": "Hello, Claude!" }
]
}'
```
## Sample Request
Once you've created your Integration key, you can start making requests to Azure AI Foundry models through Portkey.
Install the Portkey SDK with npm
```sh theme={null}
npm install portkey-ai
```
```js theme={null}
import Portkey from 'portkey-ai';
const client = new Portkey({
apiKey: 'PORTKEY_API_KEY',
provider:'@AZURE_FOUNDRY_PROVIDER'
});
async function main() {
const response = await client.chat.completions.create({
messages: [{ role: "user", content: "Tell me about cloud computing" }],
model: "DeepSeek-V3-0324", // Replace with your deployed model name
});
console.log(response.choices[0].message.content);
}
main();
```
Install the Portkey SDK with pip
```sh theme={null}
pip install portkey-ai
```
```python theme={null}
from portkey_ai import Portkey
client = Portkey(
api_key = "PORTKEY_API_KEY",
virtual_key = "AZURE_FOUNDRY_PROVIDER"
)
response = client.chat.completions.create(
model="DeepSeek-V3-0324", # Replace with your deployed model name
messages=[
{"role": "system", "content": "You are a helpful assistant."},
{"role": "user", "content": "Tell me about cloud computing"}
]
)
print(response.choices[0].message.content)
```
```sh theme={null}
curl https://api.portkey.ai/v1/chat/completions \
-H "Content-Type: application/json" \
-H "x-portkey-api-key: $PORTKEY_API_KEY" \
-H "x-portkey-provider: $AZURE_FOUNDRY_PROVIDER" \
-d '{
"model": "DeepSeek-V3-0324",
"messages": [
{ "role": "user", "content": "Tell me about cloud computing" }
]
}'
```
## Advanced Features
### Function Calling
Azure AI Foundry supports function calling (tool calling) for compatible models. Here's how to implement it with Portkey:
```javascript theme={null}
let tools = [{
type: "function",
function: {
name: "getWeather",
description: "Get the current weather",
parameters: {
type: "object",
properties: {
location: { type: "string", description: "City and state" },
unit: { type: "string", enum: ["celsius", "fahrenheit"] }
},
required: ["location"]
}
}
}];
let response = await portkey.chat.completions.create({
model: "DeepSeek-V3-0324", // Use a model that supports function calling
messages: [
{ role: "system", content: "You are a helpful assistant." },
{ role: "user", content: "What's the weather like in Delhi?" }
],
tools,
tool_choice: "auto",
});
console.log(response.choices[0]);
```
```python theme={null}
tools = [{
"type": "function",
"function": {
"name": "getWeather",
"description": "Get the current weather",
"parameters": {
"type": "object",
"properties": {
"location": {"type": "string", "description": "City and state"},
"unit": {"type": "string", "enum": ["celsius", "fahrenheit"]}
},
"required": ["location"]
}
}
}]
response = portkey.chat.completions.create(
model="DeepSeek-V3-0324", # Use a model that supports function calling
messages=[
{"role": "system", "content": "You are a helpful assistant."},
{"role": "user", "content": "What's the weather like in Delhi?"}
],
tools=tools,
tool_choice="auto"
)
print(response.choices[0])
```
### Vision Capabilities
Process images alongside text using Azure AI Foundry's vision capabilities:
```javascript theme={null}
const response = await portkey.chat.completions.create({
model: "Llama-4-Scout-17B-16E", // Use a model that supports vision
messages: [
{
role: "user",
content: [
{ type: "text", text: "What's in this image?" },
{
type: "image_url",
image_url: "https://upload.wikimedia.org/wikipedia/commons/thumb/d/dd/Gfp-wisconsin-madison-the-nature-boardwalk.jpg/2560px-Gfp-wisconsin-madison-the-nature-boardwalk.jpg",
},
],
},
],
max_tokens: 500,
});
console.log(response.choices[0].message.content);
```
```python theme={null}
response = portkey.chat.completions.create(
model="Llama-4-Scout-17B-16E", # Use a model that supports vision
messages=[
{
"role": "user",
"content": [
{"type": "text", "text": "What's in this image?"},
{
"type": "image_url",
"image_url": "https://upload.wikimedia.org/wikipedia/commons/thumb/d/dd/Gfp-wisconsin-madison-the-nature-boardwalk.jpg/2560px-Gfp-wisconsin-madison-the-nature-boardwalk.jpg",
},
],
}
],
max_tokens=500,
)
print(response.choices[0].message.content)
```
### Structured Outputs
Get consistent, parseable responses in specific formats:
```javascript theme={null}
const response = await portkey.chat.completions.create({
model: "cohere-command-a", // Use a model that supports response formats
messages: [
{ role: "system", content: "You are a helpful assistant." },
{ role: "user", content: "List the top 3 cloud providers with their main services" }
],
response_format: { type: "json_object" },
temperature: 0
});
console.log(JSON.parse(response.choices[0].message.content));
```
```python theme={null}
response = portkey.chat.completions.create(
model="cohere-command-a", # Use a model that supports response formats
messages=[
{"role": "system", "content": "You are a helpful assistant."},
{"role": "user", "content": "List the top 3 cloud providers with their main services"}
],
response_format={"type": "json_object"},
temperature=0
)
import json
print(json.loads(response.choices[0].message.content))
```
## Relationship with Azure OpenAI
For Azure OpenAI specific models and deployments, we recommend using the existing Azure OpenAI provider in Portkey:
Learn how to integrate Azure OpenAI with Portkey for access to OpenAI models hosted on Azure.
## Portkey Features with Azure AI Foundry
### Setting Up Fallbacks
Create fallback configurations to ensure reliability when working with Azure AI Foundry models:
```json theme={null}
{
"strategy": {
"mode": "fallback"
},
"targets": [
{
"provider":"@azure-foundry-virtual-key",
"override_params": {
"model": "DeepSeek-V3-0324"
}
},
{
"provider":"@openai-virtual-key",
"override_params": {
"model": "gpt-4o"
}
}
]
}
```
### Load Balancing Between Models
Distribute requests across multiple models for optimal performance:
```json theme={null}
{
"strategy": {
"mode": "loadbalance"
},
"targets": [
{
"provider":"@azure-foundry-virtual-key-1",
"override_params": {
"model": "DeepSeek-V3-0324"
},
"weight": 0.7
},
{
"provider":"@azure-foundry-virtual-key-2",
"override_params": {
"model": "cohere-command-a"
},
"weight": 0.3
}
]
}
```
### Conditional Routing
Route requests based on specific conditions like user type or content requirements:
```json theme={null}
{
"strategy": {
"mode": "conditional",
"conditions": [
{
"query": { "metadata.user_type": { "$eq": "premium" } },
"then": "high-performance-model"
},
{
"query": { "metadata.content_type": { "$eq": "code" } },
"then": "code-specialized-model"
}
],
"default": "standard-model"
},
"targets": [
{
"name": "high-performance-model",
"provider":"@azure-foundry-virtual-key-1",
"override_params": {
"model": "Llama-4-Scout-17B-16E"
}
},
{
"name": "code-specialized-model",
"provider":"@azure-foundry-virtual-key-2",
"override_params": {
"model": "DeepSeek-V3-0324"
}
},
{
"name": "standard-model",
"provider":"@azure-foundry-virtual-key-3",
"override_params": {
"model": "cohere-command-a"
}
}
]
}
```
## Managing Prompts with Azure AI Foundry
You can manage all prompts to Azure AI Foundry in the [Prompt Library](/product/prompt-library). Once you've created and tested a prompt in the library, use the `portkey.prompts.completions.create` interface to use the prompt in your application.
```js theme={null}
const promptCompletion = await portkey.prompts.completions.create({
promptID: "Your Prompt ID",
variables: {
// The variables specified in the prompt
}
})
```
```python theme={null}
prompt_completion = portkey.prompts.completions.create(
prompt_id="Your Prompt ID",
variables={
# The variables specified in the prompt
}
)
```
## Next Steps
Explore these additional resources to make the most of your Azure AI Foundry integration with Portkey:
Learn how to add custom metadata to your Azure AI Foundry requests.
Configure advanced gateway features for your Azure AI Foundry requests.
Trace your Azure AI Foundry requests for better observability.
Create fallback configurations between different providers.
#### Configure Your Model
Enter the following details for your Azure deployment:
**Model Slug**: Use your Azure Model Deployment name exactly as it appears in Azure AI Foundry
**Short Description**: Optional description for team reference
**Model Type**: Select "Custom model"
**Base Model**: Choose the model that matches your deployment's API structure (e.g., select `gpt-4` for GPT-4 deployments)
This is just for reference. If you can't find the particular model, you can just choose a similar model.
**Custom Pricing**: Enable to track costs with your negotiated rates
Once configured, this model will be available alongside others in your integration, allowing you to manage multiple Azure deployments through a single set of credentials.
## Using Anthropic Models on Azure AI Foundry
Azure AI Foundry supports Anthropic models (Claude) through a slightly different configuration process. Follow these steps to integrate Anthropic models with Portkey.
### Step 1: Create an Azure Foundry Integration
When creating the integration for Anthropic models, you'll need to configure the following:
1. **Azure API Key**: Copy this from your Azure Foundry console
2. **Azure Target URI**: From your Foundry console, you'll get a URL like:
```
https://resource-name-swedencentral.services.ai.azure.com/anthropic/v1/messages
```
You need to strip your URL till `/anthropic`:
```
https://resource-name-swedencentral.services.ai.azure.com/anthropic
```
For Anthropic models on Azure Foundry, you don't need to provide the **Azure API Version** or **Deployment Name** fields.
### Step 2: Configure Workspace Provisioning
After setting up the integration credentials, proceed with the workspace provisioning step as usual.
### Step 3: Add Your Anthropic Model
In the **Model Provisioning** step:
1. Click the **+ Add Model** button at the top
2. Configure the model with these details:
* **Model Slug**: Enter your deployment name from the Azure Foundry console
* **Base Model**: Search for and select your Anthropic model (e.g., `claude-opus-4-1-20250805`, `claude-sonnet-4-20250514`, etc.)
3. Save the configuration
### Making Requests to Anthropic Models
Once configured, you can call your Anthropic model using the Model Slug you saved:
```javascript theme={null}
import Portkey from 'portkey-ai';
const client = new Portkey({
apiKey: 'PORTKEY_API_KEY',
provider: '@AZURE_FOUNDRY_ANTHROPIC_PROVIDER'
});
const response = await client.chat.completions.create({
messages: [{ role: "user", content: "Hello, Claude!" }],
model: "your-azure-deployment-name", // Use the Model Slug you configured
});
console.log(response.choices[0].message.content);
```
```python theme={null}
from portkey_ai import Portkey
client = Portkey(
api_key="PORTKEY_API_KEY",
virtual_key="AZURE_FOUNDRY_ANTHROPIC_PROVIDER"
)
response = client.chat.completions.create(
model="your-azure-deployment-name", # Use the Model Slug you configured
messages=[
{"role": "user", "content": "Hello, Claude!"}
]
)
print(response.choices[0].message.content)
```
```sh theme={null}
curl https://api.portkey.ai/v1/chat/completions \
-H "Content-Type: application/json" \
-H "x-portkey-api-key: $PORTKEY_API_KEY" \
-H "x-portkey-provider: $AZURE_FOUNDRY_ANTHROPIC_PROVIDER" \
-d '{
"model": "your-azure-deployment-name",
"messages": [
{ "role": "user", "content": "Hello, Claude!" }
]
}'
```
## Sample Request
Once you've created your Integration key, you can start making requests to Azure AI Foundry models through Portkey.
Install the Portkey SDK with npm
```sh theme={null}
npm install portkey-ai
```
```js theme={null}
import Portkey from 'portkey-ai';
const client = new Portkey({
apiKey: 'PORTKEY_API_KEY',
provider:'@AZURE_FOUNDRY_PROVIDER'
});
async function main() {
const response = await client.chat.completions.create({
messages: [{ role: "user", content: "Tell me about cloud computing" }],
model: "DeepSeek-V3-0324", // Replace with your deployed model name
});
console.log(response.choices[0].message.content);
}
main();
```
Install the Portkey SDK with pip
```sh theme={null}
pip install portkey-ai
```
```python theme={null}
from portkey_ai import Portkey
client = Portkey(
api_key = "PORTKEY_API_KEY",
virtual_key = "AZURE_FOUNDRY_PROVIDER"
)
response = client.chat.completions.create(
model="DeepSeek-V3-0324", # Replace with your deployed model name
messages=[
{"role": "system", "content": "You are a helpful assistant."},
{"role": "user", "content": "Tell me about cloud computing"}
]
)
print(response.choices[0].message.content)
```
```sh theme={null}
curl https://api.portkey.ai/v1/chat/completions \
-H "Content-Type: application/json" \
-H "x-portkey-api-key: $PORTKEY_API_KEY" \
-H "x-portkey-provider: $AZURE_FOUNDRY_PROVIDER" \
-d '{
"model": "DeepSeek-V3-0324",
"messages": [
{ "role": "user", "content": "Tell me about cloud computing" }
]
}'
```
## Advanced Features
### Function Calling
Azure AI Foundry supports function calling (tool calling) for compatible models. Here's how to implement it with Portkey:
```javascript theme={null}
let tools = [{
type: "function",
function: {
name: "getWeather",
description: "Get the current weather",
parameters: {
type: "object",
properties: {
location: { type: "string", description: "City and state" },
unit: { type: "string", enum: ["celsius", "fahrenheit"] }
},
required: ["location"]
}
}
}];
let response = await portkey.chat.completions.create({
model: "DeepSeek-V3-0324", // Use a model that supports function calling
messages: [
{ role: "system", content: "You are a helpful assistant." },
{ role: "user", content: "What's the weather like in Delhi?" }
],
tools,
tool_choice: "auto",
});
console.log(response.choices[0]);
```
```python theme={null}
tools = [{
"type": "function",
"function": {
"name": "getWeather",
"description": "Get the current weather",
"parameters": {
"type": "object",
"properties": {
"location": {"type": "string", "description": "City and state"},
"unit": {"type": "string", "enum": ["celsius", "fahrenheit"]}
},
"required": ["location"]
}
}
}]
response = portkey.chat.completions.create(
model="DeepSeek-V3-0324", # Use a model that supports function calling
messages=[
{"role": "system", "content": "You are a helpful assistant."},
{"role": "user", "content": "What's the weather like in Delhi?"}
],
tools=tools,
tool_choice="auto"
)
print(response.choices[0])
```
### Vision Capabilities
Process images alongside text using Azure AI Foundry's vision capabilities:
```javascript theme={null}
const response = await portkey.chat.completions.create({
model: "Llama-4-Scout-17B-16E", // Use a model that supports vision
messages: [
{
role: "user",
content: [
{ type: "text", text: "What's in this image?" },
{
type: "image_url",
image_url: "https://upload.wikimedia.org/wikipedia/commons/thumb/d/dd/Gfp-wisconsin-madison-the-nature-boardwalk.jpg/2560px-Gfp-wisconsin-madison-the-nature-boardwalk.jpg",
},
],
},
],
max_tokens: 500,
});
console.log(response.choices[0].message.content);
```
```python theme={null}
response = portkey.chat.completions.create(
model="Llama-4-Scout-17B-16E", # Use a model that supports vision
messages=[
{
"role": "user",
"content": [
{"type": "text", "text": "What's in this image?"},
{
"type": "image_url",
"image_url": "https://upload.wikimedia.org/wikipedia/commons/thumb/d/dd/Gfp-wisconsin-madison-the-nature-boardwalk.jpg/2560px-Gfp-wisconsin-madison-the-nature-boardwalk.jpg",
},
],
}
],
max_tokens=500,
)
print(response.choices[0].message.content)
```
### Structured Outputs
Get consistent, parseable responses in specific formats:
```javascript theme={null}
const response = await portkey.chat.completions.create({
model: "cohere-command-a", // Use a model that supports response formats
messages: [
{ role: "system", content: "You are a helpful assistant." },
{ role: "user", content: "List the top 3 cloud providers with their main services" }
],
response_format: { type: "json_object" },
temperature: 0
});
console.log(JSON.parse(response.choices[0].message.content));
```
```python theme={null}
response = portkey.chat.completions.create(
model="cohere-command-a", # Use a model that supports response formats
messages=[
{"role": "system", "content": "You are a helpful assistant."},
{"role": "user", "content": "List the top 3 cloud providers with their main services"}
],
response_format={"type": "json_object"},
temperature=0
)
import json
print(json.loads(response.choices[0].message.content))
```
## Relationship with Azure OpenAI
For Azure OpenAI specific models and deployments, we recommend using the existing Azure OpenAI provider in Portkey:
Learn how to integrate Azure OpenAI with Portkey for access to OpenAI models hosted on Azure.
## Portkey Features with Azure AI Foundry
### Setting Up Fallbacks
Create fallback configurations to ensure reliability when working with Azure AI Foundry models:
```json theme={null}
{
"strategy": {
"mode": "fallback"
},
"targets": [
{
"provider":"@azure-foundry-virtual-key",
"override_params": {
"model": "DeepSeek-V3-0324"
}
},
{
"provider":"@openai-virtual-key",
"override_params": {
"model": "gpt-4o"
}
}
]
}
```
### Load Balancing Between Models
Distribute requests across multiple models for optimal performance:
```json theme={null}
{
"strategy": {
"mode": "loadbalance"
},
"targets": [
{
"provider":"@azure-foundry-virtual-key-1",
"override_params": {
"model": "DeepSeek-V3-0324"
},
"weight": 0.7
},
{
"provider":"@azure-foundry-virtual-key-2",
"override_params": {
"model": "cohere-command-a"
},
"weight": 0.3
}
]
}
```
### Conditional Routing
Route requests based on specific conditions like user type or content requirements:
```json theme={null}
{
"strategy": {
"mode": "conditional",
"conditions": [
{
"query": { "metadata.user_type": { "$eq": "premium" } },
"then": "high-performance-model"
},
{
"query": { "metadata.content_type": { "$eq": "code" } },
"then": "code-specialized-model"
}
],
"default": "standard-model"
},
"targets": [
{
"name": "high-performance-model",
"provider":"@azure-foundry-virtual-key-1",
"override_params": {
"model": "Llama-4-Scout-17B-16E"
}
},
{
"name": "code-specialized-model",
"provider":"@azure-foundry-virtual-key-2",
"override_params": {
"model": "DeepSeek-V3-0324"
}
},
{
"name": "standard-model",
"provider":"@azure-foundry-virtual-key-3",
"override_params": {
"model": "cohere-command-a"
}
}
]
}
```
## Managing Prompts with Azure AI Foundry
You can manage all prompts to Azure AI Foundry in the [Prompt Library](/product/prompt-library). Once you've created and tested a prompt in the library, use the `portkey.prompts.completions.create` interface to use the prompt in your application.
```js theme={null}
const promptCompletion = await portkey.prompts.completions.create({
promptID: "Your Prompt ID",
variables: {
// The variables specified in the prompt
}
})
```
```python theme={null}
prompt_completion = portkey.prompts.completions.create(
prompt_id="Your Prompt ID",
variables={
# The variables specified in the prompt
}
)
```
## Next Steps
Explore these additional resources to make the most of your Azure AI Foundry integration with Portkey:
Learn how to add custom metadata to your Azure AI Foundry requests.
Configure advanced gateway features for your Azure AI Foundry requests.
Trace your Azure AI Foundry requests for better observability.
Create fallback configurations between different providers.